Standard Library Containers
This chapter of the Standard Library deep-dive chapters covers the available containers. It explains the different containers, their categories, and what the trade-offs are between them. Some containers are discussed in much more detail compared to others. Once you know how to work with a container of each category, you will have no problems using any of the other containers from the same category. Consult your favorite Standard Library Reference for a complete reference of all member functions of all containers.
CONTAINERS OVERVIEW
Section titled “CONTAINERS OVERVIEW”Containers in the Standard Library are generic data structures that are useful for storing collections of data. You should rarely need to use a standard C-style array, write a linked list, or design a stack when you use the Standard Library. The containers are implemented as class templates, so you can instantiate them for any type that meets certain basic conditions outlined in the next section. Most of the Standard Library containers, except for array and bitset, are flexible in size and automatically grow or shrink to accommodate more or fewer elements. This is a huge benefit compared to the old, C-style arrays, which had a fixed size. Because of the fixed-size nature of C-style arrays, they are more vulnerable to overruns, which in the simplest cases merely cause the program to crash because data has been corrupted, but in the worst cases allow certain kinds of security attacks. By using Standard Library containers, you ensure that your programs will be less vulnerable to these kinds of problems.
Chapter 16, “Overview of the C++ Standard Library,” gives a high-level overview of the different containers, container adapters, and sequential views provided by the Standard Library. The following table summarizes them.
- Sequential containers - vector (dynamic array) - deque - list - forward_list - array - Sequential views - span - mdspan - Container adapters - queue - priority_queue - stack | - Ordered associative containers - map / multimap - set / multiset - Unordered associative containers or hash tables - unordered_map / unordered_multimap - unordered_set / unordered_multiset - Flat set and flat map associative container adapters - flat_map / flat_multimap - flat_set / flat_multiset |
Additionally, C++ strings and streams can also be used as Standard Library containers to a certain degree, and bitset can be used to store a fixed number of bits.
Everything in the Standard Library is in the std namespace. As always, the examples in this book usually use the blanket using namespace std; directive in source files (never use this in header files!), but you can be more selective in your own programs about which symbols from std to use.
Requirements on Elements
Section titled “Requirements on Elements”Standard Library containers use value semantics on elements. That is, they store a copy of elements that they are given, assign to elements with the assignment operator, and destroy elements with the destructor. Thus, when you write classes that you intend to use with the Standard Library, you need to make sure they are copyable. When requesting an element from the container, a reference to the stored copy is returned.
If you prefer reference semantics, you can store pointers to elements instead of the elements themselves. When the containers copy a pointer, the result still refers to the same element. An alternative is to store std::reference:wrappers in the container. A reference:wrapper basically exists to make references copyable and can be created using the std::ref() and cref() helper functions. The reference:wrapper class template, and the ref() and cref() function templates are defined in <functional>. An example of this is given in the section “Storing References in a vector” later in this chapter.
It is possible to store move-only types, i.e., non-copyable types, in a container, but when doing so, some operations on the container might not compile. An example of a move-only type is std::unique_ptr.
If you need to store pointers in containers, if possible, use unique_ptrs if the container becomes the owner of the pointed-to objects, or use shared_ptrs if the container shares ownership with other owners. Do not use the old and removed auto_ptr class in containers because it does not implement copying correctly.
One of the template type parameters for Standard Library containers is an allocator. The container uses this allocator to allocate and deallocate memory for elements. The allocator type parameter has a default value, so you can almost always just ignore it. For example, the vector class template looks as follows:
template <typename T, typename Allocator = std::allocator<T>> class vector;Some containers, such as a map, additionally accept a comparator as one of the template type parameters. This comparator is used to order elements. It has a default value as well, so you don’t always have to specify it. This default is to compare elements using operator<. The map class template looks like this:
template <typename Key, typename T, typename Compare = std::less<Key>, typename Allocator = std::allocator<std::pair<const Key, T>>> class map;Both the allocator and the comparator template type parameters are discussed in detail later in this chapter.
The specific requirements on elements in containers using the default allocator and default comparator are shown in the following table:
| MEMBER FUNCTION | DESCRIPTION | NOTES | |||
|---|---|---|---|---|---|
| Copy Constructor | Creates a new element that is “equal” to the old one, but that can safely be destructed without affecting the old one. | Used every time you insert an element, except when using an emplace member function (discussed later). | |||
| Move Constructor | Creates a new element by moving all content from the source element to the new element. | Used when the source element is an rvalue, and will be destroyed after the construction of the new element; also used when a vector grows in size. The move constructor should be noexcept; otherwise, it won’t be used! | |||
| Assignment Operator | Replaces the contents of an element with a copy of the source element. | Used every time you modify an element. | |||
| Move Assignment Operator | Replaces the contents of an element by moving all content from the source element. | Used when the source element is an rvalue and will be destroyed after the assignment operation. The move assignment operator should be noexcept; otherwise, it won’t be used! | |||
| Destructor | Cleans up an element. | Used every time you remove an element, or when a vector grows in size. | |||
| Default Constructor | Constructs an element without any arguments. | Required only for certain operations, such as the vector::resize() member function with one argument, and the map::operator[] access. | |||
operator== | Compares two elements for equality. | Required for keys in unordered associative containers, and for certain operations, such as operator== on two containers. | |||
operator< | Determines whether one element is less than another. | Required for keys in ordered associative containers and flat associative container adapters, and for certain operations, such as operator< on two containers. | |||
operator>, <=, >=, != | Compares two elements. | Required when comparing two containers. |
Chapter 9, “Mastering Classes and Objects,” explains how to write these member functions.
The Standard Library containers often move or copy elements. So, for best performance, make sure the type of objects stored in a container supports move semantics, see Chapter 9. If move semantics is not possible, make sure the copy constructor and copy assignment operator are as efficient as possible.
Exceptions and Error Checking
Section titled “Exceptions and Error Checking”The Standard Library containers provide limited error checking. Clients are expected to ensure that their uses are valid. However, some container member functions throw exceptions in certain conditions, such as out-of-bounds indexing. Of course, it is impossible to list exhaustively the exceptions that can be thrown from these member functions because they perform operations on user-specified types with unknown exception characteristics. This chapter mentions exceptions where appropriate. Consult a Standard Library Reference (see Appendix B, “Annotated Bibliography”) for a list of possible exceptions thrown from each member function.
SEQUENTIAL CONTAINERS
Section titled “SEQUENTIAL CONTAINERS”vector, deque, list, forward_list, and array are called sequential containers because they store a sequence of elements. The best way to learn about sequential containers is to jump in with an example of the vector container, which should be your default container anyway. The next section describes the vector container in detail, followed by briefer discussions of deque, list, forward_list, and array. Once you become familiar with the sequential containers, it’s trivial to switch between them.
vector
Section titled “vector”The Standard Library vector container is similar to a standard C-style array: the elements are stored in contiguous memory, each in its own “slot.” You can index into a vector, as well as add new elements to the back or insert them anywhere else. Inserting and deleting elements into and from a vector generally takes linear time, though these operations actually run in amortized constant time at the end of a vector, as explained in the section “The vector Memory Allocation Scheme,” later in this chapter. Random access of individual elements has a constant complexity; see Chapter 4, “Designing Professional C++ Programs,” for a discussion on algorithm complexity.
vector Overview
Section titled “vector Overview”vector is defined in <vector> as a class template with two type parameters: the element type to store and an allocator type:
template <typename T, typename Allocator = allocator<T>> class vector;The Allocator parameter specifies the type for a memory allocator object that the client can set in order to use custom memory allocation. This template parameter has a default value.
std::vector is constexpr (see Chapter 9), just as std::string. This means that vector can be used to perform operations at compile time and that it can be used in the implementation of constexpr functions and other constexpr classes.
Fixed-Length vectors
Section titled “Fixed-Length vectors”One way to use a vector is as a fixed-length array. vector provides a constructor that allows you to specify the number of elements and provides an overloaded operator[] to access and modify those elements. The result of operator[] is undefined when used to access an element outside the vector bounds. This means that a compiler can decide how to behave in that case. For example, the default behavior of Microsoft Visual C++ is to give a run-time error message when your program is compiled in debug mode and to disable any bounds checking in release mode for performance reasons. You can change these default behaviors.
Like “real” array indexing, operator[] on a vector does not provide bounds checking.
In addition to using operator[], you can access vector elements via at(), front(), and back(). The at() member function is identical to operator[], except that it performs bounds checking and throws an out_of_range exception if the index is out of bounds. front() and back() return references to the first and last elements of a vector, respectively. Calling front() or back() on an empty container triggers undefined behavior.
Here is a small example program to “normalize” test scores so that the highest score is set to 100, and all other scores are adjusted accordingly. The program creates a vector of ten doubles, reads in ten values from the user, divides each value by the max score (times 100), and prints out the new values. To create the vector, parentheses, (10), are used and not uniform initialization, {10}, as the latter would create a vector of just one element with the value 10. For the sake of brevity, the program forsakes error checking.
vector<double> doubleVector(10); // Create a vector of 10 doubles.
// Initialize max to smallest number.double max { -numeric_limits<double>::infinity() };
for (size_t i { 0 }; i < doubleVector.size(); ++i) {    print("Enter score {}: ", i + 1);    cin >> doubleVector[i];    if (doubleVector[i]> max) {        max = doubleVector[i];    }}
max /= 100.0;for (auto& element : doubleVector) {    element /= max;    print("{} ", element);}
As you can see from this example, you can use a vector just as you would use a standard C-style array. Note that the first for loop uses the size() member function to determine the number of elements in the container. This example also demonstrates the use of a range-based for loop with a vector. Here, the range-based for loop uses auto& and not auto because a reference is required so that the actual elements can be modified in each iteration.
Dynamic-Length vectors
Section titled “Dynamic-Length vectors”The real power of a vector lies in its ability to grow dynamically. For example, consider the test score normalization program from the previous section with the additional requirement that it should handle any number of test scores. Here is the new version:
vector<double> doubleVector; // Create a vector with zero elements.
// Initialize max to smallest number.double max { -numeric_limits<double>::infinity() };
for (size_t i { 1 }; true; ++i) {    double value;    print("Enter score {} (-1 to stop): ", i);    cin >> value;    if (value == -1) {        break;    }    doubleVector.push_back(value);    if (value > max) {        max = value;    }}
max /= 100.0;for (auto& element : doubleVector) {    element /= max;    print("{} ", element);}
This version of the program uses the default constructor to create a vector with zero elements. As each score is read, it’s added to the end of the vector with the push_back() member function, which takes care of allocating space for the new element. The range-based for loop doesn’t require any changes.
Section titled “ Formatting and Printing Vectors”Starting with C++23, std::format() and the print() functions can be used to format and print entire containers with a single statement. This works for all Standard Library sequential containers, container adapters, and associative containers, and is introduced in Chapter 2, “Working with Strings and String Views.” Here is an example:
vector values { 1.1, 2.2, 3.3 };println("{}", values); // Prints the following: [1.1, 2.2, 3.3]You can specify the n format specifier to omit the surrounding square brackets:
println("{:n}", values); // Prints the following: 1.1, 2.2, 3.3If your compiler doesn’t support this feature yet, you can use a range-based for loop to iterate over the elements of a vector and to print them, for example:
for (const auto& value : values) { std::cout << value << ", "; }vector Details
Section titled “vector Details”Now that you’ve had a taste of vectors, it’s time to delve into their details.
Constructors and Destructors
Section titled “Constructors and Destructors”The default constructor creates a vector with zero elements.
vector<int> intVector; // Creates a vector of ints with zero elementsYou can specify a number of elements and, optionally, a value for those elements, like this:
vector<int> intVector(10, 100); // Creates vector of 10 ints with value 100If you omit the default value, the new objects are zero-initialized. Zero-initialization constructs objects with the default constructor and initializes primitive integer types (such as char, int, and so on) to zero, primitive floating-point types to 0.0, and pointer types to nullptr.
You can create vectors of built-in classes like this:
vector<string> stringVector(10, "hello");User-defined classes can also be used as vector elements:
class Element { };…vector<Element> elementVector;A vector can be constructed with an initializer_list containing the initial elements:
vector<int> intVector({ 1, 2, 3, 4, 5, 6 });Uniform initialization*,* as discussed in Chapter 1, “A Crash Course in C++ and the Standard Library,” works on most Standard Library containers, including vector. Here is an example:
vector<int> intVector = { 1, 2, 3, 4, 5, 6 };vector<int> intVector { 1, 2, 3, 4, 5, 6 };Thanks to class template argument deduction (CTAD), you can omit the template type parameter. Here is an example:
vector intVector { 1, 2, 3, 4, 5, 6 };Be cautious with uniform initialization, though; usually, when calling a constructor of an object, the uniform initialization syntax can be used. Here’s an example:
string text { "Hello World." };With vector you need be careful. For example, the following line of code calls a vector constructor to create a vector of 10 integers with value 100:
vector<int> intVector(10, 100); // Creates vector of 10 ints with value 100Using uniform initialization here instead as follows does not create a vector of 10 integers, but a vector with just two elements, initialized to 10 and 100:
vector<int> intVector { 10, 100 }; // Creates vector with two elements: 10 and 100You can allocate vectors on the free store as well:
auto elementVector { make_unique<vector<Element>>(10) };Copying and Assigning vectors
Section titled “Copying and Assigning vectors”A vector stores copies of the objects, and its destructor calls the destructor for each of the objects. The copy constructor and assignment operator of the vector class perform deep copies of all the elements in the vector. Thus, for efficiency, you should pass vectors by reference-to-non-const or reference-to-const to functions, instead of by value.
In addition to normal copying and assignment, vector provides an assign() member function that removes all the current elements and adds any number of new elements. This member function is useful if you want to reuse a vector. Here is a trivial example. intVector is created with 10 elements having the default value 0. Then assign() is used to remove all 10 elements and replace them with 5 elements with value 100:
vector<int> intVector(10);println("intVector: {:n}", intVector); // 0, 0, 0, 0, 0, 0, 0, 0, 0, 0…intVector.assign(5, 100);println("intVector: {:n}", intVector); // 100, 100, 100, 100, 100assign() can also accept an initializer_list as follows. After this statement, intVector has four elements with the given values:
intVector.assign({ 1, 2, 3, 4 });println("intVector: {:n}", intVector); // 1, 2, 3, 4vector provides a swap() member function that allows you to swap the contents of two vectors in constant time. Here is a simple example:
vector<int> vectorOne(10);vector<int> vectorTwo(5, 100);println("vectorOne: {:n}", vectorOne);  // 0, 0, 0, 0, 0, 0, 0, 0, 0, 0println("vectorTwo: {:n}", vectorTwo);  // 100, 100, 100, 100, 100
vectorOne.swap(vectorTwo);
println("vectorOne: {:n}", vectorOne);  // 100, 100, 100, 100, 100println("vectorTwo: {:n}", vectorTwo);  // 0, 0, 0, 0, 0, 0, 0, 0, 0, 0
Comparing vectors
Section titled “Comparing vectors”The Standard Library provides the usual six overloaded comparison operators for vectors: ==, !=, <, >, <=, >=. Two vectors are equal if they have the same number of elements and all the corresponding elements in the two vectors are equal to each other. Two vectors are compared lexicographically; that is, one vector is “less than” another if all elements 0 through i–1 in the first vector are equal to elements 0 through i-1 in the second vector, but element i in the first is less than element i in the second, where i must be in the range 0…n and n must be less than the size() of the smallest of the two vectors.
Here is an example of a program that compares vectors of ints:
vector<int> vectorOne(10);vector<int> vectorTwo(10);
if (vectorOne == vectorTwo) { println("equal!"); }else { println("not equal!"); }
vectorOne[3] = 50;
if (vectorOne < vectorTwo) { println("vectorOne is less than vectorTwo"); }else { println("vectorOne is not less than vectorTwo"); }
The output of the program is as follows:
equal!vectorOne is not less than vectorTwovector Iterators
Section titled “vector Iterators”Chapter 17, “Understanding Iterators and the Ranges Library,” explains the concepts of container iterators. The discussion can get a bit abstract, so it’s helpful to jump in and look at a code example. Here is the last for loop of the test score normalization program from earlier in this chapter:
for (auto& element : doubleVector) { element /= max; print("{} ", element);}This loop can be written using iterators instead of a range-based for loop as follows:
for (vector<double>::iterator iter { begin(doubleVector) }; iter != end(doubleVector); ++iter) { *iter /= max; print("{} ", *iter);}First, take a look at the for loop initialization statement:
vector<double>::iterator iter { begin(doubleVector) };Recall that every container defines a type named iterator to represent iterators for that type of container. begin() returns an iterator of that type referring to the first element in the container. Thus, the initialization statement obtains in the variable iter an iterator referring to the first element of doubleVector. Next, look at the for loop comparison:
iter != end(doubleVector);This statement simply checks whether the iterator is past the end of the sequence of elements in the vector. When it reaches that point, the loop terminates. Always use operator!= in such statements and not operator< as the latter is not supported by all types of iterators; see Chapter 17 for details.
The increment statement, ++iter, increments the iterator to refer to the next element in the vector.
The for loop body contains these two lines:
*iter /= max;print("{} ", *iter);As you can see, your code can both access and modify the elements over which it iterates. The first line uses operator* to dereference iter to obtain the element to which it refers and assigns to that element. The second line dereferences iter again, but this time only to print the element to the standard output console.
The preceding for loop using iterators can be simplified by using the auto keyword:
for (auto iter { begin(doubleVector) }; iter != end(doubleVector); ++iter) { *iter /= max; print("{} ", *iter);}With auto, the compiler automatically deduces the type of the variable iter based on the right-hand side of the initializer, which in this case is the result of the call to begin().
vector supports the following member functions to get iterators:
begin()andend()returning iterators referring to the first and one past the last elementrbegin()andrend()returning reverse iterators referring to the last and one before the first elementcbegin(),cend(),crbegin(), andcrend()returningconstiterators
Accessing Fields of Object Elements
Section titled “Accessing Fields of Object Elements”If the elements of your container are objects, you can use the -> operator on iterators to call member functions or access data members of those objects. For example, the following program creates a vector of 10 strings, then iterates over all of them appending a new string to each one:
vector<string> stringVector(10, "hello");for (auto it { begin(stringVector) }; it != end(stringVector); ++it) { it->append(" there");}Often, using a range-based for loop results in more elegant code, as in this example:
for (auto& str : stringVector) { str.append(" there");}const_iterator
Section titled “const_iterator”The normal iterator is read/write. However, if you call begin() or end() on a const object, or you call cbegin() or cend(), you receive a const_iterator. A const_iterator is read-only; you cannot modify the element it refers to. An iterator can always be converted to a const_iterator, so it’s always safe to write something like this:
vector<type>::const_iterator it { begin(myVector) };However, a const_iterator cannot be converted to an iterator. If myVector is const, the following line doesn’t compile:
vector<type>::iterator it { begin(myVector) };When using the auto keyword, using const_iterators looks a bit different. Suppose you write the following code:
vector<string> stringVector(10, "hello");for (auto iter { begin(stringVector) }; iter != end(stringVector); ++iter) { println("{}", *iter);}Because of the auto keyword, the compiler deduces the type of the iter variable automatically and makes it a normal iterator because stringVector is not const. If you want a read-only const_iterator in combination with using auto, then you need to use cbegin() and cend() instead of begin() and end() as follows:
for (auto iter { cbegin(stringVector) }; iter != cend(stringVector); ++iter) { println("{}", *iter);}Now the compiler uses const_iterator as type for the variable iter because that’s what cbegin() returns.
A range-based for loop can also be forced to use const iterators as follows:
for (const auto& element : stringVector) { println("{}", element);}Iterator Safety
Section titled “Iterator Safety”Generally, iterators are about as safe as pointers—that is, extremely unsafe. For example, you can write code like this:
vector<int> intVector;auto iter { end(intVector) };*iter = 10; // Bug! Iter doesn't refer to a valid element.Recall that the iterator returned by end() is one element past the end of a vector, not an iterator referring to the last element! Trying to dereference it results in undefined behavior. Iterators are not required to perform any verification.
Another problem can occur if you use mismatched iterators. For example, the following for loop initializes iter with an iterator from vectorTwo and tries to compare it to the end iterator of vectorOne. Needless to say, this loop will not do what you intended and may never terminate. Dereferencing the iterator in the loop will likely produce undefined results.
vector<int> vectorOne(10);vector<int> vectorTwo(10);// BUG! Possible infinite loop.for (auto iter { begin(vectorTwo) }; iter != end(vectorOne); ++iter) { /* … */ }Other Iterator Operations
Section titled “Other Iterator Operations”The vector iterator is random access, which means you can move it backward and forward, and jump around. For example, the following code eventually changes the fifth element (index 4) to the value 4:
vector<int> intVector(10);auto it { begin(intVector) };it += 5;--it;*it = 4;Iterators vs. Indexing
Section titled “Iterators vs. Indexing”Given that you can write a for loop that uses a simple index variable and the size() member function to iterate over the elements of a vector, why should you bother using iterators? That’s a valid question, for which there are three main answers:
- Iterators allow you to insert and delete elements and sequences of elements at any point in the container. See the section “Adding and Removing Elements” later in this chapter.
- Iterators allow you to use the Standard Library algorithms, which are discussed in Chapter 20, “Mastering Standard Library Algorithms.”
- Using an iterator to access each element sequentially is often more efficient than indexing the container to retrieve each element individually. This generalization is not true for
vectors, but applies tolists,maps, andsets.
Storing References in a vector
Section titled “Storing References in a vector”As mentioned earlier in this chapter, it is possible to store references in a container, such as a vector. To do this, you store std::reference:wrappers in the container. The std::ref() and cref() function templates are used to create non-const and const reference:wrapper instances. The get() member function is used to get access to the object wrapped by a reference:wrapper. All this is defined in <functional>. Here is an example:
string str1 { "Hello" };string str2 { "World" };
// Create a vector of references to strings.vector<reference:wrapper<string>> vec { ref(str1) };vec.push_back(ref(str2));  // push_back() works as well.
// Modify the string referred to by the second reference in the vector.vec[1].get() += "!";
// The end result is that str2 is modified.println("{} {}", str1, str2);
Adding and Removing Elements
Section titled “Adding and Removing Elements”As you already know, you can append an element to a vector with the push_back() member function. The vector provides a corresponding remove member function called pop_back().
pop_back() does not return the element that is removed. If you want that element, you must first retrieve it with back().
You can also insert elements at any point in the vector with the insert() member function, which adds one or more elements to a position specified by an iterator, shifting all subsequent elements down to make room for the new ones. There are five different overloads of insert() that do the following:
-
Insert a single element.
-
Insert n copies of a single element.
-
Insert elements from an iterator range. Recall that the iterator range is half-open, such that it includes the element referred to by the starting iterator but not the one referred to by the ending iterator.
-
Insert a single element by moving the given element to a
vectorusing move semantics. -
Insert a list of elements into a
vectorwhere the list of elements is given as aninitializer_list.
assign_range() to replace all elements in a vector with the elements of a given range, insert_range() to insert all elements of a given range into a vector at a given position, and append_range() to append all elements of a given range to the end of a vector. Chapter 17 discusses ranges in detail.
You can remove elements from any point in a vector with erase(), and you can remove all elements with clear(). There are two overloads of erase(): one accepting a single iterator to remove a single element, and one accepting two iterators specifying a range of elements to remove.
Let’s look at an example program that demonstrates some of the member functions for adding and removing elements. The following code snippet demonstrates clear(), push_back(), pop_back(), the C++23 append_range(), the two-argument version of erase(), and the following overloads of insert():
insert(const_iterator pos, const T& x): The valuexis inserted at positionpos.insert(const_iterator pos, size_type n, const T& x): The valuexis insertedntimes at positionpos.insert(const_iterator pos, InputIterator first, InputIterator last): The elements in the range[first, last)are inserted at positionpos.
Here is the code snippet:
vector vectorOne { 1, 2, 3, 5 };vector<int> vectorTwo;println("{:n}", vectorOne);
// Oops, we forgot to add 4. Insert it in the correct place.vectorOne.insert(cbegin(vectorOne) + 3, 4);
// Add elements 6 through 10 to vectorTwo.for (int i { 6 }; i <= 10; ++i) {    vectorTwo.push_back(i);}println("{:n}", vectorOne);println("{:n}", vectorTwo);
// Add all elements from vectorTwo to the end of vectorOne.vectorOne.insert(cend(vectorOne), cbegin(vectorTwo), cend(vectorTwo));println("{:n}", vectorOne);
// Add all vectorTwo elements to the end of vectorOne using C++23 append_range().// Note how much clearer this is compared to the previous call to insert().vectorOne.append_range(vectorTwo);println("{:n}", vectorOne);
// Now erase the numbers 2 through 5 in vectorOne.vectorOne.erase(cbegin(vectorOne) + 1, cbegin(vectorOne) + 5);println("{:n}", vectorOne);
// Clear vectorTwo entirely.vectorTwo.clear();
// And add 10 copies of the value 100.vectorTwo.insert(cbegin(vectorTwo), 10, 100);println("{:n}", vectorTwo);
// Decide we only want 9 elements.vectorTwo.pop_back();println("{:n}", vectorTwo);
The output of the program is as follows:
1, 2, 3, 51, 2, 3, 4, 56, 7, 8, 9, 101, 2, 3, 4, 5, 6, 7, 8, 9, 101, 2, 3, 4, 5, 6, 7, 8, 9, 10, 6, 7, 8, 9, 101, 6, 7, 8, 9, 10, 6, 7, 8, 9, 10100, 100, 100, 100, 100, 100, 100, 100, 100, 100100, 100, 100, 100, 100, 100, 100, 100, 100Recall that iterator pairs represent half-open ranges, and insert() adds elements before the element referred to by a given iterator position. Thus, you can insert the entire contents of vectorTwo at the end of vectorOne, like this:
vectorOne.insert(cend(vectorOne), cbegin(vectorTwo), cend(vectorTwo));Member functions such as insert() and erase() that take a common iterator range as argument assume that the beginning and ending iterators refer to elements in the same container and that the end iterator refers to an element at or past the begin iterator. The member functions will not work correctly if these preconditions are not met!
If you want to remove all elements satisfying a condition, one solution would be to write a loop iterating over all the elements and erasing every element that matches the condition. However, this solution has quadratic complexity, which is bad for performance. This quadratic complexity can be avoided by using the remove-erase-idiom, which has a linear complexity. The remove-erase-idiom is discussed in Chapter 20.
Starting with C++20, however, there is a more elegant solution in the form of the std::erase() and std::erase_if() non-member functions, defined for all Standard Library containers. The former is demonstrated in the following code snippet:
vector values { 1, 2, 3, 2, 1, 2, 4, 5 };println("{:n}", values);
erase(values, 2);  // Removes all values equal to 2.println("{:n}", values);
The output is as follows:
1, 2, 3, 2, 1, 2, 4, 51, 3, 1, 4, 5erase_if() works similarly, but instead of passing a value as second argument, a predicate is passed that returns true for elements that should be removed, and false for elements that should be kept. The predicate can take the form of a function pointer, a function object, or a lambda expression, all of which are discussed in detail in Chapter 19, “Function Pointers, Function Objects, and Lambda Expressions.”
Move Semantics
Section titled “Move Semantics”Adding elements to a vector can make use of move semantics to improve performance in certain situations. For example, suppose you have the following vector of strings:
vector<string> vec;You can add an element to this vector as follows:
string myElement(5, 'a'); // Constructs the string "aaaaa"vec.push_back(myElement);However, because myElement is not a temporary object, push_back() makes a copy of myElement and puts it into the vector.
The vector class also defines a push_back(T&&), which is the move equivalent of push_back(const T&). So, copying can be avoided if you call push_back() as follows:
vec.push_back(move(myElement));This statement explicitly says that myElement should be moved into the vector. Note that after this call, myElement is in a valid but otherwise indeterminate state. You should not use myElement anymore, unless you first bring it back to a determinate state, for example by calling clear() on it! You can also call push_back() as follows:
vec.push_back(string(5, 'a'));This call to push_back() triggers a call to the move overload because the call to the string constructor results in a temporary object. The push_back() member function moves this temporary string object into the vector, avoiding any copying.
Emplace Operations
Section titled “Emplace Operations”C++ supports emplace operations on most Standard Library containers, including vector. Emplace means “to put into place.” An example is the emplace:back() member function of vector, which does not copy or move anything. Instead, it makes space in the container and constructs the object in place, as in this example:
vec.emplace:back(5, 'a');The emplace member functions take a variable number of arguments as a variadic template. Variadic templates are discussed in Chapter 26, “Advanced Templates,” but those details are not required to understand how to use emplace:back(). Basically, the arguments passed to emplace:back() are forwarded to a constructor of the type stored in the vector. The difference in performance between emplace:back() and push_back() using move semantics depends on how your specific compiler implements these operations. In most situations, you can pick the one based on the syntax that you prefer:
vec.push_back(string(5, 'a'));// Orvec.emplace:back(5, 'a');The emplace:back() member function returns a reference to the inserted element. There is also an emplace() member function that constructs an object in place at a specific position in the vector and returns an iterator to the inserted element.
Algorithmic Complexity and Iterator Invalidation
Section titled “Algorithmic Complexity and Iterator Invalidation”Inserting or erasing elements in a vector causes all subsequent elements to shift up or down to make room for, or fill in the holes left by, the affected elements. Thus, these operations take linear complexity. Furthermore, all iterators referring to the insertion or removal point or subsequent positions are invalid following the action. The iterators are not “magically” moved to keep up with the elements that are shifted up or down in the vector—that’s up to you.
Also keep in mind that an internal vector reallocation can cause invalidation of all iterators referring to elements in the vector, not just those referring to elements past the point of insertion or deletion. See the next section for details.
The vector Memory Allocation Scheme
Section titled “The vector Memory Allocation Scheme”A vector allocates memory automatically to store the elements that you insert. Recall that the vector requirements dictate that the elements must be in contiguous memory, like in standard C-style arrays. Because it’s impossible to request to add memory to the end of a current chunk of memory, every time a vector allocates more memory, it must allocate a new, larger chunk in a separate memory location and copy/move all the elements to the new chunk. This process is time-consuming, so vector implementations attempt to avoid it by allocating more space than needed when they have to perform a reallocation. That way, they can avoid reallocating memory every time you insert an element.
One obvious question at this point is why you, as a client of vector, care how it manages its memory internally. You might think that the principle of abstraction should allow you to disregard the internals of the vector memory allocation scheme. Unfortunately, there are two reasons why you need to understand how it works:
- Efficiency: The
vectorallocation scheme can guarantee that an element insertion runs in amortized constant time: most of the time the operation is constant, but once in a while (if it requires a reallocation), it’s linear. If you are worried about efficiency, you can control when avectorperforms reallocations. - Iterator invalidations: A reallocation invalidates all iterators referring to elements in a
vector.
Thus, the vector interface allows you to query and control the vector reallocations, both explained in the upcoming subsections.
If you don’t control the reallocations explicitly, you should assume that all insertions cause a reallocation and thus invalidate all iterators.
Size and Capacity
Section titled “Size and Capacity”vector provides two member functions for obtaining information about its size: size() and capacity(). The size() member function returns the number of elements in a vector, while capacity() returns the number of elements that it can hold without a reallocation. Thus, the number of elements that you can insert without causing a reallocation is capacity() – size().
There are also non-member std::size() and std::empty() global functions, which can be used with all containers. They can also be used with statically allocated C-style arrays not accessed through pointers, and with initializer_lists. Here is an example of using them with a vector:
vector vec { 1, 2, 3 };println("{}", size(vec)); // 3println("{}", empty(vec)); // falseAdditionally, std::ssize(), a global non-member helper function, returns the size as a signed integral type. Here’s an example:
auto s1 { size(vec) }; // Type is size_t (unsigned)auto s2 { ssize(vec) }; // Type is long long (signed)Reserving Capacity
Section titled “Reserving Capacity”If you don’t care about efficiency or iterator invalidations, there is never a need to control the vector memory allocation explicitly. However, if you want to make your program as efficient as possible or you want to guarantee that iterators will not be invalidated, you can force a vector to preallocate enough space to hold all of its elements. Of course, you need to know how many elements it will hold, which is sometimes impossible to predict.
One way to preallocate space is to call reserve(), which allocates enough memory to hold the specified number of elements. The upcoming round-robin class example shows the reserve() member function in action.
Reserving space for elements changes the capacity, but not the size. That is, it doesn’t actually create elements. Don’t access elements past a vector’s size.
Another way to preallocate space is to specify, in the constructor, or with the resize() or assign() member function, how many elements you want a vector to store. This member function actually creates a vector of that size (and probably of that capacity).
Reclaiming All Memory
Section titled “Reclaiming All Memory”A vector automatically allocates more memory if needed; however, it will never release any memory, unless the vector is destroyed. Removing elements from a vector decreases the size of the vector, but never its capacity. How then can you reclaim its memory?
One option is to use the shrink_to_fit() member function, which requests a vector to reduce its capacity to its size. However, it’s just a request, and a Standard Library implementation is allowed to ignore this request.
Reclaiming all memory of a vector can be done using the following trick: swap the vector with an empty one. The following code snippet shows how memory of a vector called values can be reclaimed with a single statement. The third line of code constructs a temporary empty default-constructed vector of the same type as values and swaps this with values. All memory that was allocated for values now belongs to this temporary vector, which is automatically destroyed at the end of that statement freeing all its memory. The end result is that all memory that was allocated for values is reclaimed, and values is left with a capacity of zero.
vector<int> values;// Populate values …vector<int>().swap(values);Directly Accessing the Data
Section titled “Directly Accessing the Data”A vector stores its data contiguously in memory. You can get a pointer to this block of memory with the data() member function.
There is also a non-member std::data() function that can be used to get a pointer to the data. It works for the array and vector containers, strings, statically allocated C-style arrays not accessed through pointers, and initializer_lists. Here is an example for a vector:
vector vec { 1, 2, 3 };int* data1 { vec.data() };int* data2 { data(vec) };Another way to get access to the memory block of a vector is by taking the address of the first element, as in: &vec[0]. You might find this kind of code in legacy code bases, but it is not safe for empty vectors; as such, I recommend not to use it and instead use data().
Move Semantics
Section titled “Move Semantics”All Standard Library containers support move semantics by including a move constructor and move assignment operator. See Chapter 9 for details on move semantics. Standard Library containers can be returned from functions by value without performance penalty. Take a look at the following function:
vector<int> createVectorOfSize(size_t size){ vector<int> vec(size); for (int contents { 0 }; auto& i : vec) { i = contents++; } return vec;}…vector<int> myVector;myVector = createVectorOfSize(123);Without move semantics, assigning the result of createVectorOfSize() to myVector might call the copy assignment operator. With the move semantics support in the Standard Library containers, copying of the vector is avoided. Instead, the assignment to myVector triggers a call to the move assignment operator.
Keep in mind, though, that for move semantics to work properly with Standard Library containers, the move constructor and move assignment operator of the type stored in the container must be marked as noexcept! Why are these move member functions not allowed to throw any exceptions? Imagine that they are allowed to throw exceptions. Now, when adding, for example, new elements to a vector, it might be that the capacity of the vector is not sufficient and that it needs to allocate a bigger block of memory. Subsequently, the vector must either copy or move all the data from the original memory block to the new one. If this would be done using a move member function that can potentially throw, then it might happen that an exception gets thrown when part of the data has already been moved to the new memory block. What can we do then? Not much. To avoid these kinds of problems, Standard Library containers will only use move member functions if they guarantee not to throw any exceptions. If they are not marked noexcept, the copy member functions will be used instead to guarantee strong exception safety.
When implementing your own Standard Library–like containers, there is a useful helper function available called std::move_if_noexcept(), defined in <utility>. This can be used to call either the move constructor or the copy constructor depending on whether the move constructor is noexcept. In itself, move_if_noexcept() doesn’t do much. It accepts a reference as a parameter and converts it to either an rvalue reference if the move constructor is noexcept or to a reference-to-const otherwise, but this simple trick allows you to call the correct constructor with a single call.
The Standard Library does not provide a similar helper function to call the move assignment operator or copy assignment operator depending on whether the former is noexcept. Implementing one yourself is not too complicated, but requires some template metaprogramming techniques and type traits to inspect properties of types. Both topics are discussed in Chapter 26, which also gives an example of implementing your own move_assign_if_noexcept().
vector Example: A Round-Robin Class
Section titled “vector Example: A Round-Robin Class”A common problem in computer science is distributing requests among a finite list of resources. For example, a simple operating system could keep a list of processes and assign a time slice (such as 100ms) to each process to let the process perform some of its work. After the time slice is finished, the OS suspends the process, and the next process in the list is given a time slice to perform some of its work. One of the simplest algorithmic solutions to this problem is round-robin scheduling. When the time slice of the last process is finished, the scheduler starts over again with the first process. For example, in the case of three processes, the first-time slice would go to the first process, the second slice to the second process, the third slice to the third process, and the fourth slice back to the first process. The cycle would continue in this way indefinitely.
Suppose that you decide to write a generic round-robin scheduling class that can be used with any type of resource. The class should support adding and removing resources and should support cycling through the resources to obtain the next one. You could use a vector directly, but it’s often helpful to write a wrapper class that provides more directly the functionality you need for your specific application. The following example shows a RoundRobin class template with comments explaining the code. First, here is the class definition, exported from a module called round_robin:
export module round_robin;import std;
// Class template RoundRobin// Provides simple round-robin semantics for a list of elements.export template <typename T>class RoundRobin final{    public:        // Client can give a hint as to the number of expected elements for        // increased efficiency.        explicit RoundRobin(std::size_t numExpected = 0);        // Prevent copy construction and copy assignment        RoundRobin(const RoundRobin& src) = delete;        RoundRobin& operator=(const RoundRobin& rhs) = delete;        // Explicitly default a move constructor and move assignment operator        RoundRobin(RoundRobin&& src) noexcept = default;        RoundRobin& operator=(RoundRobin&& rhs) noexcept = default;        // Appends element to the end of the list. May be called        // between calls to getNext().        void add(const T& element);        // Removes the first (and only the first) element        // in the list that is equal (with operator==) to element.        // May be called between calls to getNext().        void remove(const T& element);        // Returns the next element in the list, starting with the first,        // and cycling back to the first when the end of the list is        // reached, taking into account elements that are added or removed.        T& getNext();    private:        std::vector<T> m_elements;        typename std::vector<T>::iterator m_nextElement;};
As you can see, the public interface is straightforward: only three member functions plus the constructor. The resources are stored in a vector called m_elements. The iterator m_nextElement always refers to the element that will be returned with the next call to getNext(). If getNext() hasn’t been called yet, m_nextElement is equal to begin(m_elements). Note the use of the typename keyword in front of the line declaring m_nextElement. So far, you’ve only seen that keyword used to specify template type parameters, but there is another use for it. You must specify typename explicitly whenever you access a type based on one or more template parameters. In this case, the template parameter T is used to access the iterator type. Thus, you must specify typename.
The class also prevents copy construction and copy assignment because of the m_nextElement data member. To make copy construction and copy assignment work, you would have to implement an assignment operator and copy constructor and make sure m_nextElement is valid in the destination object.
The implementation of the RoundRobin class follows with comments explaining the code. Note the use of reserve() in the constructor, and the extensive use of iterators in add(), remove(), and getNext(). The trickiest aspect is handling m_nextElement in the add() and remove() member functions.
template <typename T> RoundRobin<T>::RoundRobin(std::size_t numExpected){    // If the client gave a guideline, reserve that much space.    m_elements.reserve(numExpected);
    // Initialize m_nextElement even though it isn't used until    // there's at least one element.    m_nextElement = begin(m_elements);}
// Always add the new element at the end.template <typename T> void RoundRobin<T>::add(const T& element){    // Even though we add the element at the end, the vector could    // reallocate and invalidate the m_nextElement iterator with    // the push_back() call. Take advantage of the random-access    // iterator features to save our spot.    // Note: ptrdiff_t is a type capable of storing the difference    //       between two random-access iterators.    std::ptrdiff_t pos { m_nextElement - begin(m_elements) };
    // Add the element.    m_elements.push_back(element);
    // Reset our iterator to make sure it is valid.    m_nextElement = begin(m_elements) + pos;}
template <typename T> void RoundRobin<T>::remove(const T& element){    for (auto it { begin(m_elements) }; it != end(m_elements); ++it) {        if (*it == element) {            // Removing an element invalidates the m_nextElement iterator            // if it refers to an element past the point of the removal.            // Take advantage of the random-access features of the iterator            // to track the position of the current element after removal.            std::ptrdiff_t newPos;
            if (m_nextElement == end(m_elements) - 1 &&                m_nextElement == it) {                // m_nextElement refers to the last element in the list,                // and we are removing that last element, so wrap back to                // the beginning.                newPos = 0;            } else if (m_nextElement <= it) {                // Otherwise, if m_nextElement is before or at the one                // we're removing, the new position is the same as before.                newPos = m_nextElement - begin(m_elements);            } else {                // Otherwise, it's one less than before.                newPos = m_nextElement - begin(m_elements) - 1;            }
            // Erase the element (and ignore the return value).            m_elements.erase(it);
            // Now reset our iterator to make sure it is valid.            m_nextElement = begin(m_elements) + newPos;
            return;        }    }}
template <typename T> T& RoundRobin<T>::getNext(){    // First, make sure there are elements.    if (m_elements.empty()) {        throw std::out_of_range { "No elements in the list" };    }
    // Store the current element which we need to return.    auto& toReturn { *m_nextElement };
    // Increment the iterator modulo the number of elements.    ++m_nextElement;    if (m_nextElement == end(m_elements)) { m_nextElement = begin(m_elements); }
    // Return a reference to the element.    return toReturn;}
Here’s a simple implementation of a scheduler that uses the RoundRobin class template, with comments explaining the code:
// Basic Process class.class Process final{    public:        // Constructor accepting the name of the process.        explicit Process(string name) : m_name { move(name) } {}
        // Lets a process perform its work for the duration of a time slice.        void doWorkDuringTimeSlice()        {            println("Process {} performing work during time slice.", m_name);            // Actual implementation omitted.        }
        // Needed for the RoundRobin::remove() member function to work.        bool operator==(const Process&) const = default; // = default since C++20.    private:        string m_name;};
// Basic round-robin based process scheduler.class Scheduler final{    public:        // Constructor takes a vector of processes.        explicit Scheduler(const vector<Process>& processes)        {            // Add the processes.            for (auto& process : processes) { m_processes.add(process); }        }
        // Selects the next process using a round-robin scheduling algorithm        // and allows it to perform some work during this time slice.        void scheduleTimeSlice()        {            try {                m_processes.getNext().doWorkDuringTimeSlice();            } catch (const out_of_range&) {                println(cerr, "No more processes to schedule.");            }        }
        // Removes the given process from the list of processes.        void removeProcess(const Process& process)        {            m_processes.remove(process);        }    private:        RoundRobin<Process> m_processes;};
int main(){    vector processes { Process { "1" }, Process { "2" }, Process { "3" } };
    Scheduler scheduler { processes };    for (size_t i { 0 }; i < 4; ++i) { scheduler.scheduleTimeSlice(); }
    scheduler.removeProcess(processes[1]);    println("Removed second process");
    for (size_t i { 0 }; i < 4; ++i) { scheduler.scheduleTimeSlice(); }}
The output should be as follows:
Process 1 performing work during time slice.Process 2 performing work during time slice.Process 3 performing work during time slice.Process 1 performing work during time slice.Removed second processProcess 3 performing work during time slice.Process 1 performing work during time slice.Process 3 performing work during time slice.Process 1 performing work during time slice.The vector Specialization
Section titled “The vector Specialization”The C++ standard requires a partial specialization of vector for bools, with the intention that it optimizes space allocation by “packing” the Boolean values. Recall that a bool is either true or false and thus could be represented by a single bit, which can take on exactly two values. C++ does not have a native type that stores exactly one bit. Some compilers represent a Boolean value with a type the same size as a char; other compilers use an int. The vector<bool> specialization is supposed to store the “array of bools” in single bits, thus saving space.
In a half-hearted attempt to provide some bit-field routines for vector<bool>, there is one additional member function called flip() that complements bits; that is, true becomes false, and false becomes true, similar to the logical NOT operator. This member function can be called either on the container—in which case it complements all the elements in the container—or on a single reference returned from operator[] or a similar member function, in which case it complements that single element.
At this point, you should be wondering how you can call a member function on a reference to bool. The answer is that you can’t. The vector<bool> specialization actually defines a class called reference that serves as a proxy for the underlying bool (or bit). When you call operator[], at(), or a similar member function, then vector<bool> returns a reference object, which is a proxy for the real bool.
The fact that references returned from vector<bool> are really proxies means that you can’t take their addresses to obtain pointers to the actual elements in the container.
In practice, the little amount of space saved by packing bools hardly seems worth the extra effort. Even worse, accessing and modifying elements in a vector<bool> is much slower than, for example, in a vector<int>. Many C++ experts recommend avoiding vector<bool> in favor of the bitset. If you do need a dynamically sized bit field, then just use something like vector<std::int_fast8_t> or vector<unsigned char>. The std::int_fast8_t type is defined in <cstdint>. It is a signed integer type for which the compiler has to use the fastest integer type it has that is at least 8 bits.
deque (abbreviation for double-ended queue) is almost identical to vector, but is used far less frequently. It is defined in <deque>. The principal differences are as follows:
- Elements are not stored contiguously in memory.
- A
dequesupports true constant-time insertion and removal of elements at both the front and the back (avectorsupports amortized constant time at just the back). - A
dequeprovides the following member functions thatvectoromits:push_front(): Inserts an element at the beginning.pop_front(): Removes the first element.emplace:front(): Creates a new element in-place at the beginning and returns a reference to the inserted element.prepend_range(): Adds all elements of a given range to the beginning of adeque. Available since C++23.
- A
dequenever moves its elements to a bigger array (asvectordoes) when inserting elements at the front or at the back. This also means that adequedoes not invalidate any iterators in such cases. - A
dequedoes not expose its memory management scheme viareserve()orcapacity().
deques are rarely used, as opposed to vectors, so they are not further discussed. Consult a Standard Library Reference for a detailed list of all supported member functions.
The Standard Library list class template, defined in <list>, is a standard doubly linked list. It supports constant-time insertion and deletion of elements at any point in the list but provides slow (linear) time access to individual elements. In fact, the list does not even provide random-access operations like operator[]. Only through iterators can you access individual elements.
Most of the list operations are identical to those of vector, including the constructors, destructor, copying operations, assignment operations, and comparison operations. This section focuses on those member functions that differ from those of vector.
Accessing Elements
Section titled “Accessing Elements”The only member functions provided by a list to access elements are front() and back(), both of which run in constant time. These member functions return a reference to the first and last elements in a list. All other element access must be performed through iterators.
Just as vector, list supports begin(), end(), rbegin(), rend(), cbegin(), cend(), crbegin(), and crend().
Lists do not provide random access to elements.
Iterators
Section titled “Iterators”A list iterator is bidirectional, not random access like a vector iterator. That means that you cannot add and subtract list iterators from each other or perform other pointer arithmetic on them. For example, if p is a list iterator, you can traverse through the elements of the list by doing ++p or --p, but you cannot use the addition or subtraction operator; p+n and p-n do not work.
Adding and Removing Elements
Section titled “Adding and Removing Elements”A list supports the same add and remove element member functions as a vector, including push_back(), pop_back(), emplace(), emplace:back(), the five forms of insert(), assign_range(), insert_range(), append_range(), the two forms of erase(), and clear(). Like a deque, it also provides push_front(), emplace:front(), pop_front(), and prepend_range(). Member functions adding or removing a single element run in constant time, once you’ve found the correct position, while member functions adding or removing multiple elements run in linear time. Thus, a list could be appropriate for applications that perform many insertions and deletions from the data structure, but do not need quick index-based element access. But even then, a vector might still be faster. Use a performance profiler to make sure.
list Size
Section titled “list Size”Like deques, and unlike vectors, lists do not expose their underlying memory model. Consequently, they support size(), empty(), and resize(), but not reserve() or capacity(). Note that the size() member function on a list has constant complexity.
Special list Operations
Section titled “Special list Operations”A list provides several special operations that exploit its quick element insertion and deletion. This section provides an overview of some of these operations with examples. Consult a Standard Library Reference for a thorough reference of all the member functions.
Splicing
Section titled “Splicing”The linked-list characteristics of a list allow it to splice, or insert, an entire list at any position in another list in constant time. The simplest version of this member function works as follows:
// Store the a words in the main dictionary.list<string> dictionary { "aardvark", "ambulance" };// Store the b words.list<string> bWords { "bathos", "balderdash" };// Add the c words to the main dictionary.dictionary.push_back("canticle");dictionary.push_back("consumerism");// Splice the b words into the main dictionary.if (!bWords.empty()) { // Get an iterator to the last b word. auto iterLastB { --(cend(bWords)) }; // Iterate up to the spot where we want to insert b words. auto it { cbegin(dictionary) }; for (; it != cend(dictionary); ++it) { if (*it > *iterLastB) { break; } } // Add in the b words. This action removes the elements from bWords. dictionary.splice(it, bWords);}// Print out the dictionary.println("{:n:}", dictionary);The result from running this program looks like this:
aardvark, ambulance, bathos, balderdash, canticle, consumerismThere are also two other overloads of splice(): one that inserts a single element from another list and one that inserts a range from another list. Additionally, all overloads of splice() are available with either a normal reference or an rvalue reference to the source list.
Splicing is destructive to the list passed as an argument, i.e., it removes the spliced elements from one list to insert them into the other.
More Efficient Versions of Algorithms
Section titled “More Efficient Versions of Algorithms”In addition to splice(), a list provides special implementations of several of the generic Standard Library algorithms. The generic forms are covered in Chapter 20. Here, only the specific versions provided by list are discussed.
The following table summarizes the algorithms for which list provides special implementations as member functions. See Chapter 20 for more details on the algorithms.
| MEMBER FUNCTION | DESCRIPTION |
|---|---|
remove() remove_if() | Removes all elements matching certain criteria from a list and returns the number of removed elements. |
unique() | Removes duplicate consecutive elements from a list, based on operator== or a user-supplied binary predicate, and returns the number of removed elements. |
merge() | Merges two lists. Both lists must be sorted according to operator< or a user-defined comparator. Like splice(), merge() is destructive to the list passed as an argument. |
sort() | Performs a stable sort on elements in a list. |
reverse() | Reverses the order of the elements in a list. |
list Example: Determining Enrollment
Section titled “list Example: Determining Enrollment”Suppose that you are writing a computer registration system for a university. One feature you might provide is the ability to generate a complete list of enrolled students in the university from lists of the students in each class. For the sake of this example, assume that you must write only a single function that takes a vector of lists of student names (as strings), plus a list of students that have been dropped from their courses because they failed to pay tuition. This function should generate a complete list of all the students in all the courses, without any duplicates, and without those students who have been dropped. Note that students might be in more than one course.
Here is the code for this function, with comments explaining the code. With the power of Standard Library lists, the function is practically shorter than its written description! Note that the Standard Library allows you to “nest” containers: in this case, you can use a vector of lists.
// courseStudents is a vector of lists, one for each course. The lists// contain the students enrolled in those courses. They are not sorted.//// droppedStudents is a list of students who failed to pay their// tuition and so were dropped from their courses.//// The function returns a list of every enrolled (non-dropped) student in// all the courses.list<string> getTotalEnrollment(const vector<list<string>>& courseStudents,                                const list<string>& droppedStudents){    list<string> allStudents;
    // Concatenate all the course lists onto the master list    for (auto& lst : courseStudents) {        allStudents.append_range(lst);    }
    // Sort the master list    allStudents.sort();
    // Remove duplicate student names (those who are in multiple courses).    allStudents.unique();
    // Remove students who are on the dropped list.    // Iterate through the dropped list, calling remove on the    // master list for each student in the dropped list.    for (auto& str : droppedStudents) {        allStudents.remove(str);    }
// done! return allStudents;}forward_list
Section titled “forward_list”A forward_list, defined in <forward_list>, is similar to a list except that it is a singly linked list, while list is a doubly linked list. This means that forward_list supports only forward iteration, and because of this, ranges need to be specified differently compared to a list. If you want to modify any list, you need access to the element before the first element of interest. Because a forward_list does not have an iterator that supports going backward, there is no easy way to get to the preceding element. For this reason, ranges that will be modified—for example, ranges supplied to erase() and splice()—must be open at the beginning. The begin() function that was discussed earlier returns an iterator to the first element and thus can only be used to construct a range that is closed at the beginning. The forward_list class therefore provides a before_begin() member function, which returns an iterator that points to an imaginary element before the beginning of the list. You cannot dereference this iterator as it points to invalid data. However, incrementing this iterator by 1 makes it the same as the iterator returned by begin(); as a result, it can be used to make a range that is open at the beginning.
Constructors and assignment operators are similar between a list and a forward_list. The C++ standard requires that forward_list minimizes its memory use. That’s the reason why there is no size() member function, because by not providing it, there is no need to store the size of the list. Additionally, a list has to store a pointer to the previous and the next element in the list, while a forward_list only needs to store a pointer to the next element, further reducing memory use. For example, each element in a list<int> on a 64-bit system requires 20 bytes (two 64-bit pointers, 16 bytes, and the int itself, 4 bytes). A forward_list<int> requires only 12 bytes (one 64-bit pointer, 8 bytes, and the int, 4 bytes) per element.
The following table sums up the differences between a list and a forward_list. A filled box (![]() ) means the container supports that operation, while an empty box (
) means the container supports that operation, while an empty box (![]() ) means the operation is not supported.
) means the operation is not supported.
| OPERATION | list | forward_list |
|---|---|---|
| append_range() (C++23) | ||
| assign() | ||
| assign_range() (C++23) | ||
| back() | ||
| before_begin() | ||
| begin() | ||
| cbefore_begin() | ||
| cbegin() | ||
| cend() | ||
| clear() | ||
| crbegin() | ||
| crend() | ||
| emplace() | ||
| emplace:after() | ||
| emplace:back() | ||
| emplace:front() | ||
| empty() | ||
| end() | ||
| erase() | ||
| erase_after() | ||
| front() | ||
| insert() | ||
| insert_after() | ||
| insert_range() (C++23) | ||
| insert_range_after() (C++23) | ||
| iterator / const_iterator | ||
| max_size() | ||
| merge() | ||
| pop_back() | ||
| pop_front() | ||
| prepend_range() (C++23) | ||
| push_back() | ||
| push_front() | ||
| rbegin() | ||
| remove() | ||
| remove_if() | ||
| rend() | ||
| resize() | ||
| reverse() | ||
| reverse_iterator / const_reverse_iterator | ||
| size() | ||
| sort() | ||
| splice() | ||
| splice:after() | ||
| swap() | ||
| unique() |
The following example demonstrates the use of forward_lists:
// Create 3 forward lists using an initializer_list// to initialize their elements (uniform initialization).forward_list<int> list1 { 5, 6 };forward_list list2 { 1, 2, 3, 4 };  // CTAD is supported.forward_list list3 { 7, 8, 9 };
// Insert list2 at the front of list1 using splice.list1.splice:after(list1.before_begin(), list2);
// Add number 0 at the beginning of the list1.list1.push_front(0);
// Insert list3 at the end of list1.// For this, we first need an iterator to the last element.auto iter { list1.before_begin() };auto iterTemp { iter };while (++iterTemp != end(list1)) { ++iter; }list1.insert_after(iter, cbegin(list3), cend(list3));
// Output the contents of list1.println("{:n}", list1);
To insert list3 at the end of list1, you need an iterator to the last element of list1. However, because this is a forward_list, you cannot use --end(list1), so you need to iterate over the list from the beginning and stop at the last element. The output is as follows:
0, 1, 2, 3, 4, 5, 6, 7, 8, 9An array, defined in <array>, is similar to a vector except that it is of a fixed size; it cannot grow or shrink in size. The purpose of a fixed size is to allow an array to be allocated on the stack, rather than always demanding access to the free store as vector does.
For arrays containing primitive types (integers, floating-point numbers, characters, Booleans, and so on), initialization of elements is different compared to how they are initialized for containers such as vector, list, and so on. If no initialization values are given to an array when it is created, then the array elements will be uninitialized, i.e., contain garbage. For other containers, such as vector and list, elements are always initialized, either with given values or using zero initialization. As such, arrays behave virtually identical to C-style arrays.
Just like vectors, arrays support random-access iterators, and elements are stored in contiguous memory. An array has support for front(), back(), at(), and operator[]. It also supports a fill() member function to fill the array with a specific element. Because it is fixed in size, it does not support push_back(), pop_back(), insert(), erase(), clear(), resize(), reserve(), capacity(), or any of the range-based member functions. A disadvantage compared to a vector is that the swap() member function of an array runs in linear time, while it has constant complexity for a vector. An array can also not be moved in constant time, while a vector can. An array has a size() member function, which is a clear advantage over C-style arrays. The following example demonstrates how to use the array class. Note that the array declaration requires two template parameters: the first specifies the type of the elements, and the second specifies the fixed number of elements in the array.
// Create an array of 3 integers and initialize them// with the given initializer_list using uniform initialization.array<int, 3> arr { 9, 8, 7 };// Output the size of the array.println("Array size = {}", arr.size()); // or std::size(arr)// Output the contents using C++23's support for formatting ranges.println("{:n}", arr);// Output the contents again using a range-based for loop.for (const auto& i : arr) { print("{} ", i); }println("");
println("Performing arr.fill(3)…");// Use the fill member function to change the contents of the array.arr.fill(3);// Output the contents of the array using iterators.for (auto iter { cbegin(arr) }; iter != cend(arr); ++iter) {    print("{} ", *iter);}
The output is as follows:
Array size = 39, 8, 79 8 7Performing arr.fill(3)…3 3 3You can use the std::get<n>() function template to retrieve an element from an std::array at the given index n. The index has to be a constant expression, so it cannot, for example, be a loop variable. The benefit of using std::get<n>() is that the compiler checks at compile time that the given index is valid; otherwise, it results in a compilation error, as in this example:
array myArray { 11, 22, 33 }; // std::array supports CTAD.println("{}", std::get<1>(myArray));println("{}", std::get<10>(myArray)); // BUG! Compilation error!std::to_array(), defined in <array>, converts a given C-style array to an std::array, using copy-initialization of the elements. The function works only for one-dimensional arrays. Here is a quick example:
auto arr1 { to_array({ 11, 22, 33 }) }; // Type is array<int, 3>
double carray[] { 9, 8, 7, 6 };auto arr2 { to_array(carray) };         // Type is array<double, 4>
SEQUENTIAL VIEWS
Section titled “SEQUENTIAL VIEWS”The C++ Standard Library provides two sequential views: std::span and std::mdspan. The latter is new in C++23. A span provides a one-dimensional, non-owning view over a contiguous sequence of data. An mdspan generalizes this concept and allows the creation of multidimensional, non-owning views over a contiguous sequence of data.
Suppose you have this function to print the contents of a vector:
void print(const vector<int>& values){ for (const auto& value : values) { print("{} ", value); } println("");}Suppose further that you also want to print the contents of C-style arrays. One option is to overload the print() function to accept a pointer to the first element of the array, and the number of elements to print:
void print(const int values[], size_t count){ for (size_t i { 0 }; i < count; ++i) { print("{} ", values[i]); } println("");}If you also want to print std::arrays, you could provide a third overload, but what would the function parameter type be? For an std::array, you have to specify the type and the number of elements in the array as template parameters. You see, it’s getting complicated.
std::span, defined in <span>, comes to the rescue here, as it allows you to write a single function that works with vectors, C-style arrays, and std::arrays of any size. Here is a single implementation of print() using span:
void print(span<int> values){ for (const auto& value : values) { print("{} ", value); } println("");}Note that, just as with string_view from Chapter 2, a span is cheap to copy; it basically just contains a pointer to the first element in a sequence and a number of elements. A span never copies data! As such, it is usually passed by value.
There are several constructors for creating a span. For example, one can be created to include all elements of a given vector, std::array, or C-style array. A span can also be created to include only part of a container, by passing the address of the first element and the number of elements you want to include in the span.
A subview can be created from an existing span using the subspan() member function. Its first argument is the offset into the span, and the second argument is the number of elements to include in the subview. There are also two additional member functions called first() and last() returning subviews of a span containing the first n elements or the last n elements respectively.
A span has a couple of member functions that are similar to vector and array: begin(), end(), rbegin(), rend(), front(), back(), operator[], data(), size(), and empty().
The following code snippet demonstrates a few ways to call the print(span) function:
vector v { 11, 22, 33, 44, 55, 66 };// Pass the whole vector, implicitly converted to a span.print(v);// Pass an explicitly created span.span mySpan { v };print(mySpan);// Create a subview and pass that.span subspan { mySpan.subspan(2, 3) };print(subspan);// Pass a subview created in-line.print({ v.data() + 2, 3 });
// Pass an std::array.array<int, 5> arr { 5, 4, 3, 2, 1 };print(arr);print({ arr.data() + 2, 3 });
// Pass a C-style array.int carr[] { 9, 8, 7, 6, 5 };print(carr);            // The entire C-style array.print({ carr + 2, 3 }); // A subview of the C-style array.
The output is as follows:
11 22 33 44 55 6611 22 33 44 55 6633 44 5533 44 555 4 3 2 13 2 19 8 7 6 57 6 5Unlike string_view that provides a read-only view of a string, a span can provide read/write access to the underlying elements. Remember that a span just contains a pointer to the first element in a sequence and the number of elements; that is, a span never copies data! As such, modifying an element in a span actually modifies the element in the underlying sequence. If this is not desired, a span of const elements can be created. For example, the print() function has no reason to modify any of the elements in a given span. We can prevent such modifications as follows:
void print(span<const int> values){ for (const auto& value : values) { print("{} ", value); } println("");}
Section titled “ mdspan”std::mdspan, defined in <mdspan>, is similar to std::span but allows you to create multidimensional views over a contiguous sequence of data. Just as span, an mdspan doesn’t own the data, so it is cheap to copy. An mdspan has four template type parameters:
ElementType: The type of the underlying elements.Extents: The number of dimensions and their size, a specialization ofstd::extents.LayoutPolicy: A policy specifying how to convert a multidimensional index to a one-dimensional index into the underlying contiguous sequence of data. You can implement whichever layout policy you need, such as tiled layout, Hilbert curve, and so on. The following standard policies are available:layout_right: Row-major multidimensional array layout, where the rightmost extent has stride 1. This is the default policy.layout_left: Column-major multidimensional array layout, where the leftmost extent has stride 1.layout_stride: A layout mapping with user-defined strides.
AccessorPolicy: A policy specifying how to convert the one-dimensional index into the underlying contiguous sequence of data into a reference to the actual element at that location. The default isstd::default_accessor.
There are numerous constructors available. One of them is a constructor accepting a pointer to the contiguous sequence of data as the first parameter, followed by one or more dimension extents. Such extents passed as constructor arguments are called dynamic extents. Data can be accessed using a multidimensional operator[]. The size() member function returns the number of elements in an mdspan, and empty() returns true if an mdspan is empty. The stride(n) member function can be used to query the stride of dimension n. The size of the dimensions can be queried using the extents() member function. It returns an std::extents instance on which you can call extent(n) to query the size of dimension n. Here is an example:
template <typename T> void print2Dmdspan(const T& mdSpan){    for (size_t i { 0 }; i < mdSpan.extents().extent(0); ++i) {        for (size_t j { 0 }; j < mdSpan.extents().extent(1); ++j) {             print("{} ", mdSpan[i, j]);        }        println("");    }}
int main(){    vector data { 1, 2, 3, 4, 5, 6, 7, 8 };    // View data as a 2D array of 2 rows with 4 integers each,    // using the default row-major layout policy.    mdspan data2D { data.data(), 2, 4 };    print2Dmdspan(data2D);}
The output is as follows:
1 2 3 45 6 7 8This code uses the default row-major layout policy. The following code snippet uses the column-major layout policy instead. Because the layout policy is the third template type parameter, you have to specify the first and second template type parameters as well. Instead of passing the size of each dimension as an argument to the constructor, the code now passes an std::extents as the second template type parameter:
mdspan<int, extents<int, 2, 4>, layout_left> data2D { data.data() };The output now is as follows:
1 3 5 72 4 6 8This mdspan definition specifies the extent of all dimensions as compile-time constants, i.e., static extents. It is also possible to combine static and dynamic extents. The following example specifies the first dimension as a compile-time constant, and the second as a dynamic extent. You then must pass the size of all dynamic extents as arguments to the constructor.
mdspan<int, extents<int, 2, dynamic_extent>> data2D { data.data(), 4 };The output is again as follows:
1 2 3 45 6 7 8CONTAINER ADAPTERS
Section titled “CONTAINER ADAPTERS”In addition to the standard sequential containers, the Standard Library provides three container adapters: queue, priority_queue, and stack. Each of these adapters is a wrapper around one of the sequential containers. They allow you to swap the underlying container without having to change the rest of the code. The intent of the adapters is to simplify the interface and to provide only those features that are appropriate for the stack, queue, or priority_queue abstraction. These adapters do not provide access to the underlying container and hence are a perfect example of the data-hiding principle explained in Chapter 4, “Designing Professional C++ Programs.” For instance, the adapters don’t provide the capability to erase multiple elements simultaneously, nor do they provide iterators. The latter means you cannot use them with range-based for loops or with any of the standard iterator-based algorithms discussed in Chapter 20. However, starting with C++23, the std::format() and print() functions do support formatting and printing the contents of these container adapters.
The queue container adapter, defined in <queue>, provides standard first-in, first-out semantics. As usual, it’s written as a class template, which looks like this:
template <typename T, typename Container = deque<T>> class queue;The T template parameter specifies the type that you intend to store in the queue. The second template parameter allows you to stipulate the underlying container that the queue adapts. However, the queue requires the sequential container to support both push_back() and pop_front(), so you have only two built-in choices: deque and list. For most purposes, you can just stick with the default deque.
queue Operations
Section titled “queue Operations”The queue interface is extremely simple: there are only nine member functions, a set of constructors, and comparison operators. New in C++23 is a constructor accepting an iterator pair, [begin, end), which constructs a queue containing the elements from the given iterator range. The push()and emplace() member functions add a new element to the tail of the queue, while pop() removes the element at the head of the queue. C++23 adds push_range() to add a range of elements to the queue. You can retrieve references to, without removing, the first and last elements with front() and back(), respectively. As usual, when called on const objects, front() and back() return references-to-const; and when called on non-const objects, they return references-to-non-const (read/write).
pop() does not return the element popped. If you want to retain a copy, you must first retrieve it with front().
The queue also supports size(), empty(), and swap().
queue Example: A Network Packet Buffer
Section titled “queue Example: A Network Packet Buffer”When two computers communicate over a network, they send information to each other divided into discrete chunks called packets. The networking layer of the computer’s operating system must pick up the packets and store them as they arrive. However, the computer might not have enough bandwidth to process all of them at once. Thus, the networking layer usually buffers, or stores, the packets until the higher layers have a chance to attend to them. The packets should be processed in the order they arrive, so this problem is perfect for a queue structure. The following is a small PacketBuffer class, with comments explaining the code, which stores incoming packets in a queue until they are processed. It’s a class template so that different layers of the networking stack can use it for different kinds of packets, such as IP packets or TCP packets. It allows the client to specify a maximum size because operating systems usually limit the number of packets that can be stored, so as not to use too much memory. When the buffer is full, subsequently arriving packets are ignored.
export template <typename T>class PacketBuffer final{    public:        // If maxSize is 0, the size is unlimited, because creating        // a buffer of size 0 makes little sense. Otherwise only        // maxSize packets are allowed in the buffer at any one time.        explicit PacketBuffer(std::size_t maxSize = 0);
        // Stores a packet in the buffer.        // Returns false if the packet has been discarded because        // there is no more space in the buffer, true otherwise.        bool bufferPacket(const T& packet);
        // Returns the next packet. Throws out_of_range        // if the buffer is empty.        [[nodiscard]] T getNextPacket();    private:        std::queue<T> m_packets;        std::size_t m_maxSize;};
template <typename T> PacketBuffer<T>::PacketBuffer(std::size_t maxSize/*= 0*/)    : m_maxSize { maxSize }{}
template <typename T> bool PacketBuffer<T>::bufferPacket(const T& packet){    if (m_maxSize > 0 && m_packets.size() == m_maxSize) {        // No more space. Drop the packet.        return false;    }    m_packets.push(packet);    return true;}
template <typename T> T PacketBuffer<T>::getNextPacket(){    if (m_packets.empty()) {        throw std::out_of_range { "Buffer is empty" };    }    // Retrieve the head element    T temp { m_packets.front() };    // Pop the head element    m_packets.pop();    // Return the head element    return temp;}
A practical application of this class would require multiple threads. However, without explicit synchronization, no Standard Library object can be used safely from multiple threads when at least one of the threads modifies the object. C++ provides synchronization classes to allow thread-safe access to shared objects. This is discussed in Chapter 27, “Multithreaded Programming with C++.” The focus in this example is on the queue class, so here is a single-threaded example of using the PacketBuffer:
class IPPacket final{    public:        explicit IPPacket(int id) : m_id { id } {}        int getID() const { return m_id; }    private:        int m_id;};
int main(){    PacketBuffer<IPPacket> ipPackets { 3 };
    // Add 4 packets    for (int i { 1 }; i <= 4; ++i) {        if (!ipPackets.bufferPacket(IPPacket { i })) {            println("Packet {} dropped (queue is full).", i);        }    }
    while (true) {        try {            IPPacket packet { ipPackets.getNextPacket() };            println("Processing packet {}", packet.getID());        } catch (const out_of_range&) {            println("Queue is empty.");            break;        }    }}
The output of this program is as follows:
Packet 4 dropped (queue is full).Processing packet 1Processing packet 2Processing packet 3Queue is empty.priority_queue
Section titled “priority_queue”A priority queue is a queue that keeps its elements in sorted order. Instead of a strict FIFO ordering, the element at the head of the queue at any given time is the one with the highest priority. This element could be the oldest on the queue or the most recent. If two elements have equal priority, their relative order in the queue is undefined.
The priority_queue container adapter is also defined in <queue>. Its template definition looks something like this (slightly simplified):
template <typename T, typename Container = vector<T>, typename Compare = less<T>>;It’s not as complicated as it looks. You’ve seen the first two parameters before: T is the element type stored in the priority_queue, and Container is the underlying container on which the priority_queue is adapted. The priority_queue uses vector as the default, but deque works as well. list does not work because the priority_queue requires random access to its elements. The third parameter, Compare, is trickier. As you’ll learn more about in Chapter 19, less is a class template that supports comparison of two objects of type T with operator<. This means the priority of elements in a priority_queue is determined according to operator<. You can customize the comparison used, but that’s a topic for Chapter 19. For now, just make sure the types stored in a priority_queue support operator<. Of course, since C++20 it’s enough to provide operator<=> which then automatically provides operator<.
priority_queue Operations
Section titled “priority_queue Operations”A priority_queue provides even fewer operations than does a queue. The push(), emplace(), and push_range() (C++23) member functions allow you to insert elements, pop() allows you to remove elements, and top() returns a reference-to-const to the head element.
top() returns a reference-to-const even when called on a non-const object, because modifying the element might change its order, which is not allowed. A priority_queue provides no mechanism to obtain the tail element.
pop() does not return the element popped. If you want to retain a copy, you must first retrieve it with top().
Like a queue, a priority_queue supports size(), empty(), and swap(). However, it does not provide any comparison operators.
priority_queue Example: An Error Correlator
Section titled “priority_queue Example: An Error Correlator”Single failures on a system can often cause multiple errors to be generated from different components. A good error-handling system uses error correlation to process the most important errors first. You can use a priority_queue to write a simple error correlator. Assume all error events encode their own priority. The error correlator simply sorts error events according to their priority so that the highest-priority errors are always processed first. Here are the class definitions:
// Sample Error class with just a priority and a string error description.export class Error final{    public:        explicit Error(int priority, std::string errorString)            : m_priority { priority }, m_errorString { std::move(errorString) } { }        int getPriority() const { return m_priority; }        const std::string& getErrorString() const { return m_errorString; }        // Compare Errors according to their priority.        auto operator<=>(const Error& rhs) const {            return getPriority() <=> rhs.getPriority(); }    private:        int m_priority;        std::string m_errorString;};
// Stream insertion overload for Errors.export std::ostream& operator<<(std::ostream& os, const Error& err){    std::print(os, "{} (priority {})", err.getErrorString(), err.getPriority());    return os;}
// Simple ErrorCorrelator class that returns highest priority errors first.export class ErrorCorrelator final{    public:        // Add an error to be correlated.        void addError(const Error& error) { m_errors.push(error); }        // Retrieve the next error to be processed.        [[nodiscard]] Error getError()        {            // If there are no more errors, throw an exception.            if (m_errors.empty()) {                throw std::out_of_range { "No more errors." };            }            // Save the top element.            Error top { m_errors.top() };            // Remove the top element.            m_errors.pop();            // Return the saved element.            return top;        }    private:        std::priority_queue<Error> m_errors;};
Here is a simple test showing how to use the ErrorCorrelator. Realistic use would require multiple threads so that one thread adds errors, while another processes them. As mentioned earlier with the queue example, this requires explicit synchronization, which is discussed in Chapter 27.
ErrorCorrelator ec;ec.addError(Error { 3, "Unable to read file" });ec.addError(Error { 1, "Incorrect entry from user" });ec.addError(Error { 10, "Unable to allocate memory!" });
while (true) {    try {        Error e { ec.getError() };        cout << e << endl;    } catch (const out_of_range&) {        println("Finished processing errors");        break;    }}
The output of this program is as follows:
Unable to allocate memory! (priority 10)Unable to read file (priority 3)Incorrect entry from user (priority 1)Finished processing errorsA stack is almost identical to a queue, except that it provides first-in, last-out (FILO) semantics, also known as last-in, first-out (LIFO), instead of FIFO. It is defined in <stack>. The template definition looks like this:
template <typename T, typename Container = deque<T>> class stack;You can use vector, list, or deque as the underlying container for the stack.
stack Operations
Section titled “stack Operations”Just as for queue, C++23 adds a constructor accepting an iterator pair, [begin, end), which constructs a stack containing the elements from the given iterator range. Also like queue, stack provides push(), emplace(), pop(), and push_range() (C++23). The difference is that push() and push_range() add new elements to the top of the stack, “pushing down” all elements inserted earlier, and pop() removes the element from the top of the stack, which is the most recently inserted element. The top() member function returns a reference-to-const to the top element if called on a const object, and a reference-to-non-const if called on a non-const object.
pop() does not return the element popped. If you want to retain a copy, you must first retrieve it with top().
The stack supports empty(), size(), swap(), and the standard comparison operators.
stack Example: Revised Error Correlator
Section titled “stack Example: Revised Error Correlator”You can rewrite the previous ErrorCorrelator class so that it gives out the most recent error instead of the one with the highest priority. The only change required is to change m_errors from a priority_queue to a stack. With this change, the errors are distributed in LIFO order instead of priority order. Nothing in the member function definitions needs to change because the push(), pop(), top(), and empty() member functions exist on both a priority_queue and a stack.
ASSOCIATIVE CONTAINERS
Section titled “ASSOCIATIVE CONTAINERS”The C++ Standard Library provides several different types of associative containers:
-
Ordered associative containers:
map,multimap,set, andmultiset. -
Unordered associative containers:
unordered_map,unordered_multimap,unordered_set, andunordered_multiset. These are also known as hash tables. -
Flat associative container adapters: flat_map,flat_multimap,flat_set, andflat_multiset. These adapt sequential containers to behave as ordered associative containers.
Ordered Associative Containers
Section titled “Ordered Associative Containers”Unlike the sequential containers, the ordered associative containers do not store elements in a linear configuration. Instead, they provide a mapping of keys to values. They generally offer insertion, deletion, and lookup times that are equivalent to each other.
There are four ordered associative containers provided by the Standard Library: map, multimap, set, and multiset. Each of these containers stores its elements in a sorted, tree-like data structure.
The pair Utility Class
Section titled “The pair Utility Class”Before delving deeper into the ordered associative containers, let’s revisit the pair class template briefly introduced in Chapter 1. It is defined in <utility> and groups together two values of possibly different types. The values are accessible through the first and second public data members. All comparison operators are supported and compare both the first and second values. Here are some examples:
// Two-argument constructor and default constructorpair<string, int> myPair { "hello", 5 };pair<string, int> myOtherPair;
// Can assign directly to first and secondmyOtherPair.first = "hello";myOtherPair.second = 6;
// Copy constructorpair<string, int> myThirdPair { myOtherPair };
// operator<if (myPair < myOtherPair) {    println("myPair is less than myOtherPair");} else {    println("myPair is greater than or equal to myOtherPair");}
// operator==if (myOtherPair == myThirdPair) {    println("myOtherPair is equal to myThirdPair");} else {    println("myOtherPair is not equal to myThirdPair");}
The output is as follows:
myPair is less than myOtherPairmyOtherPair is equal to myThirdPairWith class template argument deduction, you can omit the template type arguments. Here is an example. Note the use of the standard string literal s.
pair myPair { "hello"s, 5 }; // Type is pair<string, int>.Before C++17 introduced support for CTAD, an std::make_pair() utility function template could be used to construct a pair from two values. The following are three ways to construct a pair of an int and a double:
pair<int, double> pair1 { make_pair(5, 10.10) };auto pair2 { make_pair(5, 10.10) };pair pair3 { 5, 10.10 }; // CTADA map, defined in <map>, stores key/value pairs instead of just single values. Insertion, lookup, and deletion are all based on the key; the value is just “along for the ride.” The term map comes from the conceptual understanding that the container “maps” keys to values.
A map keeps elements in sorted order, based on the keys, so that insertion, deletion, and lookup all take logarithmic time. Because of the order, when you enumerate the elements, they come out in the ordering imposed by the type’s operator< or a user-defined comparator. It is usually implemented as some form of balanced tree, such as a red-black tree. However, the tree structure is not exposed to the client.
You should use a map whenever you need to store and retrieve elements based on a “key” and you would like to have them in a certain order.
Constructing maps
Section titled “Constructing maps”The map class template takes four types: the key type, the value type, the comparator type, and the allocator type. As always, the allocator is ignored in this chapter. The comparator is similar to the comparator for a priority_queue described earlier. It allows you to change the default comparator. In this chapter, only the default less comparator is used. When using the default, make sure that your keys all respond to operator< appropriately. If you’re interested in further detail, Chapter 19 explains how to write your own comparators.
If you ignore the comparator and allocator parameters, constructing a map is just like constructing a vector or a list, except that you specify the key and value types separately in the template instantiation. For example, the following code constructs a map that uses ints as the key and objects of the Data class as values:
class Data final{ public: explicit Data(int value = 0) : m_value { value } { } int getValue() const { return m_value; } void setValue(int value) { m_value = value; } private: int m_value;};…map<int, Data> dataMap;Internally, dataMap stores a pair<int, Data> for each element in the map.
A map also supports uniform initialization. The following map internally stores instances of pair<string, int>:
map<string, int> m { { "Marc G.", 12 }, { "Warren B.", 34 }, { "Peter V.W.", 56 }};Class template argument deduction does not work as usual. For example, the following does not compile:
map m { { "Marc G."s, 12 }, { "Warren B."s, 34 }, { "Peter V.W."s, 56 }};This does not work because the compiler cannot deduce pair<string, int> from, for example, {"Marc G."s, 12}. If you really want, you can write the following (note the s suffix for the string literals!):
map m { pair { "Marc G."s, 12 }, pair { "Warren B."s, 34 }, pair { "Peter V.W."s, 56 }};
Section titled “ Formatting and Printing Maps”Just as for vectors, std::format() and the print() functions can be used to format and print entire maps with a single statement. For vectors, the output is surrounded by square brackets, and each element is separated with a comma. For maps, the output is slightly different: the output is surrounded by curly brackets, each key/value pair is separated by a comma, and a colon separates the key and the value. For example, printing the map from the previous section, m, gives the following output:
{"Marc G.": 12, "Peter V.W.": 56, "Warren B.": 34}Inserting Elements
Section titled “Inserting Elements”Inserting an element into sequential containers such as vector and list always requires you to specify the position at which the element is to be added. A map, along with the other ordered associative containers, is different. The map’s internal implementation determines the position in which to store the new element; you need only to supply the key and the value.
When inserting elements, it is important to keep in mind that maps require unique keys: every element in the map must have a different key. If you want to support multiple elements with the same key, you have two options: either you can use a map and store another container such as a vector as the value for a key or you can use multimaps, described later.
The insert() Member Function
Section titled “The insert() Member Function”The insert() member function can be used to add elements to a map and has the advantage of allowing you to detect whether a key already exists. You must specify the key/value pair as a pair object or as an initializer_list. The return type of the basic form of insert() is a pair of an iterator and a bool. The reason for the complicated return type is that insert() does not overwrite a value if one already exists with the specified key. The bool element of the returned pair specifies whether the insert() actually inserted the new key/value pair. The iterator refers to the element in the map with the specified key (with a new or old value, depending on whether the insert succeeded or failed). map iterators are discussed in more detail in the next section. Continuing the map example from the previous section, you can use insert() as follows:
map<int, Data> dataMap;
auto ret { dataMap.insert({ 1, Data { 4 } }) };   // Using an initializer_listif (ret.second) { println("Insert succeeded!"); }else { println("Insert failed!"); }
ret = dataMap.insert(make_pair(1, Data { 6 })); // Using a pair objectif (ret.second) { println("Insert succeeded!"); }else { println("Insert failed!"); }
The type of the ret variable is a pair as follows:
pair<map<int, Data>::iterator, bool> ret;The first element of the pair is a map iterator for a map with keys of type int and values of type Data. The second element of the pair is a Boolean value.
The output of the program is as follows:
Insert succeeded!Insert failed!With if statement initializers, inserting the data into the map and checking the result can be done with a single statement as follows:
if (auto result { dataMap.insert({ 1, Data { 4 } }) }; result.second) { println("Insert succeeded!");} else { println("Insert failed!");}This can further be combined with structured bindings:
if (auto [iter, success] { dataMap.insert({ 1, Data { 4 } }) }; success) { println("Insert succeeded!");} else { println("Insert failed!");}The insert_or_assign() Member Function
Section titled “The insert_or_assign() Member Function”insert_or_assign() has a similar return type as insert(). However, if an element with the given key already exists, insert_or_assign() overwrites the old value with the new value, while insert() does not overwrite the old value in that case. Another difference with insert() is that insert_or_assign() has two separate parameters: the key and the value. Here is an example:
auto ret { dataMap.insert_or_assign(1, Data { 7 }) };if (ret.second) { println("Inserted."); }else { println("Overwritten."); }
Section titled “ The insert_range() Member Function”C++23 adds insert_range() for map, which can be used to insert all elements of a given range to the map, and returns an iterator to the first element that was added. Here is an example:
vector<pair<int, Data>> moreData { {2, Data{22}}, {3, Data{33}}, {4, Data{44}} };dataMap.insert_range(moreData);operator[]
Section titled “operator[]”Another member function to insert elements into a map is through the overloaded operator[]. The difference is mainly in the syntax: you specify the key and value separately. Additionally, operator[] always succeeds. If no value with the given key exists, it creates a new element with that key and value. If an element with the key already exists, operator[] replaces the value with the newly specified value. Here is part of the previous example using operator[] instead of insert():
map<int, Data> dataMap;dataMap[1] = Data { 4 };dataMap[1] = Data { 6 }; // Replaces the element with key 1There is, however, one major caveat to operator[]: it always constructs a new value object, even if it doesn’t need to use it. Thus, it requires a default constructor for the element values and can be less efficient than insert().
The fact that operator[] creates a new element in a map if the requested element does not already exist means that this operator is not marked as const. This sounds obvious, but might sometimes look counterintuitive. For example, suppose you have the following function:
void func(const map<int, int>& m){ println("{}", m[1]); // Error}This fails to compile, even though you appear to be just reading the value m[1]. It fails because the parameter m is a reference-to-const to a map, and operator[] is not marked as const. In such cases, you should instead use the find() or at() member function described in the section “Looking Up Elements.”
Emplace Member Functions
Section titled “Emplace Member Functions”A map supports emplace() and emplace:hint() to construct elements in-place, similar to the emplace member functions of a vector. There is also a try_emplace() member function that inserts an element in-place if the given key does not exist yet, or does nothing if the key already exists in the map.
map Iterators
Section titled “map Iterators”map iterators work similarly to the iterators on the sequential containers. The major difference is that the iterators refer to key/value pairs instead of just the values. To access the value, you must retrieve the second field of the pair object. map iterators are bidirectional, meaning you can traverse them in both directions. Here is how you can iterate through the map from the previous example:
for (auto iter { cbegin(dataMap) }; iter != cend(dataMap); ++iter) { println("{}", iter->second.getValue());}Take another look at the expression used to access the value:
iter->second.getValue()iter refers to a key/value pair, so you can use the -> operator to access the second field of that pair, which is a Data object. You can then call the getValue() member function on that Data object.
Note that the following code is functionally equivalent:
(*iter).second.getValue()Using a range-based for loop, the loop can be written more readable and less error prone as follows:
for (const auto& p : dataMap) { println("{}", p.second.getValue());}It can be implemented even more elegantly using a combination of a range-based for loop and structured bindings:
for (const auto& [key, data] : dataMap) { println("{}", data.getValue());}You can modify element values through non-const iterators, but the compiler will generate an error if you try to modify the key of an element, even through a non-const iterator, because it would destroy the sorted order of the elements in the map.
Looking Up Elements
Section titled “Looking Up Elements”A map provides logarithmic lookup of elements based on a supplied key. If you already know that an element with a given key is in a map, the simplest way to look it up is through operator[] as long as you call it on a non-const map or a reference-to-non-const map. The nice thing about operator[] is that it returns a reference to the value that you can use and modify directly, without worrying about pulling the value out of a pair object. Here is an extension of the previous example to call the setValue() member function on the Data object value with key 1:
map<int, Data> dataMap;dataMap[1] = Data { 4 };dataMap[1] = Data { 6 };dataMap[1].setValue(100);As an alternative, map provides a find() member function that returns an iterator referring to the key/value pair with the requested key, if it exists, or the end() iterator if the key is not found in the map. This can be useful in the following cases:
- If you don’t know whether the element exists, you may not want to use
operator[], because it will insert a new element with that key if it doesn’t find one already. - If you have a
constor a reference-to-const map, in which case you cannot useoperator[].
Here is an example using find() to perform the same modification to the Data object with key 1:
auto it { dataMap.find(1) };if (it != end(dataMap)) { it->second.setValue(100);}As you can see, using find() is a bit clumsier, but it’s sometimes necessary.
Alternatively, you can use the at() member function, which, just as operator[], returns a reference to the value in the map with the requested key, if it exists. It throws an out_of_range exception if the requested key isn’t found in the map. The at() member function works fine on a const or a reference-to-const map. For example:
dataMap.at(1).setValue(200);If you only want to know whether an element with a certain key is in a map, you can use the count() member function. It returns the number of elements in a map with a given key. For maps, the result will always be 0 or 1 because there can be no elements with duplicate keys.
Additionally, all associative containers (ordered, unordered, and flat) have a member function called contains(). It returns true if a given key exists in a container, false otherwise. With this, it’s no longer necessary to use count() to figure out whether a certain key is in an associative container. Here is an example:
auto isKeyInMap { dataMap.contains(1) };Removing Elements
Section titled “Removing Elements”A map allows you to remove an element at a specific iterator position or to remove all elements in a given iterator range, in amortized constant and logarithmic time, respectively. From the client perspective, these two erase() member functions are equivalent to those in the sequential containers. A great feature of a map, however, is that it also provides a version of erase() to remove an element matching a key. Here is an example:
map<int, Data> dataMap;dataMap[1] = Data { 4 };println("There are {} elements with key 1.", dataMap.count(1));dataMap.erase(1);println("There are {} elements with key 1.", dataMap.count(1));The output is as follows:
There are 1 elements with key 1.There are 0 elements with key 1.All the ordered and unordered associative containers are node-based data structures. The Standard Library provides direct access to nodes in the form of node handles. The exact type is unspecified, but each container has a type alias called node_type that specifies the type of a node handle for that container. A node handle can only be moved and is the owner of the element stored in a node. It provides read/write access to both the key and the value.
Nodes can be extracted from an associative container as a node handle using the extract() member function, based either on a given iterator position or on a given key. Extracting a node from a container removes it from the container, because the returned node handle is the sole owner of the extracted element.
New insert() overloads are provided that allow you to insert a node handle into a container.
By using extract() to extract node handles and using insert() to insert node handles, you can effectively transfer data from one associative container to another one without any copying or moving involved. You can even transfer nodes from a map to a multimap and from a set to a multiset. Continuing with the example from the previous section, the following code snippet transfers the node with key 1 from dataMap to a second map called dataMap2:
map<int, Data> dataMap2;auto extractedNode { dataMap.extract(1) };dataMap2.insert(move(extractedNode));The last two lines can be combined into one:
dataMap2.insert(dataMap.extract(1));One additional operation is available to move all nodes from one associative container to another one: merge(). Nodes that cannot be moved because they would cause, for example, duplicates in a target container that does not allow duplicates, are left in the source container. Here is an example:
map<int, int> src { {1, 11}, {2, 22} };map<int, int> dst { {2, 22}, {3, 33}, {4, 44}, {5, 55} };dst.merge(src);println("src = {}", src); // src = {2: 22}println("dst = {}", dst); // dst = {1: 11, 2: 22, 3: 33, 4: 44, 5: 55}After the merge operation, src still contains one element, {2: 22}, because the destination already contains such an element, so it cannot be moved.
map Example: Bank Account
Section titled “map Example: Bank Account”You can implement a simple bank account database using a map. A common pattern is for the key to be one field of a class or struct that is stored in a map. In this case, the key is the account number. Here are simple BankAccount and BankDB classes:
export class BankAccount final{    public:        explicit BankAccount(int accountNumber, std::string name)            : m_accountNumber { accountNumber }, m_clientName { std::move(name) }{}
        void setAccountNumber(int accountNumber) {            m_accountNumber = accountNumber; }        int getAccountNumber() const { return m_accountNumber; }
        void setClientName(std::string name) { m_clientName = std::move(name); }        const std::string& getClientName() const { return m_clientName; }    private:        int m_accountNumber;        std::string m_clientName;};
export class BankDB final{    public:        // Adds account to the bank database. If an account exists already        // with that account number, the new account is not added. Returns true        // if the account is added, false if it's not.        bool addAccount(const BankAccount& account);
        // Removes the account with accountNumber from the database.        void deleteAccount(int accountNumber);
        // Returns a reference to the account represented        // by its account number or the client name.        // Throws out_of_range if the account is not found.        BankAccount& findAccount(int accountNumber);        BankAccount& findAccount(std::string_view name);
        // Adds all the accounts from db to this database.        // Deletes all the accounts from db.        void mergeDatabase(BankDB& db);    private:        std::map<int, BankAccount> m_accounts;};
Here are the implementations of the BankDB member functions, with comments explaining the code:
bool BankDB::addAccount(const BankAccount& account){    // Do the actual insert, using the account number as the key.    auto res { m_accounts.emplace(account.getAccountNumber(), account) };    // or: auto res { m_accounts.insert(    //         pair { account.getAccountNumber(), account }) };
    // Return the bool field of the pair specifying success or failure.    return res.second;}
void BankDB::deleteAccount(int accountNumber){    m_accounts.erase(accountNumber);}
BankAccount& BankDB::findAccount(int accountNumber){    // Finding an element via its key can be done with find().    auto it { m_accounts.find(accountNumber) };    if (it == end(m_accounts)) {        throw out_of_range { format("No account with number {}.", accountNumber) };    }    // Remember that iterators into maps refer to pairs of key/value.    return it->second;}
BankAccount& BankDB::findAccount(string_view name){    // Finding an element by a non-key attribute requires a linear    // search through the elements. The following uses structured bindings.    for (auto& [accountNumber, account] : m_accounts) {        if (account.getClientName() == name) {            return account;  // found it!        }    }    throw out_of_range { format("No account with name '{}'.", name) };}
void BankDB::mergeDatabase(BankDB& db){    // Use merge().    m_accounts.merge(db.m_accounts);    // Or: m_accounts.insert(begin(db.m_accounts), end(db.m_accounts));
    // Now clear the source database.    db.m_accounts.clear();}
You can test the BankDB class with the following code:
BankDB db;db.addAccount(BankAccount { 100, "Nicholas Solter" });db.addAccount(BankAccount { 200, "Scott Kleper" });
try {    auto& account { db.findAccount(100) };    println("Found account 100");    account.setClientName("Nicholas A Solter");
    auto& account2 { db.findAccount("Scott Kleper") };    println("Found account of Scott Kleper");
    auto& account3 { db.findAccount(1000) };} catch (const out_of_range& caughtException) {    println("Unable to find account: {}", caughtException.what());}
The output is as follows:
Found account 100Found account of Scott KleperUnable to find account: No account with number 1000.multimap
Section titled “multimap”A multimap is a map that allows multiple elements with the same key. Like maps, multimaps support uniform initialization. The interface is almost identical to the map interface, with the following differences:
multimaps do not provideoperator[]andat(). The semantics of these do not make sense if there can be multiple elements with a single key.- Inserts on
multimaps always succeed. Thus, themultimap::insert()member function that adds a single element returns just aniteratorinstead of apair. - The
insert_or_assign()andtry_emplace()member functions supported bymapare not supported bymultimap.
The trickiest aspect of multimaps is looking up elements. You can’t use operator[], because it is not provided. find() isn’t very useful because it returns an iterator referring to any one of the elements with a given key (not necessarily the first element with that key).
However, multimaps store all elements with the same key together and provide member functions to obtain iterators for this subrange of elements with the same key in the container. The lower_bound() and upper_bound() member functions each return a single iterator referring to the first and one-past-the-last elements matching a given key. If there are no elements matching that key, the iterators returned by lower_bound() and upper_bound() will be equal to each other.
If you need to obtain both iterators bounding the elements with a given key, it’s more efficient to use equal_range() instead of calling lower_bound() followed by calling upper_bound(). The equal_range() member function returns a pair of the two iterators that would be returned by lower_bound() and upper_bound().
multimap Example: Buddy Lists
Section titled “multimap Example: Buddy Lists”Most of the numerous online chat programs allow users to have a “buddy list” or list of friends. The chat program confers special privileges on users in the buddy list, such as allowing them to send unsolicited messages to the user.
One way to implement the buddy lists for an online chat program is to store the information in a multimap. One multimap could store the buddy lists for every user. Each entry in the container stores one buddy for a user. The key is the user, and the value is the buddy. For example, if Harry Potter and Ron Weasley had each other on their individual buddy lists, there would be two entries of the form “Harry Potter” maps to “Ron Weasley” and “Ron Weasley” maps to “Harry Potter.” A multimap allows multiple values for the same key, so the same user is allowed multiple buddies. Here is the BuddyList class definition:
export class BuddyList final{ public: // Adds buddy as a friend of name. void addBuddy(const std::string& name, const std::string& buddy); // Removes buddy as a friend of name. void removeBuddy(const std::string& name, const std::string& buddy); // Returns true if buddy is a friend of name, false otherwise. bool isBuddy(const std::string& name, const std::string& buddy) const; // Retrieves a list of all the friends of name. std::vector<std::string> getBuddies(const std::string& name) const; private: std::multimap<std::string, std::string> m_buddies;};Here are the implementations, with comments explaining the code. It demonstrates the use of lower_bound(), upper_bound(), and equal_range().
void BuddyList::addBuddy(const string& name, const string& buddy){    // Make sure this buddy isn't already there. We don't want    // to insert an identical copy of the key/value pair.    if (!isBuddy(name, buddy)) {        m_buddies.insert({ name, buddy }); // Using initializer_list    }}
void BuddyList::removeBuddy(const string& name, const string& buddy){    // Obtain the beginning and end of the range of elements with    // key 'name'. Use both lower_bound() and upper_bound() to demonstrate    // their use. Otherwise, it's more efficient to call equal_range().    auto begin { m_buddies.lower_bound(name) };  // Start of the range    auto end { m_buddies.upper_bound(name) };    // End of the range
    // Iterate through the elements with key 'name' looking    // for a value 'buddy'. If there are no elements with key 'name',    // begin equals end, so the loop body doesn't execute.    for (auto iter { begin }; iter != end; ++iter) {        if (iter->second == buddy) {            // We found a match! Remove it from the map.            m_buddies.erase(iter);            break;        }    }}
bool BuddyList::isBuddy(const string& name, const string& buddy) const{    // Obtain the beginning and end of the range of elements with    // key 'name' using equal_range(), and structured bindings.    auto [begin, end] { m_buddies.equal_range(name) };
    // Iterate through the elements with key 'name' looking    // for a value 'buddy'.    for (auto iter { begin }; iter != end; ++iter) {        if (iter->second == buddy) {            // We found a match!            return true;        }    }    // No matches    return false;}
vector<string> BuddyList::getBuddies(const string& name) const{    // Obtain the beginning and end of the range of elements with    // key 'name' using equal_range(), and structured bindings.    auto [begin, end] { m_buddies.equal_range(name) };
    // Create a vector with all names in the range (all buddies of name).    vector<string> buddies;    for (auto iter { begin }; iter != end; ++iter) {        buddies.push_back(iter->second);    }    return buddies;}
Note that removeBuddy() can’t simply use the version of erase() that erases all elements with a given key, because it should erase only one element with the key, not all of them. Note also that getBuddies() can’t use insert() on the vector to insert the elements in the range returned by equal_range(), because the elements referred to by the multimap iterators are key/value pairs, not strings. The getBuddies() member function must iterate explicitly through the range extracting the string from each key/value pair and pushing that onto the new vector to be returned.
Alternatively, with the C++23 ranges functionality discussed in Chapter 17, getBuddies() can be implemented as follows without any explicit loops:
vector<string> BuddyList::getBuddies(const string& name) const{ auto [begin, end] { m_buddies.equal_range(name) }; return ranges::subrange { begin, end } | views::values | ranges::to<vector>();}Here is a test of the BuddyList:
BuddyList buddies;buddies.addBuddy("Harry Potter", "Ron Weasley");buddies.addBuddy("Harry Potter", "Hermione Granger");buddies.addBuddy("Harry Potter", "Hagrid");buddies.addBuddy("Harry Potter", "Draco Malfoy");// That's not right! Remove Draco.buddies.removeBuddy("Harry Potter", "Draco Malfoy");buddies.addBuddy("Hagrid", "Harry Potter");buddies.addBuddy("Hagrid", "Ron Weasley");buddies.addBuddy("Hagrid", "Hermione Granger");
auto harrysFriends { buddies.getBuddies("Harry Potter") };
println("Harry's friends: ");for (const auto& name : harrysFriends) {    println("\t{}", name);}
The output is as follows:
Harry's friends: Ron Weasley Hermione Granger HagridA set, defined in <set>, is similar to a map. The difference is that instead of storing key/value pairs, in sets the value is the key. sets are useful for storing information in which there is no explicit key, but which you want to have in sorted order without any duplicates, with quick insertion, lookup, and deletion.
The interface supplied by set is almost identical to that of map. The main difference is that set doesn’t provide operator[], insert_or_assign(), and try_emplace().
You cannot change the value of elements in a set because modifying elements of a set while they are in the container would destroy the order.
set Example: Access Control List
Section titled “set Example: Access Control List”One way to implement basic security on a computer system is through access control lists. Each entity on the system, such as a file or a device, has a list of users with permissions to access that entity. Users can generally be added to and removed from the permissions list for an entity only by users with special privileges. Internally, a set provides a nice way to represent the access control list. You could use one set for each entity, containing all the usernames that are allowed to access the entity. Here is a class definition for a simple access control list:
export class AccessList final{ public: // Default constructor AccessList() = default; // Constructor to support uniform initialization. AccessList(std::initializer_list<std::string_view> users) { m_allowed.insert(begin(users), end(users)); } // Adds the user to the permissions list. void addUser(std::string user) { m_allowed.emplace(std::move(user)); } // Removes the user from the permissions list. void removeUser(const std::string& user) { m_allowed.erase(user); } // Returns true if the user is in the permissions list. bool isAllowed(const std::string& user) const { return m_allowed.contains(user); } // Returns all the users who have permissions. const std::set<std::string>& getAllUsers() const { return m_allowed; } // Returns a vector of all the users who have permissions. std::vector<std::string> getAllUsersAsVector() const { return { begin(m_allowed), end(m_allowed) }; } private: std::set<std::string> m_allowed;};Take a look at the interesting one-line implementation of getAllUsersAsVector(). That one line constructs a vector<string> to return, by passing a begin and end iterator of m_allowed to the vector constructor. If you want, you can split this over two lines:
std::vector<std::string> users { begin(m_allowed), end(m_allowed) };return users;Finally, here is a simple test program:
AccessList fileX { "mgregoire", "baduser" };fileX.addUser("pvw");fileX.removeUser("baduser");
if (fileX.isAllowed("mgregoire")) { println("mgregoire has permissions"); }if (fileX.isAllowed("baduser")) { println("baduser has permissions"); }
// C++23 supports formatting/printing of ranges, see Chapter 2.println("Users with access: {:n:}", fileX.getAllUsers());
// Iterating over the elements of a set.print("Users with access: ");for (const auto& user : fileX.getAllUsers()) { print("{} ", user); }println("");
// Iterating over the elements of a vector.print("Users with access: ");for (const auto& user : fileX.getAllUsersAsVector()) { print("{} ", user); }println("");
One of the constructors for AccessList uses an initializer_list as a parameter so that you can use the uniform initialization syntax, as demonstrated in the test program for initializing fileX.
The output of this program is as follows:
mgregoire has permissionsUsers with access: mgregoire, pvwUsers with access: mgregoire pvwUsers with access: mgregoire pvwNote that the m_allowed data member needs to be a set of std::strings, and not of string_views. Changing it to a set of string_views will introduce problems with dangling pointers. For example, suppose you have the following code:
AccessList fileX;{ string user { "someuser" }; fileX.addUser(user);}This code snippet creates a string called user and then adds that to the fileX access control list. However, the string and the call to addUser() are inside a set of curly brackets; that is, the string has a shorter lifetime than fileX. At the closing curly bracket, the string goes out of scope and is destroyed. This would leave the fileX access control list with a string_view pointing to a destroyed string, i.e., a dangling pointer! This problem is avoided by using a set of strings.
multiset
Section titled “multiset”A multiset is to a set what a multimap is to a map. A multiset supports all the operations of a set, but it allows multiple elements that are equal to each other to be stored in the container simultaneously. An example of a multiset is not shown because it’s so similar to set and multimap.
Unordered Associative Containers Or Hash Tables
Section titled “Unordered Associative Containers Or Hash Tables”The Standard Library has support for unordered associative containers or hash tables. There are four of them: unordered_map, unordered_multimap, unordered_set, and unordered_multiset. The map, multimap, set, and multiset containers discussed earlier sort their elements, while these unordered variants do not sort their elements.
Hash Functions
Section titled “Hash Functions”The unordered associative containers are hash tables. That is because the implementation makes use of hash functions. The implementation usually consists of some kind of array where each element in the array is called a bucket. Each bucket has a specific numerical index like 0, 1, 2, up until the last bucket. A hash function transforms a key into a hash value, which is then transformed into a bucket index. The value associated with that key is then stored in that bucket.
The result of a hash function is not always unique. The situation in which two or more keys hash to the same bucket index is called a collision. A collision can occur when different keys result in the same hash value or when different hash values transform to the same bucket index. There are many approaches to handling collisions, including quadratic re-hashing and linear chaining, among others. If you are interested, consult one of the references in the “Algorithms and Data Structures” section in Appendix B. The Standard Library does not specify which collision-handling algorithm is required, but most current implementations have chosen to resolve collisions by linear chaining. With linear chaining, buckets do not directly contain the data values associated with the keys but contain a pointer to a linked list. This linked list contains all the data values for that specific bucket. Figure 18.1 shows how this works.
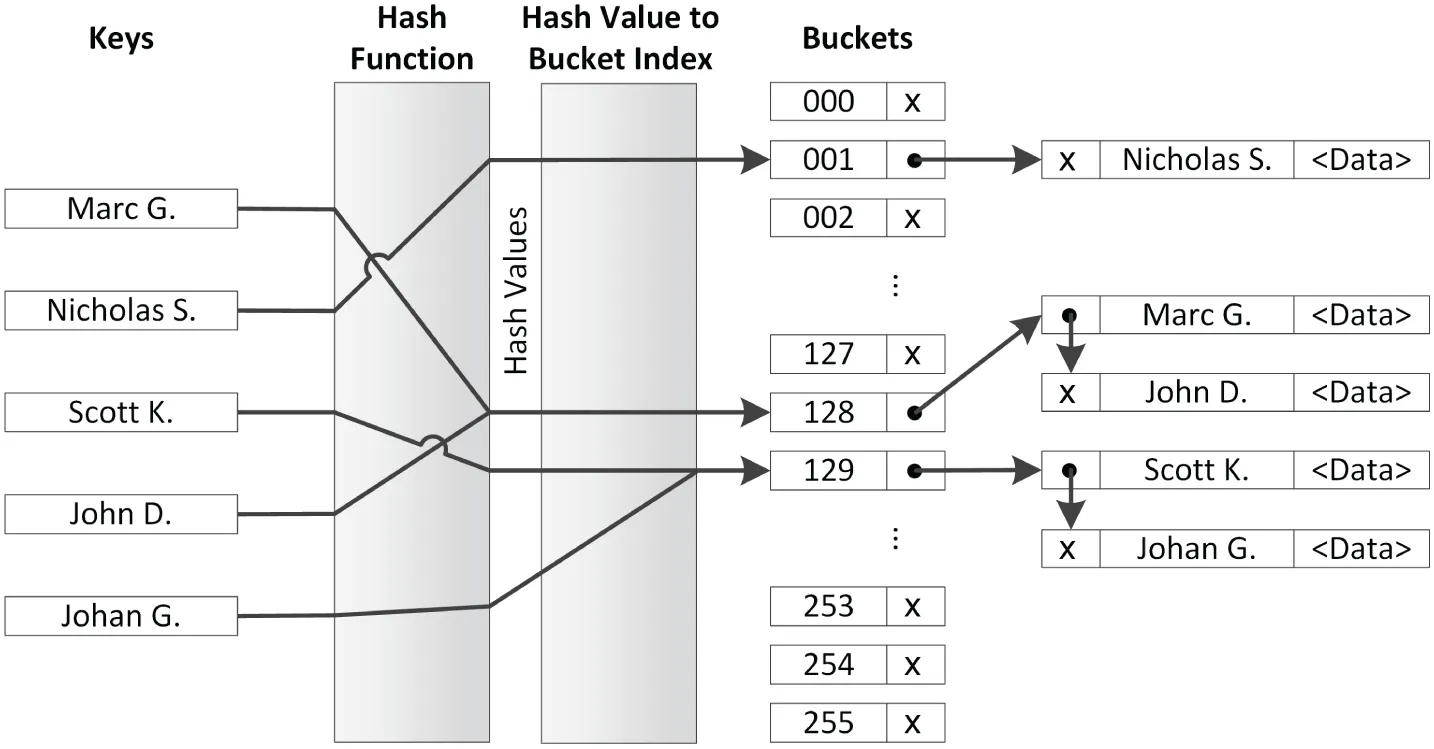
[^FIGURE 18.1]
In Figure 18.1, there are two collisions. The first collision is because applying the hash function to the keys “Marc G.” and “John D.” results in the same hash value that maps to bucket index 128. This bucket then points to a linked list containing the keys “Marc G.” and “John D.” together with their associated data values. The second collision is caused by the hash values for “Scott K.” and “Johan G.” mapping to the same bucket index 129.
From Figure 18.1, it is also clear how lookups based on keys work and what the complexity is. A lookup involves a single hash function call to calculate the hash value. This hash value is then transformed to a bucket index. Once the bucket index is known, one or more equality operations are required to find the right key in the linked list. This shows that lookups can be much faster compared to lookups with normal maps, but it all depends on how many collisions there are.
The choice of the hash function is important. A hash function that creates no collisions is known as a perfect hash. A perfect hash has a lookup time that is constant; a regular hash has a lookup time that is, on average, close to 1, independent of the number of elements. As the number of collisions increases, the lookup time increases, reducing performance. Collisions can be reduced by increasing the basic hash table size, but you need to take cache sizes into account.
The C++ standard provides hash functions for pointers and all primitive data types such as bool, char, int, float, double, and so on. Hash functions are also provided for several Standard Library classes, such as optional, bitset, unique_ptr, shared_ptr, string, string_view, vector<bool>, and more. If there is no standard hash function available for the type of keys you want to use, then you have to implement your own hash function. Creating a perfect hash is a nontrivial exercise, even when the set of keys is fixed and known. It requires deep mathematical analysis. Even creating a non-perfect one, but one that is good enough and has decent performance, is still challenging. It’s outside the scope of this book to explain the mathematics behind hash functions in detail. Instead, only an example of a simple hash function is given.
The following code demonstrates how to write a custom hash function. The code defines a class IntWrapper that just wraps a single integer. An operator== is provided because that’s a requirement for keys used in unordered associative containers.
class IntWrapper{ public: explicit IntWrapper(int i) : m_wrappedInt { i } {} int getValue() const { return m_wrappedInt; } bool operator==(const IntWrapper&) const = default;// = default since C++20 private: int m_wrappedInt;};To write the actual hash function for IntWrapper, you write a specialization of the std::hash class template for IntWrapper. The std::hash class template is defined in <functional>. This specialization needs an implementation of the function call operator that calculates and returns the hash of a given IntWrapper instance. For this example, the request is simply forwarded to the standard hash function for integers:
namespace std{ template<> struct hash<IntWrapper> { size_t operator()(const IntWrapper& x) const { return std::hash<int>{}(x.getValue()); } };}Note that you normally are not allowed to put anything in the std namespace; however, std class template specializations are an exception to this rule. The implementation of the function call operator is just one line. It creates an instance of the standard hash function for integers—std::hash<int>{}—and then calls the function call operator on it with x.getValue() as argument. Note that this forwarding works in this example because IntWrapper contains just one data member, an integer. If the class contained multiple data members, then a hash value would need to be calculated taking all those data members into account; however, those details fall outside the scope of this book.
unordered_map
Section titled “unordered_map”unordered_map is defined in <unordered_map> as a class template:
template <typename Key, typename T, typename Hash = hash<Key>, typename Pred = std::equal_to<Key>, typename Alloc = std::allocator<std::pair<const Key, T>>> class unordered_map;There are five template type parameters: the key type, the value type, the hash type, the equality comparator type, and the allocator type. The last three parameters have default values. The most important parameters are the first two. As with maps, uniform initialization can be used to initialize an unordered_map. Iterating over the elements is also similar to maps, as shown in the following example.
unordered_map<int, string> m { {1, "Item 1"}, {2, "Item 2"}, {3, "Item 3"}, {4, "Item 4"}};// Using C++23 support for formatting/printing ranges.println("{}", m);// Using structured bindings.for (const auto& [key, value] : m) { print("{} = {}, ", key, value); }println("");// Without structured bindings.for (const auto& p : m) { print("{} = {}, ", p.first, p.second); }The output is as follows:
{4: "Item 4", 3: "Item 3", 2: "Item 2", 1: "Item 1"}4 = Item 4, 3 = Item 3, 2 = Item 2, 1 = Item 1,4 = Item 4, 3 = Item 3, 2 = Item 2, 1 = Item 1,The following table summarizes the differences between map and unordered_map. A filled box (![]() ) means the container supports that operation, while an empty box (
) means the container supports that operation, while an empty box (![]() ) means the operation is not supported.
) means the operation is not supported.
| OPERATION | map | unordered_map |
|---|---|---|
| at() | ||
| begin() | ||
| begin(n) | ||
| bucket() | ||
| bucket_count() | ||
| bucket_size() | ||
| cbegin() | ||
| cbegin(n) | ||
| cend() | ||
| cend(n) | ||
| clear() | ||
| contains() | ||
| count() | ||
| crbegin() | ||
| crend() | ||
| emplace() | ||
| emplace:hint() | ||
| empty() | ||
| end() | ||
| end(n) | ||
| equal_range() | ||
| erase() | ||
| extract() | ||
| find() | ||
| insert() | ||
| insert_or_assign() | ||
| insert_range() (C++23) | ||
| iterator / const_iterator | ||
| load_factor() | ||
| local_iterator / const_local_iterator | ||
| lower_bound() | ||
| max_bucket_count() | ||
| max_load_factor() | ||
| max_size() | ||
| merge() | ||
| operator[] | ||
| rbegin() | ||
| rehash() | ||
| rend() | ||
| reserve() | ||
| reverse_iterator / const_reverse_iterator | ||
| size() | ||
| swap() | ||
| try_emplace() | ||
| upper_bound() |
As with map, all keys in an unordered_map must be unique. The preceding table includes a number of hash-specific member functions. For example, load_factor() returns the average number of elements per bucket to give you an indication of the number of collisions. The bucket_count() member function returns the number of buckets in the container. It also provides a local_iterator and const_local_iterator, allowing you to iterate over the elements in a single bucket; however, these may not be used to iterate across buckets. The bucket(key) member function returns the index of the bucket that contains the given key; begin(n) returns a local_iterator referring to the first element in the bucket with index n, and end(n) returns a local_iterator referring to one-past-the-last element in the bucket with index n. The example in the next section demonstrates how to use some of these member functions.
unordered_map Example: Phone Book
Section titled “unordered_map Example: Phone Book”The following example uses an unordered_map to represent a phone book. The name of a person is the key, while the phone number is the value associated with that key.
void printMap(const auto& m)  // Abbreviated function template{    for (auto& [key, value] : m) {        println("{} (Phone: {})", key, value);    }    println("-------");}
int main(){    // Create a hash table.    unordered_map<string, string> phoneBook {        { "Marc G.", "123-456789" },        { "Scott K.", "654-987321" } };    printMap(phoneBook);
    // Add/remove some phone numbers.    phoneBook.insert(make_pair("John D.", "321-987654"));    phoneBook["Johan G."] = "963-258147";    phoneBook["Freddy K."] = "999-256256";    phoneBook.erase("Freddy K.");    printMap(phoneBook);
    // Find the bucket index for a specific key.    const size_t bucket { phoneBook.bucket("Marc G.") };    println("Marc G. is in bucket {} containing the following {} names:",        bucket, phoneBook.bucket_size(bucket));    // Get begin and end iterators for the elements in this bucket.    // 'auto' is used here. The compiler deduces the type of    // both as unordered_map<string, string>::const_local_iterator    auto localBegin { phoneBook.cbegin(bucket) };    auto localEnd { phoneBook.cend(bucket) };    for (auto iter { localBegin }; iter != localEnd; ++iter) {        println("\t{} (Phone: {})", iter->first, iter->second);    }    println("-------");
    // Print some statistics about the hash table    println("There are {} buckets.", phoneBook.bucket_count());    println("Average number of elements in a bucket is {}.",        phoneBook.load_factor());}
A possible output is as follows. Note that the output can be different on different systems, because it depends on the implementation of both the hash function and the unordered_map itself being used.
Scott K. (Phone: 654-987321)Marc G. (Phone: 123-456789)-------Scott K. (Phone: 654-987321)Marc G. (Phone: 123-456789)Johan G. (Phone: 963-258147)John D. (Phone: 321-987654)-------Marc G. is in bucket 1 containing the following 2 names: Scott K. (Phone: 654-987321) Marc G. (Phone: 123-456789)-------There are 8 buckets.Average number of elements in a bucket is 0.5unordered_multimap
Section titled “unordered_multimap”An unordered_multimap is an unordered_map that allows multiple elements with the same key. Their interfaces are almost identical, with the following differences:
unordered_multimaps do not provideoperator[]andat(). The semantics of these do not make sense if there can be multiple elements with a single key.- Inserts on
unordered_multimaps always succeed. Thus, theunordered_multimap::insert()member function that adds a single element returns just aniteratorinstead of apair. - The
insert_or_assign()andtry_emplace()member functions supported byunordered_mapare not supported by anunordered_multimap.
As discussed earlier with multimaps, looking up elements in unordered_multimaps cannot be done using operator[] because it is not provided. You can use find(), but it returns an iterator referring to any one of the elements with a given key (not necessarily the first element with that key). Instead, it’s best to use the equal_range() member function, which returns a pair of iterators: one referring to the first element matching a given key, and one referring to one-past-the-last element matching that key. The use of equal_range() is the same as discussed for multimaps, so you can look at the example given for multimaps to see how it works.
unordered_set/unordered_multiset
Section titled “unordered_set/unordered_multiset”<unordered_set> defines unordered_set and unordered_multiset, which are similar to set and multiset, respectively, except that they do not sort their keys but use a hash function. The differences between unordered_set and unordered_map are similar to the differences between set and map as discussed earlier in this chapter, so they are not discussed in detail here. Consult a Standard Library Reference for a thorough summary of unordered_set and unordered_multiset operations.
Section titled “ Flat Set and Flat Map Associative Container Adapters”C++23 introduces the following new container adapters:
std::flat_setandflat_multisetdefined in<flat_set>std::flat_mapandflat_multimapdefined in<flat_map>
These are adapters providing an associative container interface on top of sequential containers. flat_set and flat_map require unique keys, just as set and map, while flat_multiset and flat_multimap support duplicate keys, just as multiset and multimap. They all store their data sorted on the keys using std::less as the default comparator. flat_set and flat_multiset provide for fast retrieval of a key, while flat_map and flat_multimap provide for fast retrieval of a value based on a key. A flat_set and a flat_multiset require one underlying sequential container to store their keys. A flat_map and a flat_multimap require two underlying containers, one to store the keys and another one to store the values. The underlying container must support random-access iterators, such as vector and deque. By default, vector is used.
All flat associative container adapters have an interface similar to their ordered counterparts, except that the flat container adapters are not node-based data structures and thus don’t have any concept of node handles as discussed earlier in this chapter in the context of the ordered associative containers. Another difference is that the flat variants provide random-access iterators, while the ordered counterparts provide only bidirectional iterators.
With the addition of these flat container adapters, the Standard Library now provides three variants of each associative container type; e.g., there are now three map containers: map, unordered_map, and flat_map. All three basically work in a similar fashion, but they store their data in drastically different data structures and thus have different time- and space-efficiency. Because the flat associative container adapters store their data sorted in sequential containers, they all have linear time complexity for adding and removing elements, which can potentially be slower than adding and removing elements from ordered and unordered containers. Lookups have logarithmic complexity, just as the ordered associative containers. However, for the flat variants, lookups and especially iteration over the elements are more efficient than for the ordered ones because the former store their data in sequential containers and thus have a much more efficient and cache-friendly memory layout. They also need less memory per element compared to the ordered or unordered variants. Which one of the three flavors per type to choose for a specific use case depends on the exact requirements of your use case. If performance is important, then I recommend profiling all three of them to find out which one is best suited for a specific use. Profiling is explained in Chapter 29, “Writing Efficient C++.”
The flat associative container adapters are often just drop-in replacements for their ordered counterparts. For example, the access control list example from earlier has a data member called m_allowed of type set<string>, an ordered associative container. The code can easily be changed to use a flat_set instead. Two changes are necessary. First, the type of m_allowed is changed to the following:
std::flat_set<std::string> m_allowed;Second, the return type of getAllUsers() is changed to a flat_set:
const std::flat_set<std::string>& getAllUsers() const { return m_allowed; }Everything else remains the same.
Performance of Associative Containers
Section titled “Performance of Associative Containers”As is clear from this section, the C++ Standard Library contains several different associative containers. How do you know which one to use for a certain task? If iterating over the contents of an associative container is important for your use case, then the flat associative container adapters have the best performance, because of the way they store their data in continuous memory. If other operations are more important for you, then the unordered associative containers are usually faster compared to the ordered ones. However, if performance is really important, then the only way to decide on the correct container is by benchmarking all of them for your specific use case. Usually, though, you can just pick the one that is easier to work with. To use the ordered versions with your own class types, you must implement comparison operations for your class, while for the unordered versions, you need to write a hash function. The latter is usually harder to implement.
OTHER CONTAINERS
Section titled “OTHER CONTAINERS”There are several other features of the C++ language and the Standard Library that are somewhat related to containers, including standard C-style arrays, strings, streams, and bitset.
Standard C-Style Arrays
Section titled “Standard C-Style Arrays”Recall that raw pointers are bona fide iterators because they support the required operations. This point is more than just a piece of trivia. It means that you can treat standard C-style arrays as Standard Library containers by using pointers to their elements as iterators. Standard C-style arrays, of course, don’t provide member functions like size(), empty(), insert(), and erase(), so they aren’t true Standard Library containers. Nevertheless, because they do support iterators through pointers, you can use them in the algorithms described in Chapter 20 and in some of the member functions described in this chapter.
For example, you could copy all the elements of a standard C-style array into a vector using the insert() member function of a vector that takes an iterator range from any container. This insert() member function’s prototype looks like this:
template <typename InputIterator> iterator insert(const_iterator position, InputIterator first, InputIterator last);If you want to use a standard C-style int array as the source, then the template type parameter InputIterator becomes int*. Here is a full example:
const size_t count { 10 };int values[count];     // standard C-style array// Initialize each element of the array to the value of its index.for (int i { 0 }; i < count; ++i) { values[i] = i; }
// Insert the contents of the array at the end of a vector.vector<int> vec;vec.insert(end(vec), values, values + count);
// Print the contents of the vector.println("{:n} ", vec);
Note that the iterator referring to the first element of the array is the address of the first element, which is values in this case. The name of an array alone is interpreted as the address of the first element. The iterator referring to the end must be one-past-the-last element, so it’s the address of the first element plus count, or values+count.
It’s easier to use std::begin() or cbegin() to get an iterator to the first element of a statically allocated C-style array not accessed through pointers, and std::end() or cend() to get an iterator to one-past-the-last element of such an array. For example, the call to insert() in the previous example can be written as follows:
vec.insert(end(vec), cbegin(values), cend(values));Starting with C++23, this can be written more elegantly using append_range():
vec.append_range(values);Functions such as std::begin() and end() work only on statically allocated C-style arrays not accessed through pointers. They do not work if pointers are involved or with dynamically allocated C-style arrays.
Strings
Section titled “Strings”You can think of a string as a sequential container of characters. Thus, it shouldn’t be surprising to learn that a C++ string is a full-fledged sequential container. It has begin() and end() member functions that return iterators into the string; and it has insert(), push_back(), erase(), size(), and empty() member functions, and all the rest of the sequential container basics. It resembles a vector quite closely, even providing the member functions reserve() and capacity().
You can use string as a Standard Library container just as you would use vector. Here is an example:
string myString;myString.insert(cend(myString), 'h');myString.insert(cend(myString), 'e');myString.push_back('l');myString.push_back('l');myString.push_back('o');
for (const auto& letter : myString) {    print("{}", letter);}println("");
for (auto it { cbegin(myString) }; it != cend(myString); ++it) {    print("{}", *it);}println("");
In addition to the Standard Library sequential container member functions, strings provide a host of useful member functions and friend functions. The string interface is actually quite a good example of a cluttered interface, one of the design pitfalls discussed in Chapter 6, “Designing for Reuse.” The string class is discussed in detail in Chapter 2.
Streams
Section titled “Streams”Input and output streams are not containers in the traditional sense because they do not store elements. However, they can be considered sequences of elements and as such share some characteristics with Standard Library containers. C++ streams do not provide any Standard Library–related member functions directly, but the Standard Library supplies special iterators called istream_iterator and ostream_iterator that allow you to “iterate” through input and output streams respectively. Chapter 17 explains how to use them.
bitset
Section titled “bitset”A bitset is a fixed-length abstraction of a sequence of bits. A bit can represent only two values, 1 and 0, which can be referred to as on/off, true/false, and so on. A bitset also uses the terminology set and unset. You can toggle or flip a bit from one value to the other.
A bitset is not a true Standard Library container: it’s of fixed size, it’s not parametrized on an element type, and it doesn’t support iteration. However, it’s a useful utility class, which is often lumped with the containers, so a brief introduction is provided here. Consult a Standard Library Reference for a thorough summary of the bitset operations.
bitset Basics
Section titled “bitset Basics”A bitset, defined in <bitset>, is parametrized on the number of bits it stores. The default constructor initializes all fields of a bitset to 0. An alternative constructor creates a bitset from a string of 0 and 1 characters.
You can adjust the value of individual bits with the set(), reset(), and flip() member functions, and you can access and set individual fields with an overloaded operator[]. Note that operator[] on a non-const object returns a proxy object to which you can assign a Boolean value, call flip(), or complement with operator~. You can also access individual fields with the test() member function. Bits are accessed using a zero-based index. Finally, you can convert a bitset to a string of 0 and 1 characters using to_string().
Here is a small example:
bitset<10> myBitset;
myBitset.set(3);myBitset.set(6);myBitset[8] = true;myBitset[9] = myBitset[3];
if (myBitset.test(3)) { println("Bit 3 is set!"); }println("{}", myBitset.to_string());
The output is as follows:
Bit 3 is set!1101001000Note that the leftmost character in the output string is the highest numbered bit. This corresponds to our intuitions about binary number representations, where the low-order bit representing 20 = 1 is the rightmost bit in the printed representation.
Bitwise Operators
Section titled “Bitwise Operators”In addition to the basic bit manipulation routines, a bitset provides implementations of all the bitwise operators: &, |, ^, ~, <<, >>, &=, |=, ^=, <<=, and >>=. They behave just as they would on a “real” sequence of bits. Here is an example:
auto str1 { "0011001100" };auto str2 { "0000111100" };bitset<10> bitsOne { str1 };bitset<10> bitsTwo { str2 };
auto bitsThree { bitsOne & bitsTwo };println("{}", bitsThree.to_string());bitsThree <<= 4;println("{}", bitsThree.to_string());
The output of the program is as follows:
00000011000011000000bitset Example: Representing Cable Channels
Section titled “bitset Example: Representing Cable Channels”One possible use of bitsets is tracking channels of cable subscribers. Each subscriber could have a bitset of channels associated with their subscription, with set bits representing the channels to which they actually subscribe. This system could also support “packages” of channels, also represented as bitsets, which represent commonly subscribed combinations of channels.
The following CableCompany class is a simple example of this model. It uses two maps, both mapping strings to bitsets. One stores the cable packages, while the other stores subscriber information.
export class CableCompany final{    public:        // Number of supported channels.        static constexpr std::size_t NumChannels { 10 };        // Adds package with the channels specified as a bitset to the database.        void addPackage(const std::string& packageName,            const std::bitset<NumChannels>& channels);        // Adds package with the channels specified as a string to the database.        void addPackage(const std::string& packageName,            const std::string& channels);        // Removes the specified package from the database.        void removePackage(const std::string& packageName);        // Retrieves the channels of a given package.        // Throws out_of_range if the package name is invalid.        const std::bitset<NumChannels>& getPackage(            const std::string& packageName) const;        // Adds customer to database with initial channels found in package.        // Throws out_of_range if the package name is invalid.        // Throws invalid_argument if the customer is already known.        void newCustomer(const std::string& name, const std::string& package);        // Adds customer to database with given initial channels.        // Throws invalid_argument if the customer is already known.        void newCustomer(const std::string& name,            const std::bitset<NumChannels>& channels);        // Adds the channel to the customer's profile.        // Throws invalid_argument if the customer is unknown.        void addChannel(const std::string& name, int channel);        // Removes the channel from the customer's profile.        // Throws invalid_argument if the customer is unknown.        void removeChannel(const std::string& name, int channel);        // Adds the specified package to the customer's profile.        // Throws out_of_range if the package name is invalid.        // Throws invalid_argument if the customer is unknown.        void addPackageToCustomer(const std::string& name,            const std::string& package);        // Removes the specified customer from the database.        void deleteCustomer(const std::string& name);        // Retrieves the channels to which a customer subscribes.        // Throws invalid_argument if the customer is unknown.        const std::bitset<NumChannels>& getCustomerChannels(            const std::string& name) const;    private:        // Retrieves the channels for a customer. (non-const)        // Throws invalid_argument if the customer is unknown.        std::bitset<NumChannels>& getCustomerChannelsHelper(            const std::string& name);
        using MapType = std::map<std::string, std::bitset<NumChannels>>;        MapType m_packages, m_customers;};
Here are the implementations of all member functions, with comments explaining the code:
void CableCompany::addPackage(const string& packageName,    const bitset<NumChannels>& channels){    m_packages.emplace(packageName, channels);}
void CableCompany::addPackage(const string& packageName, const string& channels){    addPackage(packageName, bitset<NumChannels> { channels });}
void CableCompany::removePackage(const string& packageName){    m_packages.erase(packageName);}
const bitset<CableCompany::NumChannels>& CableCompany::getPackage(    const string& packageName) const{    // Get an iterator to the specified package.    if (auto it { m_packages.find(packageName) }; it != end(m_packages)) {        // Found package. Note that 'it' is an iterator to a name/bitset pair.        // The bitset is the second field.        return it->second;    }    throw out_of_range { format("Invalid package '{}'.", packageName) };}
void CableCompany::newCustomer(const string& name, const string& package){    // Get the channels for the given package.    auto& packageChannels { getPackage(package) };    // Create the account with the bitset representing that package.    newCustomer(name, packageChannels);}
void CableCompany::newCustomer(const string& name,    const bitset<NumChannels>& channels){    // Add customer to the customers map.    if (auto [iter, success] { m_customers.emplace(name, channels) }; !success) {        // Customer was already in the database. Nothing changed.        throw invalid_argument { format("Duplicate customer '{}'.", name) };    }}
void CableCompany::addChannel(const string& name, int channel){    // Get the current channels for the customer.    auto& customerChannels { getCustomerChannelsHelper(name) };    // We found the customer; set the channel.    customerChannels.set(channel);}
void CableCompany::removeChannel(const string& name, int channel){    // Get the current channels for the customer.    auto& customerChannels { getCustomerChannelsHelper(name) };    // We found this customer; remove the channel.    customerChannels.reset(channel);}
void CableCompany::addPackageToCustomer(const string& name, const string& package){    // Get the channels for the given package.    auto& packageChannels { getPackage(package) };    // Get the current channels for the customer.    auto& customerChannels { getCustomerChannelsHelper(name) };    // Or-in the package to the customer's existing channels.    customerChannels |= packageChannels;}
void CableCompany::deleteCustomer(const string& name){    m_customers.erase(name);}
const bitset<CableCompany::NumChannels>& CableCompany::getCustomerChannels(    const string& name) const{    // Find an iterator to the customer.    if (auto it { m_customers.find(name) }; it != end(m_customers)) {        // Found customer. Note that 'it' is an iterator to a name/bitset pair.        // The bitset is the second field.        return it->second;    }    throw invalid_argument { format("Unknown customer '{}'.", name) };}
bitset<CableCompany::NumChannels>& CableCompany::getCustomerChannelsHelper(    const string& name){    // Forward to const getCustomerChannels() to avoid code duplication.    return const_cast<bitset<NumChannels>&>(getCustomerChannels(name));}
Finally, here is a simple program demonstrating how to use the CableCompany class:
CableCompany myCC;myCC.addPackage("basic",   "1111000000");myCC.addPackage("premium", "1111111111");myCC.addPackage("sports",  "0000100111");
myCC.newCustomer("Marc G.", "basic");myCC.addPackageToCustomer("Marc G.", "sports");println("{}", myCC.getCustomerChannels("Marc G.").to_string());
try { println("{}", myCC.getCustomerChannels("John").to_string()); }catch (const exception& e) { println("Error: {}", e.what()); }
The output is as follows:
1111100111Error: Unknown customer 'John'.SUMMARY
Section titled “SUMMARY”This chapter introduced the Standard Library containers. It also presented sample code illustrating a variety of uses for these containers. Ideally, you appreciate the power of vector, deque, list, forward_list, array, span, mdspan, stack, queue, priority_queue, map, multimap, set, multiset, unordered_map, unordered_multimap, unordered_set, unordered_multiset, flat_map, flat_multimap, flat_set, flat_multiset, string, and bitset. I recommend using these containers as much as possible instead of writing your own.
Before we can delve into the true power of the Standard Library with a discussion of its generic algorithms and how they work with the containers discussed in this chapter, we have to explain function pointers, function objects, and lambda expressions. Those are the topics of the next chapter.
EXERCISES
Section titled “EXERCISES”By solving the following exercises, you can practice the material discussed in this chapter. Solutions to all exercises are available with the code download on the book’s website at www.wiley.com/go/proc++6e. However, if you are stuck on an exercise, first reread parts of this chapter to try to find an answer yourself before looking at the solution from the website.
- Exercise 18-1: This exercise is to practice working with
vectors. Create a program containing avectorofints, calledvalues, initialized with the numbers 2 and 5. Next, implement the following operations:- Use
insert()to insert the numbers 3 and 4 at the correct place invalues. - Create a second
vectorofints initialized with 0 and 1, and then insert the contents of this newvectorat the beginning ofvalues. - Create a third
vectorofints. Loop over the elements ofvaluesin reverse, and insert them in this thirdvector. - Print the contents of the third
vectorusingprintln(). - Print the contents of the third
vectorusing a range-basedforloop.
- Use
- Exercise 18-2: Take your implementation of the
Personclass from Exercise 15-4. Add a new module calledphone_book, defining aPhoneBookclass that stores one or more phone numbers asstrings for a person. Provide member functions to add and remove person’s phone numbers to/from a phonebook. Also provide a member function that returns avectorwith all phone numbers for a given person. Test your implementation in yourmain()function. In your tests, use the user-defined person literal developed in Exercise 15-4. - Exercise 18-3: In Exercise 15-1 you developed your own
AssociativeArray. Modify the test code inmain()from that exercise to use one of the Standard Library containers instead. - Exercise 18-4: Write an
average()function (not a function template) to calculate the average of a sequence ofdoublevalues. Make sure it works with a sequence or subsequence from avectoror anarray. Test your code with both avectorand anarrayin yourmain()function. - Bonus exercise: Can you convert your
average()function into a function template? The function template should only be instantiatable with integral or floating-point types. What effect does it have on your test code inmain()?