Mastering Classes and Objects
Chapter 8, “Gaining Proficiency with Classes and Objects,” started the discussion on classes and objects. Now it’s time to master their subtleties so you can use them to their full potential. By reading this chapter, you will learn how to manipulate and exploit some of the most powerful aspects of the C++ language to write safe, effective, and useful classes.
Many of the concepts in this chapter arise in advanced C++ programming, especially in the C++ Standard Library. Let’s start the discussion with the concept of friends in the C++ world.
FRIENDS
Section titled “FRIENDS”C++ allows classes to declare that other classes, member functions of other classes, or non-member functions are friends, and can access protected and private data members and member functions. For example, suppose you have two classes called Foo and Bar. You can specify that the Bar class is a friend of Foo as follows:
class Foo{ friend class Bar; // …};Now all the member functions of Bar can access the private and protected data members and member functions of Foo.
If you only want to make a specific member function of Bar a friend, you can do that as well. Suppose the Bar class has a member function processFoo(const Foo&). The following syntax is used to make this member function a friend of Foo:
class Foo{ friend void Bar::processFoo(const Foo&); // …};Stand-alone functions can also be friends of classes. You might, for example, want to write a function that prints all data of a Foo object to the console. You might want this function to be outside the Foo class because printing is not core functionality of Foo, but the function should be able to access the internal data members of the object to print them all. Here is the Foo class definition with printFoo() as a friend:
class Foo{ friend void printFoo(const Foo&); // …};The friend declaration in the class serves as the function’s prototype. There’s no need to write the prototype elsewhere (although it’s harmless to do so).
Here is the function definition:
void printFoo(const Foo& foo){ // Print all data of foo to the console, including // private and protected data members.}You write this function outside the class definition just like any other function, except that you can directly access private and protected members of Foo. You don’t repeat the friend keyword in the function definition.
Note that a class needs to know which other classes, member functions, or functions want to be its friends; a class, member function, or function cannot declare itself to be a friend of some other class to gain access to non-public members of that class.
friend classes and functions are easy to abuse; they allow you to violate the principle of encapsulation by exposing internals of your class to other classes or functions. Thus, you should use them only in limited circumstances. Some use cases are shown throughout this chapter.
DYNAMIC MEMORY ALLOCATION IN OBJECTS
Section titled “DYNAMIC MEMORY ALLOCATION IN OBJECTS”Sometimes you don’t know how much memory you will need before your program actually runs. As you read in Chapter 7, “Memory Management,” the solution is to dynamically allocate as much space as you need during program execution. Classes are no exception. Sometimes you don’t know how much memory an object will need when you write the class. In that case, the object should dynamically allocate memory. Dynamically allocated memory in objects provides several challenges, including freeing the memory, handling object copying, and handling object assignment.
The Spreadsheet Class
Section titled “The Spreadsheet Class”Chapter 8 introduces the SpreadsheetCell class. This chapter moves on to write the Spreadsheet class. As with the SpreadsheetCell class, the Spreadsheet class evolves throughout this chapter. Thus, the various attempts do not always illustrate the best way to do every aspect of class writing.
To start, a Spreadsheet is simply a two-dimensional array of SpreadsheetCells, with member functions to set and retrieve cells at specific locations in the Spreadsheet. Although most spreadsheet applications use letters in one direction and numbers in the other to refer to cells, this Spreadsheet uses numbers in both directions.
The first line of the Spreadsheet.cppm module interface file defines the name of the module:
export module spreadsheet;The Spreadsheet class needs access to the SpreadsheetCell class, so it needs to import the spreadsheet_cell module. Additionally, to make the SpreadsheetCell class visible to users of the spreadsheet module, the spreadsheet_cell module is imported and exported with the following funny-looking syntax:
export import spreadsheet_cell;The Spreadsheet class uses the std::size_t type, which is defined in the C header called <cstddef>. You can get access to it with the following import:
import std;Finally, here is a first attempt at a definition of the Spreadsheet class:
export class Spreadsheet{ public: Spreadsheet(std::size_t width, std::size_t height); void setCellAt(std::size_t x, std::size_t y, const SpreadsheetCell& cell); SpreadsheetCell& getCellAt(std::size_t x, std::size_t y); private: bool inRange(std::size_t value, std::size_t upper) const; std::size_t m_width { 0 }; std::size_t m_height { 0 }; SpreadsheetCell** m_cells { nullptr };};Note that the Spreadsheet class does not contain a standard two-dimensional array of SpreadsheetCells. Instead, it contains a SpreadsheetCell** data member, which is a pointer to a pointer representing an array of arrays. This is because each Spreadsheet object might have different dimensions, so the constructor of the class must dynamically allocate the two-dimensional array based on the client-specified height and width.
To dynamically allocate a two-dimensional array, you need to write the following code. Note that in C++, unlike in Java, it’s not possible to simply write new SpreadsheetCell[m_width][m_height].
Spreadsheet::Spreadsheet(size_t width, size_t height) : m_width { width }, m_height { height }{ m_cells = new SpreadsheetCell*[m_width]; for (size_t i { 0 }; i < m_width; ++i) { m_cells[i] = new SpreadsheetCell[m_height]; }}Figure 9.1 shows the resulting memory layout for a Spreadsheet called s1 on the stack with width 4 and height 3.
The implementations of the inRange() and the set and retrieval member functions are straightforward:
bool Spreadsheet::inRange(size_t value, size_t upper) const{    return value < upper;}
void Spreadsheet::setCellAt(size_t x, size_t y, const SpreadsheetCell& cell){    if (!inRange(x, m_width)) {        throw out_of_range {            format("x ({}) must be less than width ({}).", x, m_width) };    }    if (!inRange(y, m_height)) {        throw out_of_range {            format("y ({}) must be less than height ({}).", y, m_height) };    }    m_cells[x][y] = cell;}
SpreadsheetCell& Spreadsheet::getCellAt(size_t x, size_t y){    if (!inRange(x, m_width)) {        throw out_of_range {            format("x ({}) must be less than width ({}).", x, m_width) };    }    if (!inRange(y, m_height)) {        throw out_of_range {            format("y ({}) must be less than height ({}).", y, m_height) };    }    return m_cells[x][y];}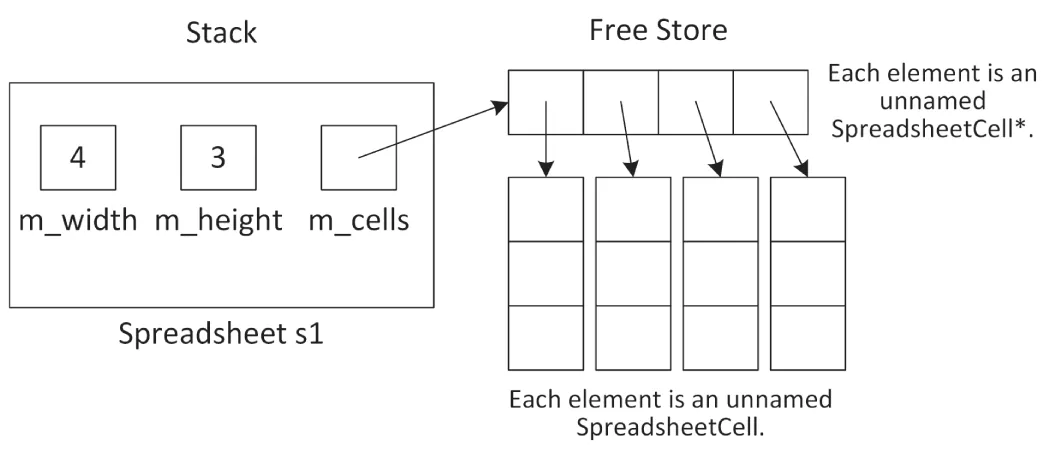
[^FIGURE 9.1]
setCellAt() and getCellAt() both use a helper function called inRange() to check that x and y represent valid coordinates in the spreadsheet. Attempting to access an array element at an out-of-range index will cause the program to malfunction. This example uses exceptions, which are introduced in Chapter 1, “A Crash Course in C++ and the Standard Library,” and described in detail in Chapter 14, “Handling Errors.”
If you look at the setCellAt() and getCellAt() implementations, you see there is some clear code duplication. Chapter 6, “Designing for Reuse,” explains that code duplication should be avoided at all costs. So, let’s follow that guideline. Instead of a helper function called inRange(), let’s define the following verifyCoordinate() member function:
void verifyCoordinate(std::size_t x, std::size_t y) const;The implementation checks the given coordinate and throws an exception if the coordinate is invalid:
void Spreadsheet::verifyCoordinate(size_t x, size_t y) const{ if (x>= m_width) { throw out_of_range { format("x ({}) must be less than width ({}).", x, m_width) }; } if (y>= m_height) { throw out_of_range { format("y ({}) must be less than height ({}).", y, m_height) }; }}The setCellAt() and getCellAt() implementations can now be simplified:
void Spreadsheet::setCellAt(size_t x, size_t y, const SpreadsheetCell& cell){    verifyCoordinate(x, y);    m_cells[x][y] = cell;}
SpreadsheetCell& Spreadsheet::getCellAt(size_t x, size_t y){    verifyCoordinate(x, y);    return m_cells[x][y];}
Freeing Memory with Destructors
Section titled “Freeing Memory with Destructors”Whenever you are finished with dynamically allocated memory, you should free it. If you dynamically allocate memory in an object, the place to free that memory is in the destructor. The compiler guarantees that the destructor is called when the object is destroyed. The following is the destructor added to the Spreadsheet class definition:
export class Spreadsheet{ public: Spreadsheet(std::size_t width, std::size_t height); ~Spreadsheet(); // Code omitted for brevity};The destructor has the same name as the name of the class (and of the constructors), preceded by a tilde (~). The destructor takes no arguments, and there can be only one of them. Destructors should never throw any exceptions for reasons explained in detail in Chapter 14.
Here is the implementation of the Spreadsheet class destructor:
Spreadsheet::˜Spreadsheet(){ for (size_t i { 0 }; i < m_width; ++i) { delete[] m_cells[i]; } delete[] m_cells; m_cells = nullptr;}This destructor frees the memory that was allocated in the constructor. However, no rule requires you to free memory in the destructor. You can write whatever code you want in the destructor, but it is generally a good idea to use it only for freeing memory or disposing of other resources.
Handling Copying and Assignment
Section titled “Handling Copying and Assignment”Recall from Chapter 8 that if you don’t write a copy constructor and a copy assignment operator yourself, C++ writes them for you. These compiler-generated member functions recursively call the copy constructor or copy assignment operator on object data members. However, for primitives, such as int, double, and pointers, they provide shallow or bitwise copying or assignment: they just copy or assign the data members from the source object directly to the destination object. That presents problems when you dynamically allocate memory in your object. For example, the following code copies the spreadsheet s1 to initialize s when s1 is passed to the printSpreadsheet() function:
import spreadsheet;
void printSpreadsheet(Spreadsheet s) { /* Code omitted for brevity. */ }
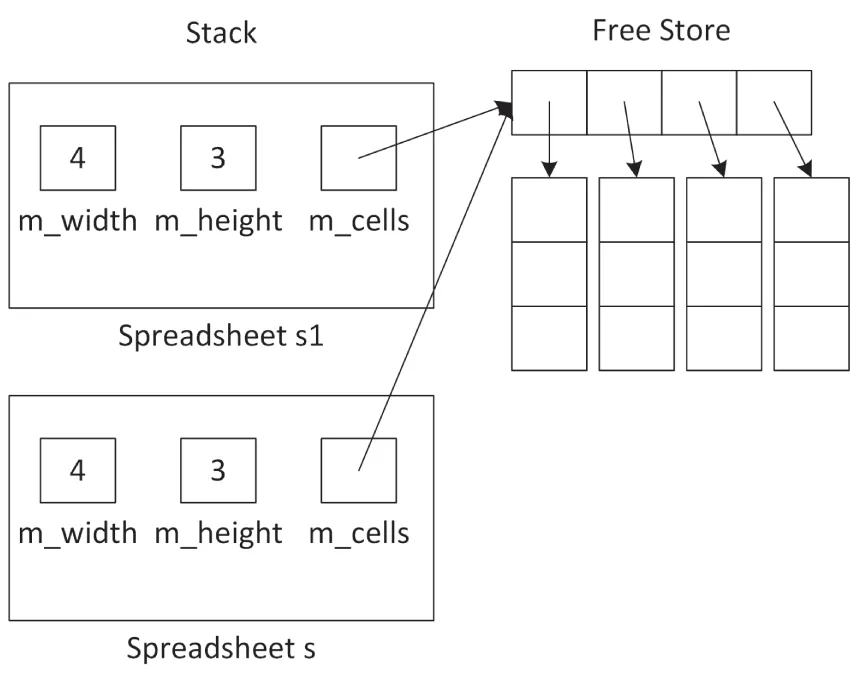
int main(){ Spreadsheet s1 { 4, 3 }; printSpreadsheet(s1);}The Spreadsheet contains one pointer variable: m_cells. A shallow copy of a Spreadsheet gives the destination object a copy of the m_cells pointer, but not a copy of the underlying data. Thus, you end up with a situation where both s and s1 have a pointer to the same data, as shown in Figure 9.2.
[^FIGURE 9.2]
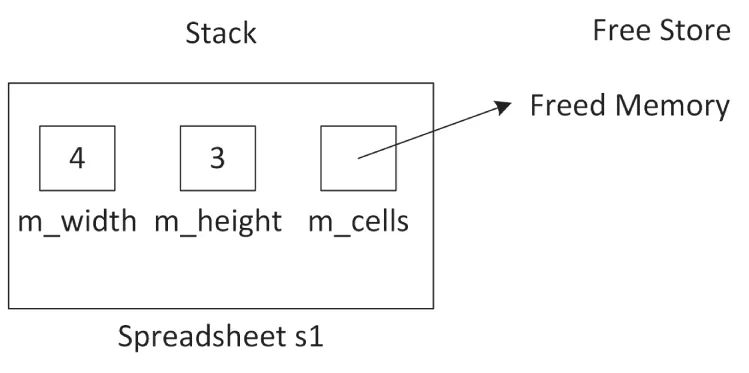
If s changes something to which m_cells points, that change shows up in s1 as well. Even worse, when the printSpreadsheet() function exits, s’s destructor is called, which frees the memory pointed to by m_cells. That leaves the situation where m_cells in s1 no longer points to valid memory, as shown in Figure 9.3. This is called a dangling pointer.
[^FIGURE 9.3]
Unbelievably, the problem is even worse with assignment. Suppose that you have the following code:
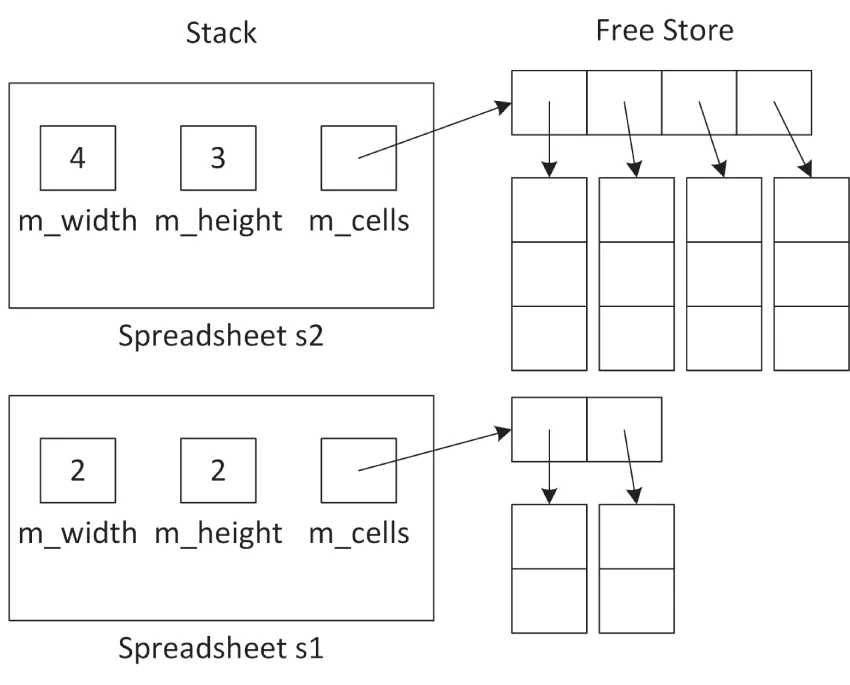
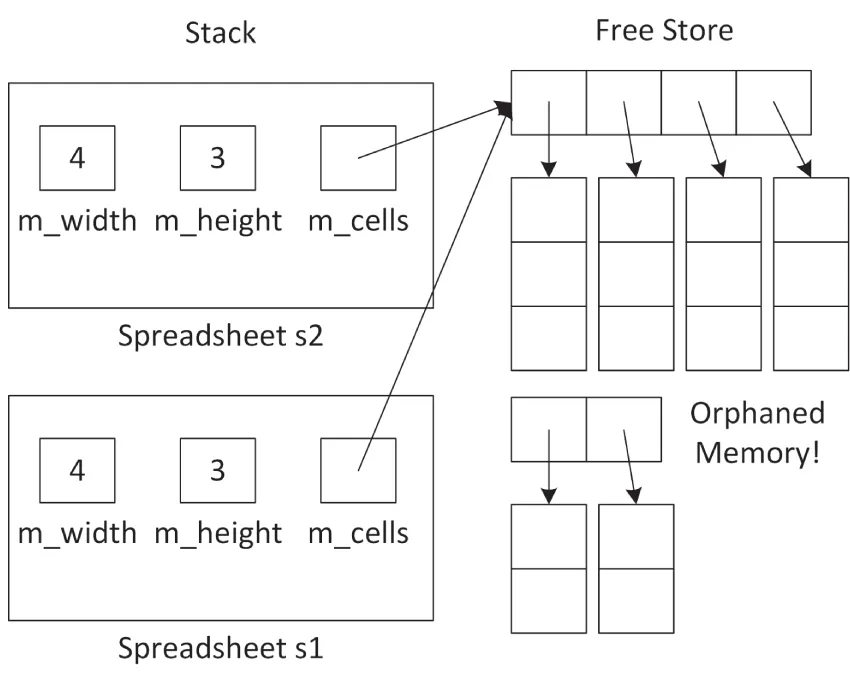
Spreadsheet s1 { 2, 2 }, s2 { 4, 3 };s1 = s2;After the first line, when both the s1 and s2 Spreadsheet objects are constructed, you have the memory layout shown in Figure 9.4.
[^FIGURE 9.4]
After the assignment statement, you have the layout shown in Figure 9.5.
Now, not only do the m_cells pointers in s1 and s2 point to the same memory, but you have also orphaned the memory to which m_cells in s1 previously pointed to. This is called a memory leak.
It should be clear by now that copy constructors and copy assignment operators must do a deep copy; that is, they must not just copy pointer data members, but must copy the actual data to which such pointers point to.
As you can see, relying on C++‘s default copy constructor and default copy assignment operator is not always a good idea.
Whenever you have dynamically allocated resources in a class, you should write your own copy constructor and copy assignment operator to provide a deep copy of the memory.
[^FIGURE 9.5]
The Spreadsheet Copy Constructor
Section titled “The Spreadsheet Copy Constructor”Here is a declaration for a copy constructor in the Spreadsheet class:
export class Spreadsheet{ public: Spreadsheet(const Spreadsheet& src); // Code omitted for brevity};The definition is as follows:
Spreadsheet::Spreadsheet(const Spreadsheet& src) : Spreadsheet { src.m_width, src.m_height }{ for (size_t i { 0 }; i < m_width; ++i) { for (size_t j { 0 }; j < m_height; ++j) { m_cells[i][j] = src.m_cells[i][j]; } }}Note the use of a delegating constructor. The ctor-initializer of this copy constructor delegates first to the non-copy constructor to allocate the proper amount of memory. The body of the copy constructor then copies the actual values. Together, this process implements a deep copy of the m_cells dynamically-allocated two-dimensional array.
There is no need to delete any existing m_cells because this is a copy constructor, and therefore there is no existing m_cells yet in this object.
The Spreadsheet Assignment Operator
Section titled “The Spreadsheet Assignment Operator”The following shows the Spreadsheet class definition with an assignment operator:
export class Spreadsheet{ public: Spreadsheet& operator=(const Spreadsheet& rhs); // Code omitted for brevity};A naïve implementation could be as follows:
Spreadsheet& Spreadsheet::operator=(const Spreadsheet& rhs){    // Check for self-assignment    if (this == &rhs) {        return *this;    }
    // Free the old memory    for (size_t i { 0 }; i < m_width; ++i) {        delete[] m_cells[i];    }    delete[] m_cells;    m_cells = nullptr;
    // Allocate new memory    m_width = rhs.m_width;    m_height = rhs.m_height;
    m_cells = new SpreadsheetCell*[m_width];    for (size_t i { 0 }; i < m_width; ++i) {        m_cells[i] = new SpreadsheetCell[m_height];    }
    // Copy the data    for (size_t i { 0 }; i < m_width; ++i) {        for (size_t j { 0 }; j < m_height; ++j) {            m_cells[i][j] = rhs.m_cells[i][j];        }    }
    return *this;}
The code first checks for self-assignment, then frees the current memory of the this object, allocates new memory, and finally copies the individual elements. There is a lot going on in this function, and a lot can go wrong! It is possible that the this object gets into an invalid state.
For example, suppose that the memory is successfully freed, that m_width and m_height are properly set, but that an exception is thrown in the loop that is allocating the memory. When that happens, execution of the remainder of the function is skipped, and the function is exited. Now the Spreadsheet instance is corrupt; its m_width and m_height data members state a certain size, but the m_cells data member does not point to the right amount of memory. Basically, this code is not exception-safe!
What we need is an all-or-nothing mechanism; either everything succeeds or the this object remains untouched. To implement such an exception-safe assignment operator, the copy-and-swap idiom is used. For this, a swap() member function is added to the Spreadsheet class. Additionally, it’s recommended to provide a non-member swap() function so that it can also be used by various Standard Library algorithms. Here is the definition of the Spreadsheet class with an assignment operator, and the swap() member function and non-member function:
export class Spreadsheet{ public: Spreadsheet& operator=(const Spreadsheet& rhs); void swap(Spreadsheet& other) noexcept; // Code omitted for brevity};export void swap(Spreadsheet& first, Spreadsheet& second) noexcept;A requirement for implementing the exception-safe copy-and-swap idiom is that swap() never throws any exceptions, so it is marked as noexcept.
The implementation of the swap() member function swaps each data member using the std::swap() utility function provided by the Standard Library in <utility>, which efficiently swaps two values:
void Spreadsheet::swap(Spreadsheet& other) noexcept{ std::swap(m_width, other.m_width); std::swap(m_height, other.m_height); std::swap(m_cells, other.m_cells);}The non-member swap() function simply forwards to the swap() member function:
void swap(Spreadsheet& first, Spreadsheet& second) noexcept{ first.swap(second);}Now that we have an exception-safe swap(), it can be used to implement the assignment operator:
Spreadsheet& Spreadsheet::operator=(const Spreadsheet& rhs){ Spreadsheet temp { rhs }; // Do all the work in a temporary instance swap(temp); // Commit the work with only non-throwing operations return *this;}The implementation uses the copy-and-swap idiom. First, a copy of the right-hand side is made, called temp. Then the current object is swapped with this copy. This pattern is the recommended way of implementing assignment operators because it guarantees strong exception safety, meaning that if any exception occurs, then the state of the current Spreadsheet object remains unchanged. The idiom is implemented in three phases:
- The first phase makes a temporary copy. This does not modify the state of the current
Spreadsheetobject, and so there is no problem if an exception is thrown during this phase. - The second phase uses the
swap()function to swap the created temporary copy with the current object. Theswap()function shall never throw exceptions. - The third phase is the destruction of the temporary object, which now contains the original object (because of the swap), to clean up any memory.
When you do not use the copy-and-swap idiom for implementing an assignment operator, then for efficiency and sometimes also for correctness, the first line of code in an assignment operator usually checks for self-assignment. Here’s an example:
Spreadsheet& Spreadsheet::operator=(const Spreadsheet& rhs){ // Check for self-assignment if (this == &rhs) { return *this; } // … return *this;}With the copy-and-swap idiom, such a self-assignment test is not needed.
When implementing an assignment operator, use the copy-and-swap idiom to avoid code duplication and to guarantee strong exception safety.
Disallowing Assignment and Pass-by-Value
Section titled “Disallowing Assignment and Pass-by-Value”Sometimes when you dynamically allocate memory in your class, it’s easiest just to prevent anyone from copying or assigning to your objects. You can do this by explicitly deleting your operator= and copy constructor. That way, if anyone tries to pass the object by value, return it from a function, or assign to it, the compiler will complain. Here is a Spreadsheet class definition that prevents assignment and pass-by-value:
export class Spreadsheet{ public: Spreadsheet(std::size_t width, std::size_t height); Spreadsheet(const Spreadsheet& src) = delete; ˜Spreadsheet(); Spreadsheet& operator=(const Spreadsheet& rhs) = delete; // Code omitted for brevity};You don’t provide implementations for deleted member functions. The linker will never look for them because the compiler won’t allow code to call them. When you now write code to copy or assign to a Spreadsheet object, the compiler will complain with a message like this:
'Spreadsheet &Spreadsheet::operator =(const Spreadsheet &)': attempting to reference a deleted functionHandling Moving with Move Semantics
Section titled “Handling Moving with Move Semantics”Move semantics for classes requires a move constructor and a move assignment operator. These can be used by the compiler when the source object is a temporary object that will be destroyed after the operation is finished or, as you will see, explicitly when using std::move(). Moving moves ownership of memory and other resources from one object to another object. It basically does a shallow copy of data members combined with switching ownership of allocated memory and other resources to prevent dangling pointers or resources and to prevent memory leaks.
Both the move constructor and the move assignment operator move the data members from a source object to a new object, leaving the source object in some valid but otherwise indeterminate state. Often, data members of the source object are reset to “null” values, but this is not a strict requirement. I do recommend, however, that you make sure your source objects are in a clearly defined empty state after a move operation. To be safe, never use any objects that have been moved from, as this could trigger undefined behavior. Some notable exceptions from the Standard Library are std::unique_ptr and shared_ptr. The Standard Library explicitly states that these smart pointers must reset their internal pointer to nullptr when moving from them, which makes it safe to reuse such smart pointers after a move operation.
Before you can implement move semantics, you need to learn about rvalues and rvalue references.
Rvalue References
Section titled “Rvalue References”In C++, an lvalue is something of which you can take an address, for example, a named variable. The name comes from the fact that lvalues can appear on the left-hand side of an assignment. An rvalue, on the other hand, is anything that is not an lvalue, such as a literal, or a temporary object or value.1 Typically, an rvalue is on the right-hand side of an assignment operator. For example, take the following statement:
int a { 4 * 2 };In this statement, a is an lvalue, it has a name, and you can take the address of it with &a. The result of the expression 4*2, on the other hand, is an rvalue. It is a temporary value that is destroyed when the statement finishes execution. In this example, a copy of this temporary value is stored in the variable with name a.
If a function returns something by value, the result of calling that function is an rvalue, a temporary. If the function returns a reference-to-non-const, then the result of calling the function is an lvalue, as you will be able to use the result on the left-hand side of an assignment.
An rvalue reference is a reference to an rvalue. In particular, it is a concept that is applied when the rvalue is a temporary object or an object that is explicitly moved using std::move(), explained later in this section. The purpose of an rvalue reference is to make it possible for a particular function overload to be chosen when an rvalue is involved. This allows certain operations that normally involve copying large values to instead copy pointers to those values.
A function can specify an rvalue reference parameter by using && as part of the parameter specification, for example, type&& name. Normally, a temporary object will be seen as a const type&, but when there is a function overload that uses an rvalue reference, a temporary object can be resolved to that overload. The following example demonstrates this. The code first defines two handleMessage() functions, one accepting an lvalue reference and one accepting an rvalue reference:
void handleMessage(string& message) // lvalue reference parameter{    println("handleMessage with lvalue reference: {}", message);}
void handleMessage(string&& message) // rvalue reference parameter{    println("handleMessage with rvalue reference: {}", message);}
You can call handleMessage() with a named variable as an argument:
string a { "Hello " };handleMessage(a); // Calls handleMessage(string& value)Because a is a named variable, the handleMessage() function accepting an lvalue reference is called. Any changes handleMessage() does through its reference parameter will change the value of a.
You can also call handleMessage() with an expression as an argument:
string b { "World" };handleMessage(a + b); // Calls handleMessage(string&& value)The handleMessage() function accepting an lvalue reference cannot be used, because the expression a + b results in a temporary, which is not an lvalue. In this case, the rvalue reference overload is called. Because the argument is a temporary, any changes handleMessage() does through its reference parameter will be lost after the call returns.
A literal can also be used as argument to handleMessage(). This also triggers a call to the rvalue reference overload because a literal cannot be an lvalue (though a literal can be passed as argument to a reference-to-const parameter):
handleMessage("Hello World"); // Calls handleMessage(string&& value)If you remove the handleMessage() function accepting an lvalue reference, calling handleMessage() with a named variable like handleMessage(b) will result in a compilation error because an rvalue reference parameter (string&&) will never be bound to an lvalue (b). You can force the compiler to call the rvalue reference overload of handleMessage() by using std::move(). The only thing move() does is cast an lvalue to an rvalue reference; that is, it does not do any actual moving. However, by returning an rvalue reference, it allows the compiler to find an overload of handleMessage() accepting an rvalue reference, which can then perform the moving. Here is an example of using move():
handleMessage(std::move(b)); // Calls handleMessage(string&& value)As I said before, but it’s worth repeating, a named variable is an lvalue. So, inside the handleMessage(string&& message) function, the message rvalue reference parameter itself is an lvalue because it has a name! If you want to forward this rvalue reference parameter to another function as an rvalue, then you need to use std::move() to cast the lvalue to an rvalue reference. For example, suppose you add the following function with an rvalue reference parameter:
void helper(string&& message) { }Calling it as follows does not compile:
void handleMessage(string&& message) { helper(message); }The helper() function needs an rvalue reference, while handleMessage() passes message, which has a name, so it’s an lvalue, causing a compilation error. Here is the correct way using std::move():
void handleMessage(string&& message) { helper(std::move(message)); }A named rvalue reference, such as an rvalue reference parameter, itself is an lvalue because it has a name!
Rvalue references are not limited to parameters of functions. You can declare a variable of an rvalue reference type and assign to it, although this usage is uncommon. Consider the following code, which is illegal in C++:
int& i { 2 }; // Invalid: reference to a constantint a { 2 }, b { 3 };int& j { a + b }; // Invalid: reference to a temporaryUsing rvalue references, the following is perfectly legal:
int&& i { 2 };int a { 2 }, b { 3 };int&& j { a + b };However, such stand-alone rvalue references are rarely used in this way.
Section titled “ Decay Copy”If you have an object x, writing “auto y{x}” creates a copy of x and gives it a name y; thus, it is an lvalue.
C++23 introduces the auto(x) or auto{x} syntax to create a copy of an object x as an rvalue, not an lvalue.
As an example, assume you have only the rvalue reference handleMessage(string&&) function from the previous section, not the lvalue reference overload. You know that the following won’t work in that case:
string value { "Hello " };handleMessage(value); // ErrorYou could use std::move(), as in:
handleMessage(std::move(value));But, after this operation, you should not use the value object any longer, as it might have been moved.
Using C++23 decay-copy syntax, you can write:
handleMessage(auto { value });This makes a temporary copy of object value as an rvalue and passes that rvalue to handleMessage(). If handleMessage() moves from the copy, the original object, value, is retained and not impacted
Implementing Move Semantics
Section titled “Implementing Move Semantics”Move semantics is implemented using rvalue references. To add move semantics to a class, you need to implement a move constructor and a move assignment operator. Move constructors and move assignment operators should be marked with the noexcept specifier to tell the compiler that they don’t throw any exceptions. This is particularly important for compatibility with the Standard Library, as fully compliant implementations of, for example, the Standard Library containers will only move stored objects if, having move semantics implemented, they also guarantee not to throw. This is done to be able to provide strong exception safety.
The following is the Spreadsheet class definition with a move constructor and move assignment operator. Two helper member functions are introduced as well: cleanup(), which is used from the destructor and the move assignment operator, and moveFrom(), which moves the data members from a source to a destination and then resets the source object.
export class Spreadsheet{ public: Spreadsheet(Spreadsheet&& src) noexcept; // Move constructor Spreadsheet& operator=(Spreadsheet&& rhs) noexcept; // Move assignment // Remaining code omitted for brevity private: void cleanup() noexcept; void moveFrom(Spreadsheet& src) noexcept; // Remaining code omitted for brevity};The implementations are as follows:
void Spreadsheet::cleanup() noexcept{    for (size_t i { 0 }; i < m_width; ++i) {        delete[] m_cells[i];    }    delete[] m_cells;    m_cells = nullptr;    m_width = m_height = 0;}
void Spreadsheet::moveFrom(Spreadsheet& src) noexcept{    // Shallow copy of data    m_width = src.m_width;    m_height = src.m_height;    m_cells = src.m_cells;
    // Reset the source object, because ownership has been moved!    src.m_width = 0;    src.m_height = 0;    src.m_cells = nullptr;}
// Move constructorSpreadsheet::Spreadsheet(Spreadsheet&& src) noexcept{    moveFrom(src);}
// Move assignment operatorSpreadsheet& Spreadsheet::operator=(Spreadsheet&& rhs) noexcept{    // Check for self-assignment    if (this == &rhs) {        return *this;    }
    // Free the old memory and move ownership    cleanup();    moveFrom(rhs);    return *this;}
Both the move constructor and the move assignment operator are moving ownership of the memory for m_cells from a source object to a new object. They reset the m_cells pointer of the source object to a null pointer and set m_width and m_height of the source object to zero to prevent the source object’s destructor from deallocating any memory because the new object is now the owner of it.
Obviously, move semantics is useful only when you know that the source object is not needed anymore.
Note that this implementation includes a self-assignment test in the move assignment operator. Depending on your class and depending on how you are moving one instance of your class to another instance, this self-assignment test might not always be necessary. However, you should always include it, just as the C++ Core Guidelines recommend,2 to make sure that code as follows never causes a crash at run time:
sheet1 = std::move(sheet1);Move constructors and move assignment operators can be explicitly deleted or defaulted, just like copy constructors and copy assignment operators, as explained in Chapter 8.
The compiler automatically generates a default move constructor for a class if and only if the class has no user-declared copy constructor, copy assignment operator, move assignment operator, or destructor. A default move assignment operator is generated for a class if and only if the class has no user-declared copy constructor, move constructor, copy assignment operator, or destructor.
When you declare one or more of the special member functions (destructor, copy constructor, move constructor, copy assignment operator, and move assignment operator), then it’s recommended to declare all of them. This is called the rule of five. You either provide explicit implementations for them or explicitly default (=default) or delete (=delete) them.
Using std::exchange
Section titled “Using std::exchange”You can use std::exchange(), defined in <utility>, to replace a value with a new value and return the old value, as in this example:
int a { 11 };int b { 22 };println("Before exchange(): a = {}, b = {}", a, b);int returnedValue { exchange(a, b) };println("After exchange(): a = {}, b = {}", a, b);println("exchange() returned: {}", returnedValue);The output is as follows:
Before exchange(): a = 11, b = 22After exchange(): a = 22, b = 22exchange() returned: 11The exchange() function is useful in implementing move assignment operators. A move assignment operator needs to move the data from a source object to a destination object, after which the data in the source object is usually nullified. In the previous section, this is done as follows:
void Spreadsheet::moveFrom(Spreadsheet& src) noexcept{    // Shallow copy of data    m_width = src.m_width;    m_height = src.m_height;    m_cells = src.m_cells;
    // Reset the source object, because ownership has been moved!    src.m_width = 0;    src.m_height = 0;    src.m_cells = nullptr;}
This member function copies the m_width, m_height, and m_cells data members from the source object and then sets them to either 0 or nullptr, because ownership has been moved. With exchange() this can be written more compactly as follows:
void Spreadsheet::moveFrom(Spreadsheet& src) noexcept{ m_width = exchange(src.m_width, 0); m_height = exchange(src.m_height, 0); m_cells = exchange(src.m_cells, nullptr);}Moving Object Data Members
Section titled “Moving Object Data Members”The moveFrom() member function uses direct assignments of the three data members because they are primitive types. If your object contains other objects as data members, then you should move these objects using std::move(). Suppose the Spreadsheet class has an std::string data member called m_name. The moveFrom() member function should then be implemented as follows:
void Spreadsheet::moveFrom(Spreadsheet& src) noexcept{    // Move object data members    m_name = std::move(src.m_name);
    // Move primitives:    m_width = exchange(src.m_width, 0);    m_height = exchange(src.m_height, 0);    m_cells = exchange(src.m_cells, nullptr);}
Move Constructor and Move Assignment Operator in Terms of Swap
Section titled “Move Constructor and Move Assignment Operator in Terms of Swap”The previous implementation of the move constructor and the move assignment operator both use the moveFrom() helper function, which moves all data members by performing shallow copies. With this implementation, if you add a new data member to the Spreadsheet class, you have to modify both the swap() function and the moveFrom() function. If you forget to update one of them, you introduce a bug. To avoid such bugs, you can write the move constructor and the move assignment operator in terms of the swap() function.
First, the cleanup() and moveFrom() helper functions can be removed. The code from the cleanup() function is moved to the destructor. The move constructor and move assignment operator can then be implemented as follows:
Spreadsheet::Spreadsheet(Spreadsheet&& src) noexcept{    swap(src);}
Spreadsheet& Spreadsheet::operator=(Spreadsheet&& rhs) noexcept{    auto moved { std::move(rhs) }; // Move rhs into moved (noexcept)    swap(moved); // Commit the work with only non-throwing operations    return *this;}
The move constructor simply swaps the default constructed *this with the given source object. The move assignment operator uses the move-and-swap idiom, which is similar to the copy-and-swap idiom discussed before.
The Spreadsheet move assignment operator could also be implemented as follows:
Spreadsheet& Spreadsheet::operator=(Spreadsheet&& rhs) noexcept{ swap(rhs); return *this;}However, doing so does not guarantee that the contents of this is immediately cleaned up. Instead, the contents of this escapes through rhs to the caller of the move assignment operator and thus might stay alive longer than expected.
Testing the Spreadsheet Move Operations
Section titled “Testing the Spreadsheet Move Operations”The Spreadsheet move constructor and move assignment operator can be tested with the following code:
Spreadsheet createObject(){    return Spreadsheet { 3, 2 };}
int main(){    vector<Spreadsheet> vec;    for (size_t i { 0 }; i < 2; ++i) {        println("Iteration {}", i);        vec.push_back(Spreadsheet { 100, 100 });        println("");    }
    Spreadsheet s { 2, 3 };    s = createObject();
    println("");
    Spreadsheet s2 { 5, 6 };    s2 = s;}
Chapter 1 introduces the vector. A vector grows dynamically in size to accommodate new objects. This is done by allocating a bigger chunk of memory and then copying or moving the objects from the old vector to the new and bigger vector. If the compiler finds a noexcept move constructor, the objects are moved instead of copied. Because they are moved, there is no need for any deep copying, making it much more efficient.
After adding print statements to all constructors and assignment operators of the Spreadsheet class, the output of the preceding test program can be as follows. The numbers to the right of each line are not part of the actual output but added in this text to make it easier to refer to specific lines in the discussion that follows. This output and the following discussion are based on the version of the Spreadsheet class using the move-and-swap idiom to implement its move operations, and on the Microsoft Visual C++ 2022 compiler for a release build of the code. The C++ standard does not specify the initial capacity of a vector nor its growth strategy, so the output can be different on different compilers.
Iteration 0Normal constructor         (1)Move constructor           (2)
Iteration 1Normal constructor         (3)Move constructor           (4)Move constructor           (5)
Normal constructor         (6)Normal constructor         (7)Move assignment operator   (8)Move constructor           (9)
Normal constructor        (10)Copy assignment operator  (11)Normal constructor        (12)Copy constructor          (13)
On the first iteration of the loop, the vector is still empty. Take the following line of code from the loop:
vec.push_back(Spreadsheet { 100, 100 });With this line, a new Spreadsheet object is created, invoking the normal constructor (1). The vector resizes itself to make space for the new object being pushed in. The created Spreadsheet object is then moved into the vector, invoking the move constructor (2).
On the second iteration of the loop, a second Spreadsheet object is created with the normal constructor (3). At this point, the vector can hold one element, so it’s again resized to make space for a second object. Because the vector is resized, the previously added elements need to be moved from the old vector to the new and bigger vector. This triggers a call to the move constructor for each previously added element. There is one element in the vector, so the move constructor is called one time (4). Finally, the new Spreadsheet object is moved into the vector with its move constructor (5).
Next, a Spreadsheet object s is created using the normal constructor (6). The createObject() function creates a temporary Spreadsheet object with its normal constructor (7), which is then returned from the function and assigned to the variable s. Because the temporary object returned from createObject() ceases to exist after the assignment, the compiler invokes the move assignment operator (8) instead of the copy assignment operator. The move assignment operator uses the move-and-swap idiom, so it delegates work to the move constructor (9).
Another Spreadsheet object is created, s2, using the normal constructor (10). The assignment s2 = s invokes the copy assignment operator (11) because the right-hand side object is not a temporary object, but a named object. This copy assignment operator uses the copy-and-swap idiom, which creates a temporary copy, triggering a call to the copy constructor, which first delegates to the normal constructor (12 and 13).
If the Spreadsheet class did not implement move semantics, all the calls to the move constructor and move assignment operator would be replaced with calls to the copy constructor and copy assignment operator. In the previous example, the Spreadsheet objects in the loop have 10,000 (100 × 100) elements. The implementations of the Spreadsheet move constructor and move assignment operator don’t require any memory allocation, while the copy constructor and copy assignment operator require 101 allocations each. So, using move semantics can increase performance a lot in certain situations.
Implementing a Swap Function with Move Semantics
Section titled “Implementing a Swap Function with Move Semantics”As another example where move semantics increases performance, take a swap() function that swaps two Objects. The following swapCopy() implementation does not use move semantics:
void swapCopy(Object& a, Object& b){ Object temp { a }; a = b; b = temp;}First, a is copied to temp, then b is copied to a, and finally temp is copied to b. This implementation will hurt performance if Object is expensive to copy. With move semantics, the implementation can avoid all copying:
void swapMove(Object& a, Object& b){ Object temp { std::move(a) }; a = std::move(b); b = std::move(temp);}This is how std::swap() from the Standard Library is implemented.
Using std::move() in Return Statements
Section titled “Using std::move() in Return Statements”As Chapter 1 states, since C++17, a compiler is not allowed to perform any copying or moving of objects for statements of the form return object; where object is a nameless temporary. This is called mandatory elision of copy/move operations and means that there’s no performance penalty at all by returning object by value. If object is a local variable that is not a function parameter, non-mandatory elision of copy/move operations is allowed, an optimization also known as named return value optimization (NRVO). This optimization is not guaranteed by the standard. Some compilers perform this optimization only for release builds but not for debug builds. With mandatory and non-mandatory elision, compilers can avoid any copying of objects that are returned from functions. This results in zero-copy pass-by-value semantics.
Note that for NRVO, even though the copy/move constructors won’t be called, they still need to be accessible; otherwise, the program is ill-formed according to the standard.
Now, what happens when using std::move() to return an object? Consider you write the following:
return std::move(object);With this code, compilers cannot apply mandatory nor non-mandatory (NRVO) elision of copy/move operations anymore, as that works only for statements of the form return object;. Since copy/move elision cannot be applied anymore, the next option for the compiler is to use move semantics if the object supports it, and if not, fall back to copy semantics.
Compared to NRVO, falling back to move semantics has a small performance impact, but falling back to copy semantics can have a big performance impact! So, keep the following warning in mind:
When returning a local variable or nameless temporary from a function, simply write return object; and do not use std::move().
Note that if you want to return a data member of a class from one of its member functions, then you need to use std::move() if you want to move it out instead of returning a copy.
Additionally, be careful with expressions such as the following:
return condition ? obj1 : obj2;This is not of the form return object;, so the compiler cannot apply copy/move elision. Even worse, an expression of the form condition ? obj1 : obj2 is an lvalue, so the compiler uses a copy constructor instead to return one of the objects. To at least trigger move semantics, you can rewrite the return statement as follows:
return condition ? std::move(obj1) : std::move(obj2);or
return std::move(condition ? obj1 : obj2);However, it’s clearer to rewrite the return statement as follows for which a compiler can automatically use move semantics without explicitly using std::move():
if (condition) { return obj1;} else { return obj2;}Optimal Way to Pass Arguments to Functions
Section titled “Optimal Way to Pass Arguments to Functions”Up to now, the advice has been to use reference-to-const parameters for non-primitive function parameters to avoid unnecessary expensive copying of an argument passed to a function. However, with rvalues in the mix, things change slightly. Imagine a function that anyways copies an argument passed as one of its parameters. This situation often pops up with class member functions. Here is a simple example:
class DataHolder{ public: void setData(const vector<int>& data) { m_data = data; } private: vector<int> m_data;};setData() makes a copy of the data passed in. Now that you are fluent with rvalues and rvalue references, you might want to add an overload to optimize setData() to avoid any copying in case of rvalues. Here’s an example:
class DataHolder{ public: void setData(const vector<int>& data) { m_data = data; } void setData(vector<int>&& data) { m_data = move(data); } private: vector<int> m_data;};When setData() is called with a temporary, no copies are made; the data is moved instead.
The code in the following code snippet triggers a call to the reference-to-const overload of setData(), and hence a copy of the data is made:
DataHolder wrapper;vector myData { 11, 22, 33 };wrapper.setData(myData);On the other hand, the following code snippet calls setData() with a temporary, which triggers a call to the rvalue reference overload of setData(). The data is subsequently moved instead of copied.
wrapper.setData({ 22, 33, 44 });Unfortunately, this way to optimize setData() for both lvalues and rvalues requires an implementation of two overloads. Luckily, there is a better way that involves a single member function using pass-by-value. Yes, pass-by-value! Up to now, it has been advised to always pass objects using reference-to-const parameters to avoid any unnecessary copying, but now we advise to use pass-by-value. Let’s clarify. For parameters that are not copied, passing by reference-to-const is still the way to go. The pass-by-value advice is suitable only for parameters that the function would copy anyway. In that case, by using pass-by-value semantics, the code is optimal for both lvalues and rvalues. If an lvalue is passed in, it’s copied exactly one time, just as with a reference-to-const parameter. And, if an rvalue is passed in, no copy is made, just as with an rvalue reference parameter. Let’s look at some code:
class DataHolder{ public: void setData(vector<int> data) { m_data = move(data); } private: vector<int> m_data;};If an lvalue is passed to setData(), it is copied into the data parameter and subsequently moved to m_data. If an rvalue is passed to setData(), it is moved into the data parameter, and moved again to m_data.
Rule of Zero
Section titled “Rule of Zero”Earlier in this chapter, the rule of five was introduced. It states that once you declare one of the five special member functions (destructor, copy constructor, move constructor, copy assignment operator, and move assignment operator), then you should declare all of them by either implementing, defaulting, or deleting them. The reason is that there are complicated rules that compilers follow to decide whether to automatically provide a compiler-generated version of those special member functions. By declaring all of them yourself, you don’t leave anything for the compiler to decide, making your intent much clearer.
All the discussions so far have been to explain how to write those five special member functions. However, in modern C++, you should adopt the rule of zero.
The rule of zero states that you should design your classes in such a way that they do not require any of those five special member functions. How do you do that? You can do that for non-polymorphic types in which you avoid using old-style dynamically allocated memory or other resources. Instead, use modern constructs such as Standard Library containers and smart pointers. For example, you can use a vector<vector<SpreadsheetCell>> instead of the SpreadsheetCell** data member in the Spreadsheet class. Or even better, use a vector<SpreadsheetCell> storing a linearized representation of a spreadsheet. The vector handles memory automatically, so there is no need for any of those five special member functions.
In modern C++, adopt the rule of zero!
The rule of five should be limited to custom resource acquisition is initialization (RAII) classes. An RAII class takes ownership of a resource and handles its deallocation at the right time. It’s a design technique used, for example, by vector and unique_ptr and discussed further in Chapter 32, “Incorporating Design Techniques and Frameworks.” Additionally, Chapter 10 explains that polymorphic types require you to follow the rule of five as well.
MORE ABOUT MEMBER FUNCTIONS
Section titled “MORE ABOUT MEMBER FUNCTIONS”C++ provides myriad choices for member functions. This section explains all the tricky details.
static Member Functions
Section titled “static Member Functions”Member functions, like data members, sometimes apply to the class as a whole, not to each object. You can write static member functions as well as data members. As an example, consider the SpreadsheetCell class from Chapter 8. It has two helper member functions: stringToDouble() and doubleToString(). These member functions don’t access information about specific objects, so they could be static. Here is the class definition with these member functions static:
export class SpreadsheetCell{ // Omitted for brevity private: static std::string doubleToString(double value); static double stringToDouble(std::string_view value); // Omitted for brevity};The implementations of these two member functions are identical to the previous implementations. You don’t repeat the static keyword in front of the member function definitions. Note that static member functions are not called on a specific object, so they do not have a this pointer and are not executing for a specific object with access to its non-static members. In fact, a static member function is just like a regular function. The only difference is that it can access private static and protected static members of the class. Additionally, it can also access private and protected non-static members on objects of the same type, if those objects are made available to the static member function, for example, by passing in a reference or pointer to such an object as a parameter.
You call a static member function just like a regular member function from within any member function of the class. Thus, the implementation of all the member functions in SpreadsheetCell can stay the same.
Outside of the class, you need to qualify the static member function name with the class name using the scope resolution operator. Access control applies as usual. For example, if you have a class Foo with a public static member function called bar(), then you can call bar() from anywhere in the code as follows:
Foo::bar();const Member Functions
Section titled “const Member Functions”A const object is an object whose value cannot be changed. If you have a const, reference to const, or pointer to a const object, the compiler does not let you call any member functions on that object unless those member functions guarantee that they won’t change any data members. The way you guarantee that a member function won’t change data members is to mark the member function itself with the const keyword. This is already done throughout Chapter 8 during the development of the SpreadsheetCell class. As a reminder, here is part of the SpreadsheetCell class with the member functions that don’t change any data members marked as const:
export class SpreadsheetCell{ public: double getValue() const; std::string getString() const; // Omitted for brevity};The const specification is part of the member function prototype and must accompany its definition as well:
double SpreadsheetCell::getValue() const{    return m_value;}
string SpreadsheetCell::getString() const{    return doubleToString(m_value);}
Marking a member function as const signs a contract with client code guaranteeing that you will not change the internal values of the object from within that member function. If you try to declare a member function const that actually modifies a data member, the compiler will complain. const member functions work by making it appear inside the member function that you have a reference-to-const to each data member. Thus, if you try to change a data member, the compiler will flag an error.
You cannot declare a static member function const, because it is redundant. Static member functions do not work on a specific instance of the class, so it would be impossible for them to change internal values.
You can call const and non-const member functions on a non-const object. However, you can only call const member functions on a const object. Here are some examples:
SpreadsheetCell myCell { 5 };println("{}", myCell.getValue());       // OKmyCell.setString("6");                  // OK
const SpreadsheetCell& myCellConstRef { myCell };println("{}", myCellConstRef.getValue()); // OKmyCellConstRef.setString("6");             // Compilation Error!
You should get into the habit of declaring const all member functions that don’t modify the object so that you can use references to const objects in your program.
Note that const objects can still be destroyed, and their destructor can be called. Nevertheless, destructors are not allowed to be declared const.
mutable Data Members
Section titled “mutable Data Members”Sometimes you write a member function that is “logically” const but happens to change a data member of the object. This modification has no effect on any user-visible data, but is technically a change, so the compiler won’t let you declare the member function const. For example, suppose that you want to profile your spreadsheet application to obtain information about how often data is being read. A crude way to do this would be to add a counter to the SpreadsheetCell class that counts each call to getValue() or getString(). Unfortunately, that makes those member functions non-const in the compiler’s eyes, which is not what you intended. The solution is to make your new counter variable mutable, which tells the compiler that it’s OK to change it in a const member function. Here is the new SpreadsheetCell class definition:
export class SpreadsheetCell{ // Omitted for brevity private: double m_value { 0 }; mutable unsigned m_numAccesses { 0 };};Here are the definitions for getValue() and getString():
double SpreadsheetCell::getValue() const{    ++m_numAccesses;    return m_value;}
string SpreadsheetCell::getString() const{    ++m_numAccesses;    return doubleToString(m_value);}
Member Function Overloading
Section titled “Member Function Overloading”You’ve already noticed that you can write multiple constructors in a class, all of which have the same name. These constructors differ only in the number and/or types of their parameters. You can do the same thing for any member function or function in C++. Specifically, you can overload a function or member function name by using it for multiple functions, as long as the number and/or types of the parameters differ. For example, in the SpreadsheetCell class you can rename both setString() and setValue() to set(). The class definition now looks like this:
export class SpreadsheetCell{ public: void set(double value); void set(std::string_view value); // Omitted for brevity};The implementations of the set() member functions stay the same. When you write code to call set(), the compiler determines which instance to call based on the argument you pass: if you pass a string_view, the compiler calls the string_view instance; if you pass a double, the compiler calls the double instance. This is called overload resolution.
You might be tempted to do the same thing for getValue() and getString(): rename each of them to get(). However, that does not work. C++ does not allow you to overload a member function name based only on the return type because in many cases it would be impossible for the compiler to determine which instance of the member function to call. For example, if the return value of the member function is not captured anywhere, the compiler has no way to tell which instance of the member function you are trying to call.
Overloading Based on const
Section titled “Overloading Based on const”You can overload a member function based on const. That is, you can write two member functions with the same name and same parameters, one of which is declared const and one of which is not. The compiler calls the const member function if you have a const object and calls the non-const overload if you have a non-const object. Writing these two overloaded member functions could introduce code duplication, because, often, the implementations of the const and non-const overloads are identical. As you know, code duplication should be avoided as much as possible, even if it’s just a few lines of code. Doing so follows the DRY (Don’t Repeat Yourself) principle discussed in Chapter 6 and makes future maintenance of the code easier. For example, imagine that in a few months or years you need to make a small change to duplicated code. When doing so, you need to remember to make the same change to all the places where the code has been duplicated.
The next sections provide two solutions to avoid code duplication when writing such overloaded member functions.
Scott Meyers’ const_cast Pattern
Section titled “Scott Meyers’ const_cast Pattern”To prevent code duplication, you can use the Scott Meyers’s const_cast() pattern. For example, the Spreadsheet class has a member function called getCellAt() returning a reference-to-non-const to a SpreadsheetCell. You can add a const overload that returns a reference-to-const to a SpreadsheetCell as follows:
export class Spreadsheet{ public: SpreadsheetCell& getCellAt(std::size_t x, std::size_t y); const SpreadsheetCell& getCellAt(std::size_t x, std::size_t y) const; // Code omitted for brevity.};Scott Meyers’ const_cast() pattern implements the const overload as you normally would and implements the non-const overload by forwarding the call to the const overload with the appropriate casts, as follows:
const SpreadsheetCell& Spreadsheet::getCellAt(size_t x, size_t y) const{    verifyCoordinate(x, y);    return m_cells[x][y];}
SpreadsheetCell& Spreadsheet::getCellAt(size_t x, size_t y){    return const_cast<SpreadsheetCell&>(as_const(*this).getCellAt(x, y));}
The pattern first casts *this (a Spreadsheet&) to a const Spreadsheet& using std::as_const() (defined in <utility>). Next, you call the const overload of getCellAt(), which returns a const SpreadsheetCell&. You then cast this to a non-const SpreadsheetCell& with a const_cast().
With these two getCellAt() overloads, you can now call getCellAt() on const and non-const Spreadsheet objects:
Spreadsheet sheet1 { 5, 6 };SpreadsheetCell& cell1 { sheet1.getCellAt(1, 1) };
const Spreadsheet sheet2 { 5, 6 };const SpreadsheetCell& cell2 { sheet2.getCellAt(1, 1) };
Private Helper Member Function
Section titled “Private Helper Member Function”Another option to avoid code duplication when implementing both const and non-const overloads is to have a private const helper member function with a non-const return type. The const and non-const overloaded member functions then both call this helper function. For example, for the getCellAt() overloads from the previous section, a getCellAtHelper() can be added as follows:
export class Spreadsheet{ public: SpreadsheetCell& getCellAt(std::size_t x, std::size_t y); const SpreadsheetCell& getCellAt(std::size_t x, std::size_t y) const; // Code omitted for brevity. private: SpreadsheetCell& getCellAtHelper(std::size_t x, std::size_t y) const;};And here are the implementations:
SpreadsheetCell& Spreadsheet::getCellAt(size_t x, size_t y){    return getCellAtHelper(x, y);}
const SpreadsheetCell& Spreadsheet::getCellAt(size_t x, size_t y) const{    return getCellAtHelper(x, y);}
SpreadsheetCell& Spreadsheet::getCellAtHelper(size_t x, size_t y) const{    verifyCoordinate(x, y);    return m_cells[x][y];}
Explicitly Deleting Overloads
Section titled “Explicitly Deleting Overloads”Overloaded member functions can be explicitly deleted, which enables you to forbid calling a member function with particular arguments. For example, the SpreadsheetCell class has a member function setValue(double) that can be called as follows:
SpreadsheetCell cell;cell.setValue(1.23);cell.setValue(123);For the third line, the compiler converts the integer value (123) to a double and then calls setValue(double). If, for some reason, you do not want setValue() to be called with integers, you can explicitly delete an integer overload of setValue():
export class SpreadsheetCell{ public: void setValue(double value); void setValue(int) = delete;};With this change, an attempt to call setValue() with an integer will be flagged as an error by the compiler.
Ref-Qualified Member Functions
Section titled “Ref-Qualified Member Functions”Ordinary class member functions can be called on both non-temporary and temporary instances of a class. Suppose you have the following class that simply remembers the string passed as argument to the constructor:
class TextHolder{ public: explicit TextHolder(string text) : m_text { move(text) } {} const string& getText() const { return m_text; } private: string m_text;};Of course, there is no doubt that you can call the getText() member function on non-temporary instances of TextHolder. Here’s an example:
TextHolder textHolder { "Hello world!" };println("{}", textHolder.getText());However, getText() can also be called on temporary instances:
println("{}", TextHolder{ "Hello world!" }.getText());It is possible to explicitly specify on what kind of instances a certain member function can be called, be it temporary or non-temporary instances. This is done by adding a ref-qualifier to the member function. If a member function can only be called on non-temporary instances, a & qualifier is added after the member function header. Similarly, if a member function can only be called on temporary instances, a && qualifier is added.
The following modified TextHolder class implements the & qualified getText() by returning a reference-to-const to m_text. The && qualified getText(), on the other hand, returns an rvalue reference to m_text so that m_text can be moved out of a TextHolder. This can be more efficient if you, for example, want to retrieve the text from a temporary TextHolder instance.
class TextHolder{ public: explicit TextHolder(string text) : m_text { move(text) } {} const string& getText() const & { return m_text; } string&& getText() && { return move(m_text); } private: string m_text;};Suppose you have the following invocations:
TextHolder textHolder { "Hello world!" };println("{}", textHolder.getText());println("{}", TextHolder{ "Hello world!" }.getText());Then the first call to getText() calls the & qualified overload, while the second invocation calls the && qualified overload.
A second example of using ref-qualifiers is to prevent a user from assigning a value to a temporary instance of a class. For instance, you can add an assignment operator to TextHolder:
class TextHolder{ public: TextHolder& operator=(const string& rhs) { m_text = rhs; return *this; } // Remainder of the class definition omitted for brevity};Once such an assignment operator is added to TextHolder, assigning a new value to a temporary instance of TextHolder, as shown in the next code snippet, does not make much sense, as the object will cease to exist soon:
TextHolder makeTextHolder() { return TextHolder { "Hello World!" }; }
int main(){    makeTextHolder() = "Pointless!"; // Pointless, object is a temporary.}
Such pointless operations can be prevented by ref-qualifying the assignment operator to only work on lvalues:
TextHolder& operator=(const string& rhs) & { m_text = rhs; return *this; }With this assignment operator, the earlier “Pointless!” statement in main() fails to compile. You can now only assign values to lvalues:
auto text { makeTextHolder() };text = "Ok";
Section titled “ Ref-Qualification Using Explicit Object Parameters”As Chapter 8 explains, C++23 introduces the concept of explicit object parameters. This allows you to rewrite the ref-qualified member functions from the previous TextHolder class using a slightly different syntax:
class TextHolder{    public:        const string& getText(this const TextHolder& self) { return self.m_text; }        string&& getText(this TextHolder&& self) { return move(self.m_text); }
        TextHolder& operator=(this TextHolder& self, const string& rhs)        {            self.m_text = rhs;            return self;        }    // Remainder of the class definition omitted for brevity};
This is certainly more verbose than the syntax used in the previous section, but it makes the ref-qualification more obvious. In the previous section, there’s just an & or && at the end of the member function signature, but this is easily overlooked, e.g., when a colleague reviews your code.
Inline Member Functions
Section titled “Inline Member Functions”C++ gives you the ability to recommend to the compiler that a call to a function should not be implemented in the generated code as a call to a separate block of code. Instead, the compiler should insert the function’s body directly into the code where the function is called. This process is called inlining, and functions that want this behavior are called inline functions.
You can specify an inline member function by placing the inline keyword in front of its name in the member function definition. For example, you might want to make the accessor member functions of the SpreadsheetCell class inline, in which case you would define them like this:
inline double SpreadsheetCell::getValue() const{    ++m_numAccesses;    return m_value;}
inline std::string SpreadsheetCell::getString() const{    ++m_numAccesses;    return doubleToString(m_value);}
This gives a hint to the compiler to replace calls to getValue() and getString() with the actual member function’s body instead of generating code to make a function call. Note that the inline keyword is just a hint for the compiler. The compiler can ignore it if it thinks it would hurt performance.
There is one caveat: definitions of inline functions should be available in every source file in which they are called. That makes sense if you think about it: how can the compiler substitute the function’s body if it can’t see the function definition? Thus, if you write inline member functions, you should place the definitions of such member functions in the same file as the definition of the class to which the member functions belong.
Outside of C++ modules, if the definition of a member function is placed directly in the class definition, that member function implicitly is marked as inline, even without using the inline keyword. With classes exported from modules, this is not the case. If you want such member functions to be inline, you need to mark them with the inline keyword. Here’s an example:
export class SpreadsheetCell{    public:        inline double getValue() const { ++m_numAccesses; return m_value; }
inline std::string getString() const { ++m_numAccesses; return doubleToString(m_value); } // Omitted for brevity};Many C++ programmers discover the inline function syntax and employ it without understanding the ramifications. Marking a function as inline only gives a hint to the compiler. Compilers will only inline the simplest functions. If you define an inline function that the compiler doesn’t want to inline, it will silently ignore the hint. Modern compilers will take metrics such as code bloat into account before deciding to inline a function, and they will not inline anything that is not cost-effective.
Default Arguments
Section titled “Default Arguments”A feature similar to function overloading in C++ is default arguments. You can specify defaults for function parameters in the prototype. If the user provides arguments for those parameters, the default values are ignored. If the user omits those arguments, the default values are used. There is a limitation, though: you can only provide defaults for a continuous list of parameters starting from the rightmost parameter. Otherwise, the compiler will not be able to match missing arguments to default arguments. Default arguments can be used in functions, member functions, and constructors. For example, you can assign default values for the width and height in the Spreadsheet constructor as follows:
export class Spreadsheet{ public: explicit Spreadsheet(std::size_t width = 100, std::size_t height = 100); // Omitted for brevity};The implementation of the Spreadsheet constructor stays the same. Note that you specify the default arguments only in the function declaration, but not in the definition.
Now you can call the Spreadsheet constructor with zero, one, or two arguments even though there is only one non-copy constructor:
Spreadsheet s1;Spreadsheet s2 { 5 };Spreadsheet s3 { 5, 6 };A constructor with defaults for all its parameters can function as a default constructor. That is, you can construct an object of that class without specifying any arguments. If you try to declare both a default constructor and a multi-argument constructor with defaults for all its parameters, the compiler will complain because it won’t know which constructor to call if you don’t specify any arguments.
CONSTEXPR AND CONSTEVAL
Section titled “CONSTEXPR AND CONSTEVAL”In modern C++, it’s possible to easily perform computations at compile time instead of at run time. This improves the run-time performance of your code. Two important keywords are used to accomplish this: constexpr and consteval.
The constexpr Keyword
Section titled “The constexpr Keyword”C++ always had the notion of constant expressions, which are expressions evaluated at compile time. In some circumstances, constant expressions are a requirement. For example, when defining an array, the size of the array needs to be a constant expression. Because of this restriction, the following piece of code is not valid in C++:
const int getArraySize() { return 32; }
int main(){    int myArray[getArraySize()];    // ERROR: Invalid in C++    println("Size of array = {}", size(myArray));}
Using the constexpr keyword, getArraySize() can be redefined to allow it to be called from within a constant expression:
constexpr int getArraySize() { return 32; }
int main(){    int myArray[getArraySize()];    // OK    println("Size of array = {}", size(myArray));}
You can even do something like this:
int myArray[getArraySize() + 1]; // OKConstant expressions can only use constexpr entities and integer, Boolean, character, and enumeration constants.
Declaring a function as constexpr imposes restrictions on what the function can do because the compiler has to be able to evaluate the function at compile time. For example, a constexpr function is not allowed to have any side effects, nor can it let any exceptions escape the function. Throwing exceptions and catching them in try blocks inside the function is allowed. A constexpr function is allowed to unconditionally call other constexpr functions. It is also allowed to call non-constexpr functions, but only if those calls are triggered during evaluation at run time, and not during constant evaluation. For example:
void log(string_view message) { print("{}", message); }
constexpr int computeSomething(bool someFlag){    if (someFlag) {        log("someFlag is true");        return 42;    }    else { return 84; }}
The computeSomething() function is constexpr and includes a call to log(), which is non-constexpr, but that call is executed only when someFlag is true. As long as computeSomething() is called with someFlag set to false, it can be called within a constant expression, for example:
constexpr auto value1 { computeSomething(false) };Calling the function with someFlag set to true cannot be done in a constant expression. The following does not compile:
constexpr auto value2 { computeSomething(true) };The following works fine, as the evaluation now happens at run time instead of at compile time:
const auto value3 { computeSomething(true) };constexpr functions a bit: goto statements, labels (besides case labels), and static and static constexpr variables are now allowed in constexpr functions, but were not allowed before.
The consteval Keyword
Section titled “The consteval Keyword”The constexpr keyword specifies that a function could be executed at compile time, but it does not guarantee compile-time execution. Take the following constexpr function:
constexpr double inchToMm(double inch) { return inch * 25.4; }If called as follows, the function is evaluated at compile time as desired:
constexpr double const_inch { 6.0 };constexpr double mm1 { inchToMm(const_inch) }; // at compile timeHowever, if called as follows, the function is not evaluated at compile time, but at run time!
double dynamic_inch { 8.0 };double mm2 { inchToMm(dynamic_inch) }; // at run timeIf you really want the guarantee that a function is always evaluated at compile time, you need to use the consteval keyword to turn a function into an immediate function. The inchToMm() function can be changed as follows:
consteval double inchToMm(double inch) { return inch * 25.4; }Now, the call to inchToMm() in the definition of mm1 earlier still compiles fine and results in compile-time evaluation. However, the call in the definition of mm2 now results in a compilation error because it cannot be evaluated at compile time.
consteval int f(int i) { return i; }This immediate function can be called from a constexpr function, but only when the constexpr function is being executed during constant evaluation. For example, the following function uses an if consteval statement to check if constant evaluation is happening in which case it can call f(). In the else branch, f() cannot be called.
constexpr int g(int i){ if consteval { return f(i); } else { return 42; }}constexpr and consteval Classes
Section titled “constexpr and consteval Classes”By defining a constexpr or consteval constructor, you can create constant-expression variables of user-defined types. Just as constexpr functions, constexpr classes may or may not be evaluated at compile time, while consteval classes are guaranteed to be evaluated at compile time.
The following Matrix class defines a constexpr constructor. It also defines a constexpr getSize() member function that is performing some calculation.
class Matrix{    public:        Matrix() = default; // Implicitly constexpr
        constexpr explicit Matrix(unsigned rows, unsigned columns)            : m_rows { rows }, m_columns { columns } { }
        constexpr unsigned getSize() const { return m_rows * m_columns; }    private:        unsigned m_rows { 0 }, m_columns { 0 };};
Using this class to declare constexpr objects is straightforward:
constexpr Matrix matrix { 8, 2 };constexpr Matrix matrixDefault;Such a constexpr object can now be used, e.g., to create an array big enough to store the matrix in linear form:
int linearizedMatrix[matrix.getSize()]; // OKCompiler-generated (either implicitly or explicitly using =default) member functions, such as default constructors, destructors, assignment operators, and so on, are automatically constexpr unless the class contains data members where those member functions are not constexpr.
The definition of constexpr and consteval member functions must be available for the compiler so they can be evaluated at compile time. This means that if the class is defined in a module, such member functions must be defined in the module interface file, not in a module implementation file.
DIFFERENT KINDS OF DATA MEMBERS
Section titled “DIFFERENT KINDS OF DATA MEMBERS”C++ gives you many choices for data members. In addition to declaring simple data members in your classes, you can create static data members that all objects of the class share, const members, reference members, reference-to-const members, and more. This section explains the intricacies of these different kinds of data members.
static Data Members
Section titled “static Data Members”Sometimes giving each object of a class a copy of a variable is overkill or won’t work. The data member might be specific to the class, but not appropriate for each object to have its own copy. For example, you might want to give each spreadsheet a unique numerical identifier. You would need a counter that starts at 0 from which each new object could obtain its ID. This spreadsheet counter really belongs to the Spreadsheet class, but it doesn’t make sense for each Spreadsheet object to have a copy of it, because you would have to keep all the counters synchronized somehow. C++ provides a solution with static data members. A static data member is a data member associated with a class instead of an object. You can think of static data members as global variables specific to a class. Here is the Spreadsheet class definition, including the new static counter data member:
export class Spreadsheet{ // Omitted for brevity private: static std::size_t ms_counter;};In addition to listing static class members in the class definition, you will have to allocate space for them in a source file, usually the source file in which you place your class member function definitions. You can initialize them at the same time, but note that unlike normal variables and data members, they are initialized to 0 by default. Static pointers are initialized to nullptr. Here is the code to allocate space for, and zero-initialize, ms_counter:
size_t Spreadsheet::ms_counter;Static data members are zero-initialized by default, but if you want, you can explicitly initialize them to 0 as follows:
size_t Spreadsheet::ms_counter { 0 };This code appears outside of any function or member function bodies. It’s almost like declaring a global variable, except that the Spreadsheet:: scope resolution specifies that it’s part of the Spreadsheet class.
Just as for normal data members, access control specifiers apply to static data members as well. You could make the ms_counter data member public, but, as you already know, it’s not recommended to have public data members (const static data members discussed in an upcoming section are an exception). You should grant access to data members through public getters and setters. If you want to grant access to static data members, you can provide public static get/set member functions.
Inline Variables
Section titled “Inline Variables”You can declare your static data members as inline. The benefit of this is that you do not have to allocate space for them in a source file. Here’s an example:
export class Spreadsheet{ // Omitted for brevity private: static inline std::size_t ms_counter { 0 };};Note the inline keyword. With this class definition, the following line can be removed from the source file:
size_t Spreadsheet::ms_counter;Accessing static Data Members from within Class Member Functions
Section titled “Accessing static Data Members from within Class Member Functions”You can use static data members as if they were regular data members from within class member functions. For example, you might want to create an m_id data member for the Spreadsheet class and initialize it from ms_counter in the Spreadsheet constructor. Here is the Spreadsheet class definition with an m_id member:
export class Spreadsheet{ public: // Omitted for brevity std::size_t getId() const; private: // Omitted for brevity static inline std::size_t ms_counter { 0 }; std::size_t m_id { 0 };};Here is an implementation of the Spreadsheet constructor that assigns the initial ID:
Spreadsheet::Spreadsheet(size_t width, size_t height) : m_id { ms_counter++ }, m_width { width }, m_height { height }{ // Omitted for brevity}As you can see, the constructor can access ms_counter as if it were a normal member. The copy constructor should also assign a new ID. This is handled automatically because the Spreadsheet copy constructor delegates to the non-copy constructor, which creates the new ID.
For this example, assume that once an ID is assigned to an object, it never changes. So, you should not copy the ID in the copy assignment operator. Thus, it’s recommended to make m_id a const data member:
export class Spreadsheet{ private: // Omitted for brevity const std::size_t m_id { 0 };};Since const data members cannot be changed once created, it’s, for example, not possible to initialize them inside the body of a constructor. Such data members must be initialized either directly inside the class definition or in the ctor-initializer of a constructor. This also means you cannot assign new values to such data members in an assignment operator. This is not a problem for m_id, because once a Spreadsheet has an ID, it’ll never change. However, depending on your use case, if this makes your class unassignable, the assignment operator is typically explicitly deleted.
constexpr static Data Members
Section titled “constexpr static Data Members”Data members in your class can be declared const or constexpr, meaning they can’t be changed after they are created and initialized. You should use static constexpr (or constexpr static) data members in place of global constants when the constants apply only to the class, also called class constants. static constexpr data members of integral types and enumerations can be defined and initialized inside the class definition even without making them inline variables. For example, you might want to specify a maximum height and width for spreadsheets. If the user tries to construct a spreadsheet with a greater height or width than the maximum, the maximum is used instead. You can make the maximum height and width static constexpr members of the Spreadsheet class:
export class Spreadsheet{ public: // Omitted for brevity static constexpr std::size_t MaxHeight { 100 }; static constexpr std::size_t MaxWidth { 100 };};You can use these new constants in your constructor as follows:
Spreadsheet::Spreadsheet(size_t width, size_t height) : m_id { ms_counter++ } , m_width { std::min(width, MaxWidth) } // std::min() defined in <algorithm> , m_height { std::min(height, MaxHeight) }{ // Omitted for brevity}Such constants can also be used as default values for parameters. Remember that you can only give default values for a continuous set of parameters starting with the rightmost parameter. Here is an example:
export class Spreadsheet{ public: explicit Spreadsheet( std::size_t width = MaxWidth, std::size_t height = MaxHeight); // Omitted for brevity};Accessing static Data Members from Outside Class Member Functions
Section titled “Accessing static Data Members from Outside Class Member Functions”As mentioned earlier, access control specifiers apply to static data members: MaxWidth and MaxHeight are public, so they can be accessed from outside class member functions by specifying that the variable is part of the Spreadsheet class using the :: scope resolution operator. For example:
println("Maximum height is: {}", Spreadsheet::MaxHeight);Reference Data Members
Section titled “Reference Data Members”Spreadsheets and SpreadsheetCells are great, but they don’t make a useful application by themselves. You need code to control the entire spreadsheet program, which you could package into a SpreadsheetApplication class. Suppose further that we want each Spreadsheet to store a reference to the application object. The exact definition of the SpreadsheetApplication class is not important at this moment, so the following code simply defines it as an empty class. The Spreadsheet class is modified to include a new reference data member called m_theApp:
export class SpreadsheetApplication { };
export class Spreadsheet{    public:        Spreadsheet(std::size_t width, std::size_t height,            SpreadsheetApplication& theApp);        // Code omitted for brevity.    private:        // Code omitted for brevity.        SpreadsheetApplication& m_theApp;};
This definition adds a SpreadsheetApplication reference as a data member. It’s recommended to use a reference in this case instead of a pointer because a Spreadsheet should always refer to a SpreadsheetApplication. This would not be guaranteed with a pointer.
Note that storing a reference to the application is done only to demonstrate the use of references as data members. It’s not recommended to couple the Spreadsheet and SpreadsheetApplication classes together in this way, but instead to use a paradigm such as Model-View-Controller (MVC), introduced in Chapter 4, “Designing Professional C++ Programs.”
The application reference is given to each Spreadsheet in its constructor. A reference cannot exist without referring to something, so m_theApp must be given a value in the ctor-initializer of the constructor.
Spreadsheet::Spreadsheet(size_t width, size_t height, SpreadsheetApplication& theApp) : m_id { ms_counter++ } , m_width { std::min(width, MaxWidth) } , m_height { std::min(height, MaxHeight) } , m_theApp { theApp }{ // Code omitted for brevity.}You must also initialize the reference member in the copy constructor. This is handled automatically because the Spreadsheet copy constructor delegates to the non-copy constructor, which initializes the reference data member.
Remember that after you have initialized a reference, you cannot change the object to which it refers. It’s not possible to assign to references in the assignment operator. Depending on your use case, this might mean that an assignment operator cannot be provided for your class with reference data members. If that’s the case, the assignment operator is typically marked as deleted.
Finally, a reference data member can also be marked as const. For example, you might decide that Spreadsheets should only have a reference-to-const to the application object. You can simply change the class definition to declare m_theApp as a reference-to-const:
export class Spreadsheet{ public: Spreadsheet(std::size_t width, std::size_t height, const SpreadsheetApplication& theApp); // Code omitted for brevity. private: // Code omitted for brevity. const SpreadsheetApplication& m_theApp;};NESTED CLASSES
Section titled “NESTED CLASSES”Class definitions can contain more than just member functions and data members. They can also contain nested classes and structs, type aliases, and enumerations. Anything declared inside a class is in the scope of that class. If it is public, you can access it outside the class by scoping it with the ClassName:: scope resolution syntax.
You can provide a class definition inside another class definition. For example, you might decide that the SpreadsheetCell class is really part of the Spreadsheet class. And since it becomes part of the Spreadsheet class, you might as well rename it to Cell. You could define both of them like this:
export class Spreadsheet{    public:        class Cell        {            public:                Cell() = default;                Cell(double initialValue);                // Remainder omitted for brevity        };
        Spreadsheet(std::size_t width, std::size_t height,            const SpreadsheetApplication& theApp);        // Remainder of Spreadsheet declarations omitted for brevity};
Now, the Cell class is defined inside the Spreadsheet class, so anywhere you refer to a Cell outside of the Spreadsheet class, you must qualify the name with the Spreadsheet:: scope. This applies even to the member function definitions. For example, the double constructor of Cell now looks like this:
Spreadsheet::Cell::Cell(double initialValue) : m_value { initialValue }{}You must even use the syntax for return types (but not parameters) of member functions in the Spreadsheet class itself:
const Spreadsheet::Cell& Spreadsheet::getCellAt(size_t x, size_t y) const{ verifyCoordinate(x, y); return m_cells[x][y];}Fully defining the nested Cell class directly inside the Spreadsheet class makes the definition of the Spreadsheet class a bit bloated. You can alleviate this by only including a forward declaration for Cell in the Spreadsheet class and then defining the Cell class separately, as follows:
export class Spreadsheet{    public:        class Cell;
        Spreadsheet(std::size_t width, std::size_t height,            const SpreadsheetApplication& theApp);        // Remainder of Spreadsheet declarations omitted for brevity};class Spreadsheet::Cell{    public:        Cell() = default;        Cell(double initialValue);        // Omitted for brevity};
Normal access control applies to nested class definitions. If you declare a private or protected nested class, you can only use it from inside the outer class. A nested class has access to all protected and private members of the outer class. The outer class on the other hand can only access public members of the nested class.
ENUMERATIONS INSIDE CLASSES
Section titled “ENUMERATIONS INSIDE CLASSES”Enumerations can also be data members of a class. For example, you can add support for cell coloring to the SpreadsheetCell class as follows:
export class SpreadsheetCell{ public: // Omitted for brevity enum class Color { Red = 1, Green, Blue, Yellow }; void setColor(Color color); Color getColor() const; private: // Omitted for brevity Color m_color { Color::Red };};The implementations of the setColor() and getColor() member functions are straightforward:
void SpreadsheetCell::setColor(Color color) { m_color = color; }SpreadsheetCell::Color SpreadsheetCell::getColor() const { return m_color; }The new member functions can be used as follows:
SpreadsheetCell myCell { 5 };myCell.setColor(SpreadsheetCell::Color::Blue);auto color { myCell.getColor() };OPERATOR OVERLOADING
Section titled “OPERATOR OVERLOADING”You often want to perform operations on objects, such as adding them, comparing them, or streaming them to or from files. For example, spreadsheets are useful only when you can perform arithmetic actions on them, such as summing an entire row of cells. All this can be accomplished by overloading operators.
Many people find the syntax of operator overloading tricky and confusing, at least at first. The irony is that it’s supposed to make things simpler. As you will discover in this section, that doesn’t mean simpler for the person writing the class, but simpler for the person using the class. The point is to make your new classes as similar as possible to built-in types such as int and double: it’s easier to add objects using + than to remember whether the member function name you should call is add() or sum().
At this point, you might be wondering exactly which operators you can overload. The answer is almost all of them—even some you’ve never heard of. This chapter just scratches the surface: the assignment operator is explained earlier in this chapter, while this section introduces the basic arithmetic operators, the shorthand arithmetic operators, and the comparison operators. Overloading the stream insertion and extraction operators is also useful. In addition, there are some tricky, but interesting, things you can do with operator overloading that you might not anticipate at first. The Standard Library uses operator overloading extensively. Chapter 15 explains how and when to overload the rest of the operators. Chapters 16 to 24 cover the Standard Library.
Example: Implementing Addition for SpreadsheetCells
Section titled “Example: Implementing Addition for SpreadsheetCells”In true object-oriented fashion, SpreadsheetCell objects should be able to add themselves to other SpreadsheetCell objects. Adding one cell to another cell produces a third cell with the result. It doesn’t change either of the original cells. The meaning of addition for SpreadsheetCells is the addition of the values of the cells.
First Attempt: The add Member Function
Section titled “First Attempt: The add Member Function”You can declare and define an add() member function for your SpreadsheetCell class like this:
export class SpreadsheetCell{ public: SpreadsheetCell add(const SpreadsheetCell& cell) const; // Omitted for brevity};This member function adds two cells together, returning a new third cell whose value is the sum of the first two. It is declared const and takes a reference to a const SpreadsheetCell because add() does not change either of the source cells. Here is the implementation:
SpreadsheetCell SpreadsheetCell::add(const SpreadsheetCell& cell) const{ return SpreadsheetCell { getValue() + cell.getValue() };}You can use the add() member function like this:
SpreadsheetCell myCell { 4 }, anotherCell { 5 };SpreadsheetCell aThirdCell { myCell.add(anotherCell) };auto aFourthCell { aThirdCell.add(anotherCell) };That works, but it’s a bit clumsy. We can do better.
Second Attempt: Overloaded operator+ as a Member Function
Section titled “Second Attempt: Overloaded operator+ as a Member Function”It would be convenient to be able to add two cells with the plus sign the way that you add two ints or two doubles—something like this:
SpreadsheetCell myCell { 4 }, anotherCell { 5 };SpreadsheetCell aThirdCell { myCell + anotherCell };auto aFourthCell { aThirdCell + anotherCell };C++ allows you to write your own version of the plus sign, called the addition operator, to work correctly for your classes. To do that, you write a member function with the name operator+ that looks like this:
export class SpreadsheetCell{ public: SpreadsheetCell operator+(const SpreadsheetCell& cell) const; // Omitted for brevity};The definition of the overloaded operator+ member function is identical to the implementation of the add() member function:
SpreadsheetCell SpreadsheetCell::operator+(const SpreadsheetCell& cell) const{ return SpreadsheetCell { getValue() + cell.getValue() };}Now you can add two cells together using the plus operator as shown earlier.
This syntax takes a bit of getting used to. Try not to worry too much about the strange member function name operator+—it’s just a name like foo or add. To understand the rest of the syntax, it helps to understand what’s really going on. When your C++ compiler parses a program and encounters an operator, such as +, -, =, or <<, it tries to find a function or member function with the name operator+, operator-, operator=, or operator<<, respectively, that takes the appropriate parameters. For example, when the compiler sees the following line, it tries to find a member function in the SpreadsheetCell class named operator+ that accepts another SpreadsheetCell as argument (or, as discussed later in this chapter, a global function named operator+ that accepts two SpreadsheetCell arguments):
SpreadsheetCell aThirdCell { myCell + anotherCell };If the SpreadsheetCell class contains such an operator+ member function, then the previous line is translated to this:
SpreadsheetCell aThirdCell { myCell.operator+(anotherCell) };Note that there’s no requirement that operator+ takes as a parameter an object of the same type as the class for which it’s written. You could write an operator+ for SpreadsheetCells that takes a Spreadsheet to add to the SpreadsheetCell. That wouldn’t make sense to the programmer, but the compiler would allow it. The next section gives an example of an operator+ for SpreadsheetCells accepting a double value.
Note also that you can give operator+ any return type you want. However, you should follow the principle of least astonishment; that is, the return type of your operator+ should generally be what users would expect.
Implicit Conversions
Section titled “Implicit Conversions”Surprisingly, once you’ve written the operator+ shown earlier, not only can you add two cells together, but you can also add a cell to a string_view, a double, or an int! Here are some examples:
SpreadsheetCell myCell { 4 }, aThirdCell;string str { "hello" };aThirdCell = myCell + string_view{ str };aThirdCell = myCell + 5.6;aThirdCell = myCell + 4;The reason this code works is that the compiler does more to try to find an appropriate operator+ than just look for one with the exact types specified. The compiler also tries to find an appropriate conversion for the types so that an operator+ can be found. The SpreadsheetCell class has converting constructors (discussed in Chapter 8) to convert a double or a string_view into a SpreadsheetCell. In the preceding example, when the compiler sees a SpreadsheetCell trying to add itself to a double, it finds the SpreadsheetCell constructor that takes a double and constructs a temporary SpreadsheetCell object to pass to operator+. Similarly, when the compiler sees the line trying to add a SpreadsheetCell to a string_view, it calls the string_view SpreadsheetCell constructor to create a temporary SpreadsheetCell to pass to operator+.
Keep in mind, though, that the use of an implicit converting constructor might be inefficient, because temporary objects must be created. In this example, to avoid implicit construction for adding a double, you could write a second operator+ as follows:
SpreadsheetCell SpreadsheetCell::operator+(double rhs) const{ return SpreadsheetCell { getValue() + rhs };}Third Attempt: Global operator+
Section titled “Third Attempt: Global operator+”Implicit conversions allow you to use an operator+ member function to add your SpreadsheetCell objects to ints and doubles. However, the operator is not commutative, as shown in the following code:
aThirdCell = myCell + 5.6; // Works fine.aThirdCell = myCell + 4; // Works fine.aThirdCell = 5.6 + myCell; // FAILS TO COMPILE!aThirdCell = 4 + myCell; // FAILS TO COMPILE!The implicit conversion works fine when the SpreadsheetCell object is on the left of the operator, but it doesn’t work when it’s on the right. Addition is supposed to be commutative, so something is wrong here. The problem is that the operator+ member function must be called on a SpreadsheetCell object, and that object must be on the left-hand side of the operator+. That’s just the way the C++ language is defined. So, there’s no way you can get this code to work with an operator+ member function.
However, you can get it to work if you replace the in-class operator+ member function with a global operator+ function that is not tied to any particular object. The function looks like this:
SpreadsheetCell operator+(const SpreadsheetCell& lhs, const SpreadsheetCell& rhs){ return SpreadsheetCell { lhs.getValue() + rhs.getValue() };}You need to declare this operator in the module interface file and export it:
export class SpreadsheetCell { /* Omitted for brevity */ };
export SpreadsheetCell operator+(const SpreadsheetCell& lhs,    const SpreadsheetCell& rhs);
Now all four of the earlier additions work as you expect.
aThirdCell = myCell + 5.6; // Works fine.aThirdCell = myCell + 4; // Works fine.aThirdCell = 5.6 + myCell; // Works fine.aThirdCell = 4 + myCell; // Works fine.You might be wondering what happens if you write the following code:
aThirdCell = 4.5 + 5.5;It compiles and runs, but it’s not calling the operator+ you wrote. It does normal double addition of 4.5 and 5.5, which results in the following intermediate statement:
aThirdCell = 10;To make this assignment work, there should be a SpreadsheetCell object on the right-hand side. The compiler will discover a non-explicit user-defined constructor that takes a double, will use this constructor to implicitly convert the double value into a temporary SpreadsheetCell object, and will then call the assignment operator.
Overloading Arithmetic Operators
Section titled “Overloading Arithmetic Operators”Now that you understand how to write operator+, the rest of the basic arithmetic operators are straightforward. Here are the declarations of +, -, *, and /, where you have to replace +, -, *, and /, resulting in four functions. You can also overload %, but it doesn’t make sense for the double values stored in SpreadsheetCells.
export class SpreadsheetCell { /* Omitted for brevity */ };
export SpreadsheetCell operator<op>(const SpreadsheetCell& lhs,    const SpreadsheetCell& rhs);
The implementations of operator- and operator* are similar to the implementation of operator+, so these are not shown. For operator/, the only tricky aspect is remembering to check for division by zero. This implementation throws an exception if division by zero is detected:
SpreadsheetCell operator/(const SpreadsheetCell& lhs, const SpreadsheetCell& rhs){ if (rhs.getValue() == 0) { throw invalid_argument { "Divide by zero." }; } return SpreadsheetCell { lhs.getValue() / rhs.getValue() };}C++ does not require you to actually implement multiplication in operator*, division in operator/, and so on. You could implement multiplication in operator/, division in operator+, and so forth. However, that would be extremely confusing, and there is no good reason to do so. Whenever possible, stick to the commonly used operator meanings in your implementations.
Overloading the Arithmetic Shorthand Operators
Section titled “Overloading the Arithmetic Shorthand Operators”In addition to the basic arithmetic operators, C++ provides shorthand operators such as += and -=. You might assume that writing operator+ for your class also provides operator+=. No such luck. You have to overload the shorthand arithmetic operators explicitly. These operators differ from the basic arithmetic operators in that they change the object on the left-hand side of the operator instead of creating a new object. A second, subtler difference is that, like the assignment operator, they generate a result that is a reference to the modified object.
The arithmetic shorthand operators always require an object of your class on the left-hand side, so you should write them as member functions, not as global functions. Here are the declarations for the SpreadsheetCell class:
export class SpreadsheetCell{ public: SpreadsheetCell& operator+=(const SpreadsheetCell& rhs); SpreadsheetCell& operator-=(const SpreadsheetCell& rhs); SpreadsheetCell& operator*=(const SpreadsheetCell& rhs); SpreadsheetCell& operator/=(const SpreadsheetCell& rhs); // Omitted for brevity};Here is the implementation for operator+=. The others are similar.
SpreadsheetCell& SpreadsheetCell::operator+=(const SpreadsheetCell& rhs){ set(getValue() + rhs.getValue()); return *this;}The shorthand arithmetic operators are combinations of the basic arithmetic and assignment operators. With the previous definitions, you can now write code like this:
SpreadsheetCell myCell { 4 }, aThirdCell { 2 };aThirdCell -= myCell;aThirdCell += 5.4;You cannot, however, write code like this (which is a good thing!):
5.4 += aThirdCell;Here’s an example:
SpreadsheetCell operator+(const SpreadsheetCell& lhs, const SpreadsheetCell& rhs){ auto result { lhs }; // Local copy result += rhs; // Forward to +=() return result;}Overloading Comparison Operators
Section titled “Overloading Comparison Operators”The comparison operators, >, <, <=, >=, ==, and !=, are another useful set of operators to define for your classes. The C++20 standard has brought quite a few changes for these operators and has added the three-way comparison operator, also known as the spaceship operator, <=>, introduced in Chapter 1. To make you appreciate more what has changed since C++20, let’s first start by looking at what you had to do before C++20 and what you still need to do as long as your compiler does not support the three-way comparison operator yet.
Overloading Comparison Operators Before C++20
Section titled “Overloading Comparison Operators Before C++20”Like the basic arithmetic operators, the six pre-C++20 comparison operators should be global functions so that you can use implicit conversion on both the left- and the right-hand side argument of the operator. The comparison operators all return a bool. Of course, you can change the return type, but that’s not recommended.
Here are the declarations, where you have to replace ==, <, >, !=, <=, and >=, resulting in six functions:
class SpreadsheetCell { /* Omitted for brevity */ };
bool operator<op>(const SpreadsheetCell& lhs, const SpreadsheetCell& rhs);
Here is the definition of operator==. The others are similar.
bool operator==(const SpreadsheetCell& lhs, const SpreadsheetCell& rhs){ return (lhs.getValue() == rhs.getValue());}In classes with more data members, it might be painful to compare each data member. However, once you’ve implemented == and <, you can write the rest of the comparison operators in terms of those two. For example, here is a definition of operator>= that uses operator<:
bool operator>=(const SpreadsheetCell& lhs, const SpreadsheetCell& rhs){ return !(lhs < rhs);}You can use these operators to compare SpreadsheetCells to other SpreadsheetCells, and also to doubles and ints:
if (myCell> aThirdCell || myCell < 10) { cout << myCell.getValue() << endl;}As you can see, you need to write six separate functions to support the six comparison operators, and that’s only to compare two SpreadsheetCells with each other. With the current six implemented comparison functions, it’s possible to compare a SpreadsheetCell with a double because a double argument is implicitly converted to a SpreadsheetCell. As discussed earlier, such implicit conversions might be inefficient, because temporary objects must be created. Just as with operator+ earlier, you can avoid this by implementing explicit functions to compare with doubles. For each operator
bool operator<op>(const SpreadsheetCell& lhs, const SpreadsheetCell& rhs);bool operator<op>(double lhs, const SpreadsheetCell& rhs);bool operator<op>(const SpreadsheetCell& lhs, double rhs);If you want to support all comparison operators, that’s a lot of repetitive code to write!
Overloading Comparison Operators Since C++20
Section titled “Overloading Comparison Operators Since C++20”Let’s now switch gears and see what C++20 and later versions bring to the table. Starting with C++20, adding support for comparison operators to your classes is simplified a lot. First, it is now actually recommended to implement operator== as a member function of the class instead of a global function. Note also that it’s a good idea to add the [[nodiscard]] attribute so the result of the operator cannot be ignored. Here’s an example:
[[nodiscard]] bool operator==(const SpreadsheetCell& rhs) const;Since C++20, this single operator== overload makes the following comparisons work:
if (myCell == 10) { println("myCell == 10"); }if (10 == myCell) { println("10 == myCell"); }An expression such as 10 == myCell is now rewritten by the compiler as myCell == 10 for which the operator== member function can be called. Additionally, by implementing operator==, the compiler automatically adds support for != as well; expressions using != are rewritten to use ==.
Next, to implement support for the full suite of comparison operators, you just need to implement one additional overloaded operator, operator<=>. Once your class has an overload for operator== and <=>, the compiler automatically provides support for all six comparison operators! For the SpreadsheetCell class, operator<=> looks as follows:
[[nodiscard]] std::partial_ordering operator<=>(const SpreadsheetCell& rhs) const;The value stored in a SpreadsheetCell is a double. Remember from Chapter 1 that floating-point types only have a partial order, so that’s why the overload returns std::partial_ordering. The implementation is straightforward:
partial_ordering SpreadsheetCell::operator<=>(const SpreadsheetCell& rhs) const{ return getValue() <=> rhs.getValue();}By implementing operator<=>, the compiler automatically provides support for >, <, <=, and >=, by rewriting expressions using those operators to use <=> instead. For example, an expression such as myCell < aThirdCell is automatically rewritten to something equivalent to std::is_lt(myCell <=> aThirdCell), where is_lt() is a named comparison function; see Chapter 1.
So, by just implementing operator== and operator<=>, the SpreadsheetCell class supports the full set of comparison operators:
if (myCell < aThirdCell) { println("myCell < aThirdCell"); }if (aThirdCell < myCell) { println("aThirdCell < myCell"); }
if (myCell <= aThirdCell) { println("myCell <= aThirdCell"); }if (aThirdCell <= myCell) { println("aThirdCell <= myCell"); }
if (myCell> aThirdCell) { println("myCell> aThirdCell"); }if (aThirdCell> myCell) { println("aThirdCell> myCell"); }
if (myCell>= aThirdCell) { println("myCell>= aThirdCell"); }if (aThirdCell>= myCell) { println("aThirdCell>= myCell"); }
if (myCell == aThirdCell) { println("myCell == aThirdCell"); }if (aThirdCell == myCell) { println("aThirdCell == myCell"); }
if (myCell != aThirdCell) { println("myCell != aThirdCell"); }if (aThirdCell != myCell) { println("aThirdCell != myCell"); }
Since the SpreadsheetCell class supports implicit conversion from double to a SpreadsheetCell, comparisons such as the following are supported as well:
if (myCell < 10) { println("myCell < 10"); }if (10 < myCell) { println("10 < myCell"); }if (10 != myCell) { println("10 != myCell"); }As with comparing two SpreadsheetCell objects, the compiler rewrites such expressions in terms of operator== and <=>, and optionally swaps the order of the arguments. For example, 10 < myCell is rewritten first to something equivalent to is_lt(10 <=> myCell), which won’t work because we only have an overload for <=> as a member, meaning that the left-hand side argument must be a SpreadsheetCell. Noticing this, the compiler then tries to rewrite the expression to something equivalent to is_gt(myCell <=> 10), which works out fine.
As before, if you want to avoid the slight performance impact of implicit conversions, you can provide specific overloads for doubles. And since C++20, this is not even a lot of work. You only need to provide the following two additional overloaded operators as member functions:
[[nodiscard]] bool operator==(double rhs) const;[[nodiscard]] std::partial_ordering operator<=>(double rhs) const;These are implemented as follows:
bool SpreadsheetCell::operator==(double rhs) const{ return getValue() == rhs;}partial_ordering SpreadsheetCell::operator<=>(double rhs) const{ return getValue() <=> rhs;}Compiler-Generated Comparison Operators
Section titled “Compiler-Generated Comparison Operators”Looking at the implementation of operator== and <=> for SpreadsheetCell, they simply compare all data members. In such a case, you can reduce the number of lines of code needed even further, as C++20 (and later) can write those for you. Just as, for example, a copy constructor can be explicitly defaulted, operator== and <=> can also be defaulted in which case the compiler writes them for you and implements them by comparing each data member in turn in the order they are declared in the class definition, also known as a member-wise lexicographical comparison.
Additionally, if you just explicitly default operator<=>, the compiler automatically includes a defaulted operator== as well. So, for the SpreadsheetCell version without the explicit operator== and <=> for doubles (I’ll come back to this later in this section), you can simply write the following single line of code to add full support for all six comparison operators to compare two SpreadsheetCells:
[[nodiscard]] std::partial_ordering operator<=>( const SpreadsheetCell&) const = default;Furthermore, you can use auto as the return type for operator<=>, in which case the compiler deduces the return type based on the return types of the <=> operator for the data members:
[[nodiscard]] auto operator<=>(const SpreadsheetCell&) const = default;If not all data members of the class have an accessible operator==, then a defaulted operator== for the class is implicitly deleted.
If the class has data members that do not support operator<=>, a defaulted operator<=> falls back to using operator< and == for those data members. In that case, return type deduction won’t work and you need to explicitly specify the return type to be either strong_ordering, partial_ordering, or weak_ordering. If the data members don’t even have an accessible operator< and ==, then the defaulted operator<=> is implicitly deleted.
To summarize, for the compiler to be able to write a defaulted <=> operator, all data members of the class need to either support operator<=>, in which case the return type can be auto, or operator< and ==, in which case the return type cannot be auto. Since SpreadsheetCell has a single double as data member, the compiler deduces the return type to be partial_ordering.
In the beginning of this section, I mentioned that this single explicitly defaulted operator<=> works for the SpreadsheetCell version without the explicit operator== and <=> for doubles. If you do add those explicit double versions, you are adding a user-declared operator==(double). Because of this, the compiler will no longer automatically generate an operator==(const SpreadsheetCell&), so you have to explicitly default one yourself as follows:
export class SpreadsheetCell{    public:        // Omitted for brevity        [[nodiscard]] auto operator<=>(const SpreadsheetCell&) const = default;        [[nodiscard]] bool operator==(const SpreadsheetCell&) const = default;
        [[nodiscard]] bool operator==(double rhs) const;        [[nodiscard]] std::partial_ordering operator<=>(double rhs) const;        // Omitted for brevity};
If you can explicitly default operator<=> for your class, I recommend doing so instead of implementing it yourself. By letting the compiler write it for you, it will stay up-to-date with newly added or modified data members. If you implement the operator yourself, then whenever you add data members or change existing data members, you need to remember to update your implementation of operator<=>. The same holds for operator== in case it’s not automatically generated by the compiler.
It is only possible to explicitly default operator== and <=> when they have as parameter a reference-to-const to the class type for which the operators are defined. For example, the following does not work:
[[nodiscard]] auto operator<=>(double) const = default; // Does not work!BUILDING STABLE INTERFACES
Section titled “BUILDING STABLE INTERFACES”Now that you understand all the syntax of writing classes in C++, it helps to revisit the design principles from Chapter 5, “Designing with Classes,” and Chapter 6, “Designing for Reuse.” Classes are the main unit of abstraction in C++. You should apply the principles of abstraction to your classes to separate the interface from the implementation as much as possible. Specifically, you should make all data members private and optionally provide getter and setter member functions. This is how the SpreadsheetCell class is implemented: m_value is private, while the public set() member function sets the value, and the public getValue() and getString() retrieve the value.
Using Interface and Implementation Classes
Section titled “Using Interface and Implementation Classes”Even with the preceding measures and the best design principles, the C++ language is fundamentally unfriendly to the principle of abstraction. The syntax requires you to combine your public interfaces and private (or protected) data members and member functions together in one class definition, thereby exposing some of the internal implementation details of the class to its clients. The downside of this is that if you have to add new non-public member functions or data members to your class, all the clients of the class have to be recompiled. This can become a burden in bigger projects.
The good news is that you can make your interfaces a lot cleaner and hide all implementation details, resulting in stable interfaces. The bad news is that it takes a bit of coding. The basic principle is to define two classes for every class you want to write: the interface class and the implementation class. The implementation class is identical to the class you would have written if you were not taking this approach. The interface class presents public member functions identical to those of the implementation class, but it has only one data member: a pointer to an implementation class object. This is called the pimpl idiom, private implementation idiom, or bridge pattern. The interface class member function implementations simply call the equivalent member functions on the implementation class object. The result of this is that no matter how the implementation changes, it has no impact on the public interface class. This reduces the need for recompilation. None of the clients that use the interface class need to be recompiled if the implementation (and only the implementation) changes. Note that this idiom works only if the single data member is a pointer to the implementation class. If it were a by-value data member, clients would have to recompile when the definition of the implementation class changes.
To use this approach with the Spreadsheet class, define the following public interface class, called Spreadsheet. The important parts are highlighted.
export module spreadsheet;
export import spreadsheet_cell;import std;
export class Spreadsheet{    public:        explicit Spreadsheet(            std::size_t width = MaxWidth, std::size_t height = MaxHeight);        Spreadsheet(const Spreadsheet& src);        Spreadsheet(Spreadsheet&&) noexcept;        ˜Spreadsheet();
        Spreadsheet& operator=(const Spreadsheet& rhs);        Spreadsheet& operator=(Spreadsheet&&) noexcept;
        void setCellAt(std::size_t x, std::size_t y, const SpreadsheetCell& cell);        SpreadsheetCell& getCellAt(std::size_t x, std::size_t y);        const SpreadsheetCell& getCellAt(std::size_t x, std::size_t y) const;
        std::size_t getId() const;
        static constexpr std::size_t MaxHeight { 100 };        static constexpr std::size_t MaxWidth { 100 };
        void swap(Spreadsheet& other) noexcept;
    private:        class Impl;        std::unique_ptr<Impl> m_impl;};export void swap(Spreadsheet& first, Spreadsheet& second) noexcept;
The implementation class, Impl, is a private nested class, because no one else besides the Spreadsheet class needs to know about this implementation class. The Spreadsheet class now contains only one data member: a pointer to an Impl instance. The public member functions are identical to the old Spreadsheet.
The nested Spreadsheet::Impl class is defined in a spreadsheet module implementation file. It should be hidden from clients, so the Impl class is not exported. The Spreadsheet.cpp module implementation file starts as follows:
module spreadsheet;import std;using namespace std;
// Spreadsheet::Impl class definition.class Spreadsheet::Impl{    public:        Impl(size_t width, size_t height);        // Remainder omitted for brevity.};
This Impl class has almost the same interface as the original Spreadsheet class. You can find the full definition in the downloadable source code archive. For the member function implementations, you need to remember that Impl is a nested class; hence, you need to specify the scope as Spreadsheet::Impl. So, for the constructor, it becomes Spreadsheet::Impl::Impl(…):
// Spreadsheet::Impl member function definitions.Spreadsheet::Impl::Impl(size_t width, size_t height) : m_id { ms_counter++ } , m_width { min(width, Spreadsheet::MaxWidth) } , m_height { min(height, Spreadsheet::MaxHeight) }{ m_cells = new SpreadsheetCell*[m_width]; for (size_t i { 0 }; i < m_width; ++i) { m_cells[i] = new SpreadsheetCell[m_height]; }}// Other member function definitions omitted for brevity.Now that the Spreadsheet class has a unique_ptr to an Impl instance, the Spreadsheet class needs to have a user-declared destructor. Since we don’t need to do anything in this destructor, it can be defaulted in the implementation file as follows:
Spreadsheet::˜Spreadsheet() = default;In fact, it must be defaulted in the implementation file and not directly in the class definition. The reason is that the Impl class is only forward declared in the Spreadsheet class definition; that is, the compiler knows there will be a Spreadsheet::Impl class somewhere, but at this time it does not know the definition yet. As such, you cannot default the destructor in the class definition, because then the compiler would try to use the destructor of the as of yet undefined Impl class. The same is true when defaulting other member functions in this case, such as the move constructor and move assignment operator.
The implementations of the Spreadsheet member functions, such as setCellAt() and getCellAt(), just pass the request on to the underlying Impl object:
void Spreadsheet::setCellAt(size_t x, size_t y, const SpreadsheetCell& cell){    m_impl->setCellAt(x, y, cell);}
const SpreadsheetCell& Spreadsheet::getCellAt(size_t x, size_t y) const{    return m_impl->getCellAt(x, y);}
SpreadsheetCell& Spreadsheet::getCellAt(size_t x, size_t y){    return m_impl->getCellAt(x, y);}
The constructors for the Spreadsheet must construct a new Impl to do its work:
Spreadsheet::Spreadsheet(size_t width, size_t height){    : m_impl { make_unique<Impl>(width, height) }}}
Spreadsheet::Spreadsheet(const Spreadsheet& src)    : m_impl { make_unique<Impl>(*src.m_impl) }{}
The copy constructor looks a bit strange because it needs to copy the underlying Impl from the source Spreadsheet. The copy constructor takes a reference to an Impl, not a pointer, so you must dereference the m_impl pointer to get to the object itself.
The Spreadsheet assignment operator must similarly pass on the assignment to the underlying Impl:
Spreadsheet& Spreadsheet::operator=(const Spreadsheet& rhs){ *m_impl = *rhs.m_impl; return *this;}The first line in the assignment operator looks a little odd. The Spreadsheet assignment operator needs to forward the call to the Impl assignment operator, which runs only when you copy direct objects. By dereferencing the m_impl pointers, you force direct object assignment, which causes the assignment operator of Impl to be called.
The swap() member function simply swaps the single data member:
void Spreadsheet::swap(Spreadsheet& other) noexcept{ std::swap(m_impl, other.m_impl);}This technique to truly separate the interface from the implementation is powerful. Although it is a bit clumsy at first, once you get used to it, you will find it natural to work with. However, it’s not common practice in most workplace environments, so you might find some resistance to trying it from your coworkers. The most compelling argument in favor of it is not the aesthetic one of splitting out the interface, but the speedup in build time if the implementation of the class changes. When a class is not using the pimpl idiom, a change to its implementation details might trigger a long rebuild. For example, adding a new data member to a class definition triggers a rebuild of all other source files that use this class definition. With the pimpl idiom, you can modify the implementation class definition as much as you like, and as long as the public interface class remains untouched, it won’t trigger a long rebuild.
An alternative to separating the implementation from the interface is to use an abstract interface—that is, an interface with only pure virtual member functions—and then have an implementation class that implements that interface. That’s a topic for the next chapter.
SUMMARY
Section titled “SUMMARY”This chapter, along with Chapter 8, provided all the tools you need to write solid, well-designed classes, and to use objects effectively.
You discovered that dynamic memory allocation in objects presents new challenges: you need to implement a destructor, copy constructor, copy assignment operator, move constructor, and move assignment operator, which properly copy, move, and free your memory. You learned how to prevent pass-by-value and assignment by explicitly deleting the copy constructor and assignment operator. You discovered the copy-and-swap idiom to implement copy assignment operators and the move-and-swap idiom to implement move assignment operators, as well as learned about the rule of zero.
You read more about different kinds of data members, including static, const, reference-to-const, and mutable members. You also learned about static, inline, and const member functions, member function overloading, and default arguments. This chapter also described nested class definitions, and friend classes, functions, and member functions.
You encountered operator overloading and learned how to overload the arithmetic and comparison operators, both as global functions and as class member functions. You also discovered how the three-way comparison operator makes adding comparison support to your classes so much easier.
Finally, you learned how to take abstraction to the extreme by providing separate interface and implementation classes.
Now that you’re fluent in the language of object-oriented programming, it’s time to tackle inheritance, which is covered next in Chapter 10, “Discovering Inheritance Techniques.”
EXERCISES
Section titled “EXERCISES”By solving the following exercises, you can practice the material discussed in this chapter. Solutions to all exercises are available with the code download on the book’s website at www.wiley.com/go/proc++6e. However, if you are stuck on an exercise, first reread parts of this chapter to try to find an answer yourself before looking at the solution from the website.
- Exercise 9-1: Take your implementation of the
Personclass from Exercise 8-3 and adapt it to pass strings in the most optimal way you can think of. Additionally, add a move constructor and move assignment operator to it. In both member functions, write a message to the console so you can track when they get called. Implement any additional member functions you need for implementing the move member functions and for improving the implementation of other member functions from Exercise 8-3 to avoid code duplication. Modifymain()to test your member functions. - Exercise 9-2: Take the Person class from Exercise 8-4. Just as for Exercise 9-1, make changes to pass strings in the most optimal way. Then add full support for all six comparison operators to compare two Person objects. Try to implement this support in the least amount of code. Test your implementation by performing all kinds of comparisons in
main(). How arePersons ordered? Is the ordering happening based on the first name, based on the last name, or based on a combination? - Exercise 9-3: Before C++20, adding support for all six comparison operators required a bit more lines of code. Start from the
Personclass from Exercise 9-2, remove theoperator<=>, and add the necessary code to add all comparison operators to compare twoPersonobjects without using<=>. Perform the same set of tests as you’ve implemented for Exercise 9-2. - Exercise 9-4: In this exercise, you’ll practice writing stable interfaces. Take your
Personclass from Exercise 8-4 and split it into a stable public interface class and a separate implementation class. - Exercise 9-5: Start from your solution for Exercise 9-2, and optimize the
getFirstName(),getLastName(), andgetInitials()member functions for when these are called on rvalues.
Footnotes
Section titled “Footnotes”-
Technically, the C++ standard defines three more categories (xvalues, prvalues, and glvalues), but those details are not important for the current discussion. ↩
-
Guideline C.65 of the C++ Core Guidelines (see Appendix B, “Annotated Bibliography”) states, “Make move assignment safe for self-assignment.” ↩