使用 C++ 进行多线程编程
在拥有多个处理单元的计算机系统上,多线程编程非常重要。它让你能够编写程序,并让这些处理单元并行工作。系统拥有多个处理单元的方式有很多种:它可以有多个独立的处理器芯片,每个芯片都是一个独立的中央处理单元(CPU);也可以只有一块处理器芯片,但芯片内部包含多个彼此独立的 CPU,这些内部 CPU 也叫 core。这种处理器称为 multicore processor。当然,系统也可以同时具备这两种形式。拥有多个处理单元的系统其实早就存在,只不过过去它们很少出现在面向消费者的设备中。如今,所有 CPU 厂商都在销售 multicore processor,而它们已经无处不在——从 server 到个人电脑,再到 smartphone 都在使用。正因为 multicore processor 已经如此普及,理解如何编写 multithreaded application 也就变得至关重要。对专业 C++ 程序员来说,必须掌握如何写出正确的 multithreaded code,才能真正把现有处理单元的能力用满。过去,编写 multithreaded application 往往依赖平台相关、操作系统相关的 API,这让跨平台代码很难写。而从 C++11 开始,标准中加入了标准化的 threading library,这个问题才真正得到改善。
多线程编程是一门复杂的主题。本章会借助标准线程库来介绍它,但由于篇幅所限,不可能展开所有细节。事实上,已经有整本书专门讨论多线程程序的开发。如果你想进一步深入,可以参考附录 B“带注释的参考书目”中多线程部分的资料。
当然,也有一些第三方 C++ 库试图让多线程编程更易于跨平台,例如 pthreads 和 boost::thread。不过,由于这些库不属于 C++ 标准的一部分,因此本书不会讨论它们。
执行多个任务,大体上有三种主要风格:
- 顺序执行: 每个任务一个接一个地顺序执行。
- 并发执行: 多个任务看起来像是在同时执行,但这可能只是因为操作系统把一小段时间——也就是 time slice——分给一个任务去做一点工作,然后再切换到另一个任务,如此反复轮转,直到所有任务完成。
- 并行执行: 多个任务真正意义上同时执行,例如运行在多个处理单元上。
多线程编程让你能够并发执行多个任务(甚至有可能真正并行地执行)。因此,你就可以利用如今几乎所有系统中都存在的多个处理单元。二十年前,处理器市场的竞争重点还是更高的频率,这对单线程应用很理想。大约从 2005 年开始,由于功耗和散热等问题,这条路线基本停止了。此后,处理器市场的方向逐渐转向“单颗芯片上塞进更多核心”。如今,四核和八核处理器已经非常常见,而多达 128 个甚至更多核心的处理器也并不罕见。
同样地,如果你看看显卡上的处理器,也就是 graphics processing unit(GPU),会发现它们本质上是高度并行的处理器。如今,高端显卡拥有超过 16,000 个 core,而且这个数字还在快速上升!这些显卡不仅用于游戏,还被广泛用于各种计算密集型任务,例如 artificial intelligence、machine learning、图像和视频处理、protein folding(有助于发现新药)、作为 Search for Extraterrestrial Intelligence(SETI)项目一部分的信号处理等等。
C++98/03 本身并不支持多线程编程,你只能依赖第三方库或目标操作系统自己的多线程 API。C++11 引入标准线程库之后,跨平台编写多线程应用才真正变得容易一些。不过,当前的 C++ 标准主要面向 CPU,而非 GPU;未来或许会有所改变。
开始编写多线程代码,通常有两个主要理由。第一,如果你手头有一个计算问题,并且能把它拆分成若干彼此独立、可以并行运行的小块,那么在多个处理单元上执行时,往往能够获得显著的性能提升。第二,你可以沿着彼此正交的职责边界来模块化计算。例如,把耗时计算放到工作线程中执行,而不是阻塞 UI 线程,这样即使后台有长时间运行的计算,用户界面也依然能够保持响应。
下图展示了一类非常适合并行执行的场景。一个典型例子,是对图像像素进行处理,而该算法又不需要访问相邻像素的信息。此时,算法可以把整张图像切成四部分。在 single-core processor 上,这四部分会顺序处理;在 dual-core processor 上,其中两部分可以并行;而在 quad-core processor 上,四部分都能并行执行,从而带来几乎与 core 数量线性相关的性能提升。

当然,问题并不总能被切分成可彼此独立并行执行的小块。不过,很多时候至少能做到“部分并行”,从而带来性能收益。multithreaded programming 中真正困难的一部分,恰恰就在于如何把你的 algorithm 改造成 parallel 版本,而这又高度依赖 algorithm 自身的性质。除此之外,还有 race condition、deadlock、tearing 和 false sharing 这些难点。接下来的几节会逐一讨论它们。让代码 thread-safe 的常见手段包括:
- Immutable data: 不可变数据天生适合被多个线程并发访问。
- Atomic operations: 这是底层级别的类型/操作,能自动提供 thread-safe 语义。
- Mutual exclusion 以及其他 synchronization mechanism: 用于协调多个线程对共享数据的访问。
- Thread-local storage: 使用
thread_local标记的变量属于各自线程独有;其他线程默认无法访问,因此通常天然 thread-safe。
本章会依次触及这些主题。
当多个线程都想访问某种共享资源时,就可能出现 race condition。在“多个线程共享的内存”这个语境下,race condition 更具体地称为 data race。只要多个线程同时访问同一变量,并且至少有一个线程会对其进行写操作,就可能发生 data race。比如,假设你有一个共享变量,一个线程对它做递增,另一个线程对它做递减。无论递增还是递减,其实都意味着:先从内存中取出当前值,做加一/减一,再把结果写回内存。大多数处理器都有 INC 和 DEC 指令来完成这类操作。但在现代 x86 processor 上,这些指令并不是 atomic 的,也就是说,在这个操作的中途,其他指令仍然可以插进来执行,从而让代码读到错误的值。
下面这张表展示的是“递增在线程 2 的递减开始之前就已经执行完”的情况,并假设初始值为 1:
| THREAD 1 (INCREMENT) | THREAD 2 (DECREMENT) |
|---|---|
| load value (value = 1) | |
| increment value (value = 2) | |
| store value (value = 2) | |
| load value (value = 2) | |
| decrement value (value = 1) | |
| store value (value = 1) |
最终写回内存的值是 1。如果反过来,让递减线程先执行完,再轮到递增线程,最终结果仍然是 1,如下表所示:
| THREAD 1 (INCREMENT) | THREAD 2 (DECREMENT) |
|---|---|
| load value (value = 1) | |
| decrement value (value = 0) | |
| store value (value = 0) | |
| load value (value = 0) | |
| increment value (value = 1) | |
| store value (value = 1) |
但是,如果这些指令以交错方式执行,结果就会不同,如下所示:
| THREAD 1 (INCREMENT) | THREAD 2 (DECREMENT) |
|---|---|
| load value (value = 1) | |
| increment value (value = 2) | |
| load value (value = 1) | |
| decrement value (value = 0) | |
| store value (value = 2) | |
| store value (value = 0) |
这时最终结果变成了 0。换句话说,递增操作的效果被“吃掉”了。这就是 data race。
撕裂(Tearing)
Section titled “撕裂(Tearing)”Tearing 是 data race 的一种特定表现或后果。它又分成两种:torn read 和 torn write。如果某个线程只把一部分数据写回了内存,而另一部分还没来得及写完,这时另一个线程正好去读那块数据,就会读到前后不一致的内容,这就是 torn read。如果两个线程同时在写同一份数据,那么一个线程可能写了其中一部分,而另一个线程又写了另一部分;最后得到的结果就是不一致的,这就是 torn write。
如果你打算通过 synchronization mechanism(例如 mutual exclusion)来解决 race condition,那么你很快就会碰到多线程中的另一个经典问题:deadlock。当两个线程都在等待对方做某件事时,它们就 deadlock 了;这种情况当然也可以扩展到多于两个线程的场景。举例来说,假设两个线程都需要访问某个共享资源,那么它们就需要先获得访问该资源的许可。如果其中一个线程当前持有该资源的许可,却又因为别的原因无限期阻塞,那么另一个线程在尝试获取同一资源许可时,也会无限期阻塞。获取共享资源访问权的一种典型机制,就是 mutual exclusion object,简称 mutex;本章稍后会详细讲到。比如,假设你有两个线程、两个资源,以及分别保护这两个资源的两个 mutex——A 和 B。两个线程都需要同时获取这两个资源的访问权,但它们获取的顺序不一样。下面的伪代码表格展示了这种情况:
| THREAD 1 | THREAD 2 |
|---|---|
Acquire AAcquire B// ... computeRelease BRelease A | Acquire BAcquire A// ... computeRelease ARelease B |
现在,设想代码按以下顺序执行:
- Thread 1: Acquire A(成功)
- Thread 2: Acquire B(成功)
- Thread 1: Acquire B(阻塞,因为 B 正被 thread 2 持有)
- Thread 2: Acquire A(阻塞,因为 A 正被 thread 1 持有)
这时,两个线程都陷入了无限等待,形成 deadlock。图 27.2 给出了这个 deadlock 的图形化表示:thread 1 已经获得 resource A,正等待 resource B;thread 2 已经获得 resource B,正等待 resource A。在图中,这种循环等待关系形成了一个环,而这个环正是 deadlock 的可视化体现。两个线程都会无限期等待下去。

为了避免这种 deadlock,最好始终按照相同顺序获取资源许可。当然,你也可以在程序中加入额外机制来打破 deadlock。一个常见做法是:只尝试在一定时间内获取资源;如果超时还拿不到,就停止等待,并释放自己当前已经持有的其他资源;然后线程稍微 sleep 一下,稍后再重新尝试获取它需要的全部资源。这种机制能为其他线程提供机会,让它们先获取所需资源并继续执行。不过,这种方法是否有效,仍然高度依赖你面对的 deadlock 具体是什么样。
前一段描述的其实都是“绕开 deadlock”的补救手段。Standard Library 已经把这类精确的 workaround 实现在了 std::lock() 里,稍后会在 “Mutual Exclusion” 一节讲到。这个函数可以一次性为多个资源获取许可,而且不会引入 deadlock。与其自己重新发明一套 workaround,不如直接用 std::lock()。不过,更理想的做法,是在设计阶段就尽量避免出现“必须同时持有多个锁”的局面。能不写需要多重加锁的模式,就尽量不写。
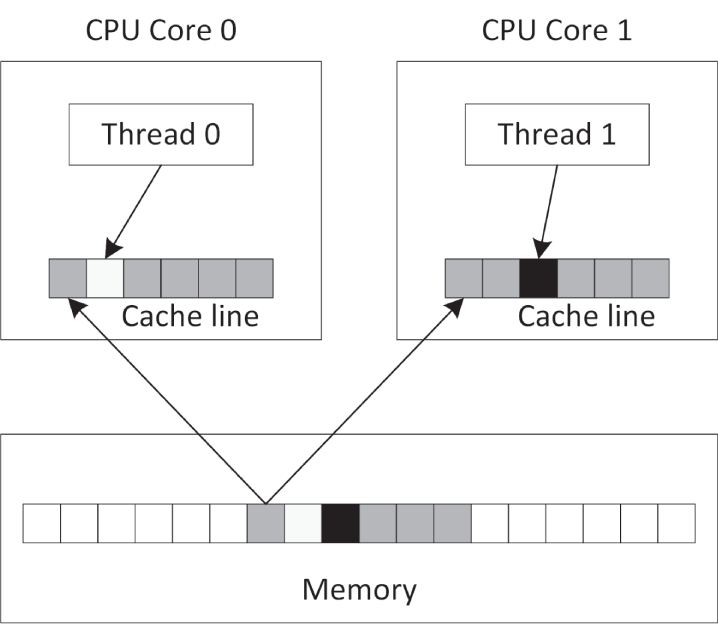
大多数 cache 都以 cache line 为单位工作。对现代 CPU 来说,cache line 通常是 64 字节。如果某个 cache line 中有数据需要写入,那么整个 line 都必须被锁住。如果数据结构设计不当,这会让 multithreaded code 出现严重性能惩罚。比如,两个线程明明操作的是不同数据,但如果这些数据恰好落在同一条 cache line 上,那么只要其中一个线程发生写操作,另一个线程就会被阻塞,因为整条 cache line 都被锁住了。下图展示的正是这样一种情况:两个线程显然写的是不同内存块,但它们却共享了同一条 cache line。
你可以通过显式的内存对齐来优化数据结构,确保由多个线程并发访问的数据不会共享任何 cache line。为了以可移植方式做到这一点,可以使用定义在 <new> 中的常量 hardware_destructive_interference_size。它会返回两块被并发访问对象之间的最小推荐偏移量,以避免 cache line sharing。你可以把这个值和 alignas 关键字结合起来,对数据做正确对齐。
定义在 <thread> 中的 C++ threading library,让启动新线程变得非常容易。你可以用多种方式指定“新线程要执行什么”:它可以执行一个全局函数、某个函数对象的 operator()、一个 lambda expression,甚至还可以执行某个类实例上的成员函数。接下来的几节会分别给出这些方式的小例子。
使用函数指针启动线程
Section titled “使用函数指针启动线程”在 Windows 上,像 CreateThread()、_beginthread() 这类函数,以及 pthreads 库中的 pthread_create(),通常都要求线程函数只能接受一个参数。相比之下,如果你使用标准 C++ 的 std::thread 类,那么线程函数可以拥有任意多个参数。
假设你有一个 counter() 函数,它接收两个整数:第一个表示 ID,第二个表示该函数应循环多少次。函数体只是一个简单循环,在每次迭代中把一条消息输出到标准输出。
void counter(int id, int numIterations){ for (int i { 0 }; i < numIterations; ++i) { println("Counter {} has value {}", id, i); }}你可以使用 std::thread 启动多个线程来执行这个函数。例如,可以像下面这样创建线程 t1,让它以参数 1 和 6 调用 counter():
thread t1 { counter, 1, 6 };thread 类的构造函数是一个 variadic template,也就是说它接受任意数量的参数;关于 variadic template,本书已在第 26 章“高级模板”中详细讨论。第一个参数是要在新线程中执行的 callable object(在这个例子里就是函数指针,也就是指向 counter() 的指针);后续所有参数则会在新线程真正开始执行时,一并传给这个 callable。
如果某个 thread 对象代表一个系统中正在运行或曾经运行过的线程,那么它就被称为 joinable。即使底层线程已经执行结束,只要对应的 thread 对象还没处理完,它仍然处于 joinable 状态。一个默认构造出来的 thread 对象则是 unjoinable。在销毁一个 joinable 的 thread 对象之前,你必须确保已经对它调用了 join() 或 detach()。join() 是阻塞调用:它会等待目标线程把工作全部做完;detach() 则会把 thread 对象和其底层 OS 线程分离,之后底层 OS 线程继续独立运行。无论调用的是哪一个,都会使该线程变为 unjoinable。如果一个仍处于 joinable 状态的 thread 对象被销毁,其析构函数会调用 std::terminate(),直接终止所有线程以及整个应用。之所以这样设计,是因为“销毁一个还没 join 的线程”几乎肯定是 bug,而直接终止程序,是库能够明确指出问题的最直接方式。
下面的代码启动了两个线程,都执行 counter()。线程启动后,对两个线程分别调用 join():
thread t1 { counter, 1, 6 };thread t2 { counter, 2, 4 };t1.join();t2.join();这个例子的一种可能输出如下:
Counter 2 has value 0Counter 1 has value 0Counter 1 has value 1Counter 1 has value 2Counter 1 has value 3Counter 1 has value 4Counter 1 has value 5Counter 2 has value 1Counter 2 has value 2Counter 2 has value 3你在自己的系统上看到的输出会不同,而且很可能每次运行都不一样。这是因为两个线程在同时执行 counter(),所以输出顺序取决于机器中的处理器 core 数量,以及操作系统的线程调度策略。
如果多个线程同时调用 print() 或 println(),这是 thread-safe 的,不会引发 data race。但如果你把 counter() 中唯一那条 println() 改成下面这样:
print("Counter {} has value {}", id, i);println("");或者:
cout << format("Counter {} has value {}", id, i) << endl;或者:
cout << format("Counter {} has value {}", id, i);cout << endl;那么即使仍然没有 data race,不同线程的输出也依然可能发生交错!换句话说,输出内容可能会“粘在一起”,像下面这样:
Counter 1 has value 0Counter 2 has value 0
Counter 2 has value 1Counter 2 has value 2Counter 1 has value 1...
这个问题可以通过 synchronization mechanism 来修复,本章后面会讨论。
使用函数对象启动线程
Section titled “使用函数对象启动线程”除了 function pointer,你也可以让线程执行一个 function object。与前一节“使用 function pointer”的方式相比,function object 的一大优势在于:除了通过函数参数传信息以外,你还可以直接在 function object class 中加入数据成员,并随意初始化和使用它们。下面这个例子先定义了一个名为 Counter 的类,其中有两个数据成员:一个 ID,以及一个表示循环次数的值。这两个成员都通过构造函数初始化。为了让 Counter 成为一个 function object,你需要为它实现 operator();这一点在第 19 章“函数指针、函数对象与 Lambda 表达式”中已经讲过。这里 operator() 的实现与前一节里的 counter() 函数完全相同。代码如下:
class Counter{    public:        explicit Counter(int id, int numIterations)            : m_id { id }, m_numIterations { numIterations } { }
        void operator()() const        {            for (int i { 0 }; i < m_numIterations; ++i) {                println("Counter {} has value {}", m_id, i);            }        }    private:        int m_id { 0 };        int m_numIterations { 0 };};
下面的代码展示了两种把 function object 交给线程执行的方式。第一种直接使用统一初始化语法:先临时构造一个 Counter,再用花括号把它传给 thread 构造函数。第二种则先定义一个具名的 Counter 实例,再把这个具名对象传给 thread 构造函数。
// Using uniform initialization syntax.thread t1 { Counter { 1, 20 } };
// Using named variable.Counter c { 2, 12 };thread t2 { c };
// Wait for threads to finish.t1.join();t2.join();使用 Lambda 启动线程
Section titled “使用 Lambda 启动线程”lambda expression 与标准 C++ threading library 的搭配也非常自然。下面就是一个典型例子:它启动一个线程来执行某个给定的 lambda expression。
int id { 1 };int numIterations { 5 };thread t1 { [id, numIterations] { for (int i { 0 }; i < numIterations; ++i) { println("Counter {} has value {}", id, i); }} };t1.join();使用成员函数指针启动线程
Section titled “使用成员函数指针启动线程”你也可以让线程去执行某个类的成员函数。下面的例子定义了一个简单的 Request 类,其中有一个 process() 成员函数。main() 会创建一个 Request 实例,然后启动一个新线程,让它去执行 req 这个实例上的 process() 成员函数。
class Request{    public:        explicit Request(int id) : m_id { id } { }        void process() { println("Processing request {}", m_id); }    private:        int m_id { 0 };};
int main(){    Request req { 100 };    thread t { &Request::process, &req };    t.join();}
这种方式的含义是:你在另一个线程中,对某个特定对象执行一个成员函数。如果别的线程也在访问同一个对象,那么你必须确保这类访问是 thread-safe 的,否则就会出现 data race。要做到 thread-safe,可以使用本章后面会讨论的 mutual exclusion 作为 synchronization mechanism。
线程局部存储
Section titled “线程局部存储”C++ 标准支持 thread-local storage。通过一个名为 thread_local 的关键字,你可以把任意变量标记成 thread-local,这意味着每个线程都会拥有该变量的独立副本,而且这份副本会在整个线程生命周期内持续存在。对每一个线程来说,这个变量只会被初始化一次。例如,下面这段代码定义了两个全局变量 k 和 n。所有线程共享唯一一份 k,而每个线程都拥有自己独立的 n。
int k;thread_local int n;下面的代码片段可以验证这一点。threadFunction() 会打印 k 和 n 的当前值,然后分别对它们加一。main() 则依次启动两个线程,并在启动第二个线程前等待第一个线程结束。
void threadFunction(int id){    println("Thread {}: k={}, n={}", id, k, n);    ++n;    ++k;}
int main(){ thread t1 { threadFunction, 1 }; t1.join(); thread t2 { threadFunction, 2 }; t2.join();}从下面的输出可以清楚看出:k 在所有线程之间只有一个共享实例,而每个线程都会拥有自己独立的 n 副本。
Thread 1: k=0, n=0Thread 2: k=1, n=0前面的说明展示了 thread_local 在全局变量上的行为。它同样适用于类的 static 数据成员,以及函数中的 static 局部变量。在函数内部,而且仅限函数内部,将某个变量声明为 thread_local 会隐式包含 static 语义,不过仍然建议你显式把 static 写出来。示例如下:
static thread_local int x1;     // OK, internal linkage (See Chapter 11)thread_local int x2;            // OK, external linkage (See Chapter 11)
class Foo{    static thread_local int x3; // OK    thread_local int x4;        // Error!};
void f(){ static thread_local int x5; // OK thread_local int x6; // OK, implicitly static!}C++ 标准本身并没有提供“一个线程强行取消另一个正在运行的 thread”的机制。一种(部分)解决方案,是使用下一节会讲到的 jthread。如果这不可行,那么更好的办法,是让两个线程事先约定一种通信机制。最简单的做法就是共享一个变量,让目标线程周期性检查它,从而决定自己是否应当终止;其他线程则通过修改这个共享变量,间接通知目标线程退出。这里必须格外小心,因为这个共享变量会被多个线程访问,而且至少有一个线程会对其写入。为了确保 thread-safe,推荐使用 atomic variable 或 condition variable;这两者都会在本章后面介绍。
自动等待线程结束
Section titled “自动等待线程结束”前面已经提到过:如果一个仍然 joinable 的 thread 对象在销毁时还没被 join() 或 detach() 处理,那么 C++ runtime 就会调用 std::terminate() 来结束程序。<thread> 中还定义了 std::jthread,它和 thread 几乎完全相同,只是多了两点关键区别:
- 它会在析构函数中自动 join。
- 它支持 cooperative cancellation。
jthread 的取消机制叫 cooperative cancellation。之所以叫 cooperative,是因为要支持取消的线程必须自己周期性检查:是否应该停止。要理解这一点,先得引入两个重要类,它们都定义在 <stop_token> 中:
std::stop_token: 用于主动检查是否已有取消请求。支持取消的线程应当周期性地对某个stop_token调用stop_requested(),以判断自己是否应该停止工作。stop_token还可以与condition_variable_any配合,让线程在需要停止时被唤醒。std::stop_source: 用于发出取消请求。你可以通过对某个stop_source调用request_stop(),请求对应线程停止执行。只要某个stop_source发出了取消请求,这个 stop request 就会对所有相关联的stop_source和stop_token可见。成员函数stop_requested()则可以用来检查是否已经发出过停止请求。
如果你手里有一个 jthread 实例,就可以通过 get_stop_token() 和 get_stop_source() 成员函数分别获取它对应的 stop_token 与 stop_source。此外,传给 jthread 构造函数的 callable 还可以把 stop_token 作为自己的第一个参数。
来看一个例子。下面的 threadFunction() callable 把 stop_token 作为第一个参数接收。由于这里采用的是 cooperative cancellation,因此这个线程函数体内部会主动使用该 stop_token 来检查自己是否应该终止。这段代码还借助 std::this_thread::sleep_for() 在每次循环中引入一个小延迟。传给 sleep_for() 的参数是 std::chrono::duration;相关内容见第 22 章“日期与时间工具”。
void threadFunction(stop_token token, int id){ while (!token.stop_requested()) { println("Thread {} doing some work.", id); this_thread::sleep_for(500ms); } println("Stop requested for thread {}.", id);}下面这个 main() 会创建两个 jthread 来执行 threadFunction(),然后 sleep 两秒,输出一条即将结束的消息,并请求两个线程都停止执行:
int main(){    jthread job1 { threadFunction, 1 };    jthread job2 { threadFunction, 2 };
    this_thread::sleep_for(2s);    println("main() is ending.");
    job1.request_stop();    job2.request_stop();}
这个程序的一种可能输出如下:
Thread 2 doing some work.Thread 1 doing some work.Thread 2 doing some work.Thread 1 doing some work.Thread 2 doing some work.Thread 1 doing some work.Thread 2 doing some work.Thread 1 doing some work.main() is ending.Stop requested for thread 2.Stop requested for thread 1.jthread 的析构函数会在 join 之前自动请求线程停止执行,因此前面的 main() 其实还可以再稍微简化一点,直接省掉那两次显式的 request_stop() 调用。
从线程中获取结果
Section titled “从线程中获取结果”正如前面这些例子所展示的,启动一个新线程其实很容易。但在大多数真实场景中,你更关心的往往是线程运行出来的结果。例如,如果你的线程在做某些数学计算,那么在线程执行结束后,你很可能希望把最终结果取回来。一种办法,是在线程函数中传入一个结果变量的指针或引用,让线程把结果写进去。另一种办法,是把结果保存到 function object 的数据成员中,等线程执行结束后再取回。这种做法只有在你使用 std::ref() 将 function object 以引用形式传给 jthread 构造函数时才有效。下面是一个例子:
class Calculator{ public: explicit Calculator(int a, int b) : m_a { a }, m_b { b } {} void operator()() { result = m_a * m_b; } int getResult() const { return result; } private: int m_a { 0 }; int m_b { 0 }; int result { 0 };};int main(){ Calculator calculator { 21, 2 }; jthread job { ref(calculator) }; job.join(); println("21*2 = {}", calculator.getResult());}这段代码会正确输出:
21*2 = 42如果你不使用 ref(),而是像下面这样初始化 job,那么输出就会变成 21*2 = 0:
jthread job { calculator };不过,从线程中取得结果还有一种更轻松的机制:future。future 不仅让线程结果的获取更自然,也让线程内发生错误(例如异常)的处理更容易。本章后面会专门讨论它们。
复制并重新抛出异常
Section titled “复制并重新抛出异常”C++ 的整套 exception 机制,在“单个线程内部”时工作得很好。每个线程都可以抛出自己的 exception,但它们必须在各自线程内部被捕获。如果某个线程抛出了 exception,却没有在该线程中捕获,那么 C++ runtime 就会调用 std::terminate(),从而直接结束整个应用。一个线程里抛出的 exception,不能被另一个线程直接捕获。这就给“希望在多线程环境下使用 exception handling”的代码带来了不少问题。
如果没有标准 threading library,要想优雅地跨线程处理 exception,往往很难,甚至几乎不可能。标准 threading library 则通过下面这些与 exception 相关的函数解决了这一问题。这些函数不仅适用于 std::exception,同样也适用于其他类型的异常,例如 int、string、自定义异常等等:
-
exception_ptr current_exception() noexcept;预期是在 catch block 内部调用。它会返回一个
exception_ptr对象,该对象引用当前正在处理的 exception,或者说引用这个 exception 的副本。如果当前并没有在处理任何异常,那么返回的是空的exception_ptr。被这个exception_ptr引用的异常对象采用引用计数管理,类似std::shared_ptr,只要还有任何exception_ptr对象引用它,它就会一直有效。 -
[[noreturn]] void rethrow_exception(exception_ptr p);重新抛出
exception_ptr参数所引用的异常(该参数不能为空)。这个“重新抛出”的动作并不要求发生在与最初抛出异常相同的线程中,因此它天生就很适合跨线程处理 exception。[[noreturn]]attribute 则明确说明:这个函数永远不会正常返回。 -
template<class E> exception_ptr make_exception_ptr(E e) noexcept;创建一个
exception_ptr对象,用来引用给定异常对象的副本。它本质上只是下面这段代码的简写形式:
try { throw e; }catch(...) { return current_exception(); }下面来看如何利用这些函数,在不同线程之间处理异常。下面这段代码定义了一个会做一些工作并抛出异常的函数。最终,它会在另一个线程中运行。
void doSomeWork(){ for (int i { 0 }; i < 5; ++i) { println("{}", i); } println("Thread throwing a runtime_error exception..."); throw runtime_error { "Exception from thread" };}下面的 threadFunc() 会把前面的函数调用包在一个 try/catch 块中,捕获 doSomeWork() 可能抛出的所有 exception。它接收一个类型为 exception_ptr& 的参数。一旦捕获到异常,就通过 current_exception() 取得当前异常的引用,并把它赋给这个 exception_ptr 参数。做完后,线程正常退出。
void threadFunc(exception_ptr& err){ try { doSomeWork(); } catch (...) { println("Thread caught exception, returning exception..."); err = current_exception(); }}下面的 doWorkInThread() 则在主线程中调用。它的职责是创建一个新线程,并在其中执行 threadFunc()。传给 threadFunc() 的参数是一个 exception_ptr 对象的引用。线程创建好之后,doWorkInThread() 会通过 join() 等待该线程结束,随后检查这个错误对象。由于 exception_ptr 属于 NullablePointer 类型,因此你可以直接在 if 语句里判断它。如果它非空,那么就在当前线程中重新抛出该 exception——这个例子中当前线程就是主线程。也就是说,异常就这样从一个线程“转移”到了另一个线程。
void doWorkInThread(){ exception_ptr error; // Launch thread. jthread t { threadFunc, ref(error) }; // Wait for thread to finish. t.join(); // See if thread has thrown any exception. if (error) { println("Main thread received exception, rethrowing it..."); rethrow_exception(error); } else { println("Main thread did not receive any exception."); }}main() 函数本身很直接:它调用 doWorkInThread(),并把这次调用包在 try/catch 中,用来捕获由 doWorkInThread() 所启动线程抛出的异常。
int main(){ try { doWorkInThread(); } catch (const exception& e) { println("Main function caught: '{}'", e.what()); }}输出如下:
01234Thread throwing a runtime_error exception...Thread caught exception, returning exception...Main thread received exception, rethrowing it...Main function caught: 'Exception from thread'为了让本章示例尽量紧凑、聚焦,大多数示例中的 main() 都会显式或隐式(借助 jthread)调用 join(),从而阻塞主线程,等其他线程执行结束。当然,在真实应用里你通常不希望这样阻塞主线程。举例来说,在 GUI application 中,如果阻塞主线程,就意味着 UI 会失去响应。此时,你可以采用 messaging 模式在线程之间通信。例如,前面的 threadFunc() 完全可以向 UI thread 发送一条消息,并把 current_exception() 返回结果的副本作为参数传过去。
Atomic type 允许 atomic access。这意味着,在不借助额外 synchronization mechanism 的情况下,也允许安全地并发读写。没有 atomic operation 时,对某个变量做递增并不是 thread-safe 的,因为编译器通常会先把值从内存加载到寄存器里,再在寄存器中加一,最后把结果写回内存。在这个过程尚未结束时,另一个线程完全可能访问同一块内存,从而形成 data race。例如,下面这段代码就不是 thread-safe 的,并且包含 data race;这正是本章一开始讨论过的那一类问题。
int counter { 0 }; // Global variable...++counter; // Executed in multiple threads你可以使用定义在 <atomic> 中的 std::atomic class template,让它在不显式使用任何 synchronization mechanism 的情况下仍然 thread-safe。下面是把前面那段代码改成 atomic integer 的版本:
atomic<int> counter { 0 } ; // Global variable...++counter; // Executed in multiple threads<atomic> 还为所有 primitive type 定义了对应的具名 integral atomic type。下表只列出其中一部分:
| NAMED ATOMIC TYPE | EQUIVALENT STD::ATOMIC TYPE |
|---|---|
| atomic_bool | atomic |
| atomic_char | atomic |
| atomic_uchar | atomic |
| atomic_int | atomic |
| atomic_uint | atomic |
| atomic_long | atomic |
| atomic_ulong | atomic |
| atomic_llong | atomic |
| atomic_ullong | atomic |
| atomic_wchar_t | atomic<wchar_t> |
| atomic_flag | (none) |
使用 atomic type 时,你不必手动写出显式同步逻辑。不过在底层,某些特定类型的 atomic 操作仍有可能使用 mutex 等同步机制。比如,当目标硬件并不具备执行某个操作所需的原子指令时,就可能发生这种情况。你可以对某个 atomic type 调用 is_lock_free() 成员函数,以判断它是否支持 lock-free operation;所谓 lock-free,就是其全部操作都不依赖底层显式同步机制。除此之外,还有一个 static 常量 atomic<T>::is_always_lock_free:若 atomic<T> 总是 lock free,则其值为 true,否则为 false。
std::atomic class template 并不只适用于 integral type。你同样可以创建 atomic<double>,甚至 atomic<MyType>,只不过前提是 MyType 必须是 trivially copyable。根据给定类型的大小不同,底层实现仍有可能依赖显式同步机制。下面的例子里,Foo 和 Bar 都是 trivially copyable,也就是说对它们来说 std::is_trivially_copyable_v 都是 true。但由于 Foo 过大,atomic<Foo> 并不是 lock-free,而 atomic<Bar> 则是。
struct Foo { int m_array[123]; };struct Bar { int m_int; };
int main(){    atomic<Foo> f;    println("{} {}", is_trivially_copyable_v<Foo>, f.is_lock_free()); // true false
    atomic<Bar> b;    println("{} {}", is_trivially_copyable_v<Bar>, b.is_lock_free()); // true true}
当多线程访问同一份数据时,atomic 除了解决“原子性”本身之外,也同时帮你处理了 memory ordering、编译器优化重排等问题。说得更直接一点:如果在多个线程之间对同一份数据既有读又有写,那么几乎永远都不应在没有 atomic 或显式 synchronization mechanism 的情况下直接操作它。
atomic_flag 是一个 atomic Boolean,并且根据 C++ 标准保证始终 lock-free。它和 atomic<bool> 的区别在于:它不提供赋值运算符,而是提供命名成员函数 clear()、test() 和 test_and_set()。稍后在本章的 mutual exclusion 部分,我们会在实现 spinlock 时看到 atomic_flag 的实际用法。
C++ 标准为 atomic<T> 定义了不少专门操作。本节只介绍其中几个;如果想看完整列表,请查阅 Standard Library 参考资料(见附录 B)。
第一个例子是下面这个 atomic 操作:
bool atomic<T>::compare_exchange_strong(T& expected, T desired);它以原子方式实现的逻辑,可以用下面的伪代码表示:
if (*this == expected) { *this = desired; return true;} else { expected = *this; return false;}乍一看,这个逻辑似乎有点怪,但它其实是实现复杂 atomic 操作时非常关键的一块基石。下面这个例子就展示了:如何原子地把一个 atomic<int> 乘上给定数字。
void atomicallyMultiply(atomic<int>& a, int n){    int expected { a.load() };    int desired { n * expected };    while (!a.compare_exchange_strong(expected, desired)) {        desired = n * expected;    }}
int main(){    atomic<int> value { 10 };    println("Value = {}", value.load());    atomicallyMultiply(value, 3);    println("Result = {}", value.load());}
第二个例子是 atomic<T>::fetch_add()。它会先取出 atomic 当前的值,然后把给定增量加到 atomic 自身上,并返回原来的、尚未递增的值。示例如下:
atomic<int> value { 10 };println("Value = {}", value.load());int fetched { value.fetch_add(4) };println("Fetched = {}", fetched);println("Value = {}", value.load());如果没有别的线程同时修改这个 atomic 变量 value,那么输出如下:
Value = 10Fetched = 10Value = 14atomic integral type 支持以下 atomic operation:fetch_add()、fetch_sub()、fetch_and()、fetch_or()、fetch_xor()、++、--、+=、-=、&=、^= 和 |=。atomic pointer type 支持 fetch_add()、fetch_sub()、++、--、+= 和 -=。atomic floating-point type 则支持 fetch_add() 与 fetch_sub()。
大多数 atomic operation 还可以额外接收一个参数,用来指定你想要的 memory ordering。例如:
T atomic<T>::fetch_add(T value, memory_order = memory_order_seq_cst);你可以自行修改默认的 memory_order。C++ 标准在 std 命名空间下提供了 memory_order_relaxed、memory_order_consume、memory_order_acquire、memory_order_release、memory_order_acq_rel 和 memory_order_seq_cst。不过,除非你是这个领域的专家,否则几乎很少需要把它们换掉。虽然某些 memory order 在某些指标上可能比默认值更快,但如果你哪怕用错一点点,就可能重新引入 data race 或其他极难排查的多线程问题。如果你确实想深入理解 memory ordering,可以参考附录 B中的多线程资料。
原子智能指针
Section titled “原子智能指针”atomic<std::shared_ptr<T>> 是被支持的。shared_ptr 的 control block——其中保存了引用计数等信息——一直以来都是 thread-safe 的,因此它能保证被指向对象恰好只会被删除一次。但除此之外,shared_ptr 的其他部分并不 thread-safe。如果多个线程并发使用的是“同一个 shared_ptr 实例”,那么只要其中有线程调用该 shared_ptr 的非 const 成员函数(例如 reset()、赋值、swap() 等),就会产生 data race。而如果多个线程并发使用的是“同一个 atomic<shared_ptr<T>> 实例”,那么即使调用 shared_ptr 的非 const 成员函数,也依然是 thread-safe 的。需要注意的是:如果你通过这个 shared_ptr 去调用其所指对象上的非 const 成员函数,这本身仍然不是 thread-safe 的,依旧需要手动同步。
std::atomic_ref 与 std::atomic 基本相同,甚至接口也几乎一致;区别在于,atomic_ref 工作在“引用”之上,而 atomic 总是先拷贝一份传给它的值。atomic_ref 实例本身的生命周期,应短于它所引用的对象。atomic_ref 是可复制的,而且你可以创建任意多个 atomic_ref 实例来引用同一个对象。通过这些 atomic_ref 实例进行的 load/store 都是原子的,彼此之间不会形成 race;但如果还有其他线程绕过 atomic_ref,直接并发访问这份数据,那么这些普通访问仍然可能和 atomic_ref 的原子访问形成 data race。和 std::atomic 一样,atomic_ref<T> 也可用于任意 trivially copyable 的 T。此外,标准还提供了下列 specializations:
- 针对 pointer type 的 partial specialization,支持
fetch_add()和fetch_sub() - 针对 integral type 的 full specialization,支持
fetch_add()、fetch_sub()、fetch_and()、fetch_or()和fetch_xor() - 针对 floating-point type 的 full specialization,支持
fetch_add()和fetch_sub()
使用原子类型
Section titled “使用原子类型”这一节更具体地解释:为什么你应该使用 atomic type。假设你有下面这样一个函数 increment(),它在循环中不断递增一个整型引用参数:
void increment(int& counter){ for (int i { 0 }; i < 100; ++i) { ++counter; this_thread::sleep_for(1ms); }}现在,你想并行启动多个线程,并让它们都对同一个共享变量 counter 执行这个 increment()。如果你天真地在没有 atomic、也没有任何同步机制的情况下这样写,就一定会引入 data race。下面这段代码启动了 10 个执行 increment() 的线程,然后对每个线程调用 join(),最后输出结果:
int main(){ int counter { 0 }; vector<jthread> threads; for (int i { 0 }; i < 10; ++i) { threads.emplace_back(increment, ref(counter)); } for (auto& t : threads) { t.join(); } println("Result = {}", counter);}由于 increment() 会让 counter 增加 100 次,而总共又启动了 10 个线程,因此你也许会以为最后结果理应是 1000。但如果你运行几次,得到的可能是类似下面这样、而且每次都不同的结果:
Result = 982Result = 977Result = 984这段代码非常直观地展示了 data race:多个线程在完全没有同步的情况下并发写入同一个 counter。在这个例子里,你可以用 atomic type 来修正它。下面这段代码高亮了所需改动:
void increment(atomic<int>& counter){    for (int i { 0 }; i < 100; ++i) {        ++counter;        this_thread::sleep_for(1ms);    }}
int main(){    atomic<int> counter { 0 };    vector<jthread> threads;    for (int i { 0 }; i < 10; ++i) {        threads.emplace_back(increment, ref(counter));    }    for (auto& t : threads) { t.join(); }    println("Result = {}", counter);}
唯一的改动,就是把共享 counter 的类型从 int 改成了 std::atomic<int>。运行这个版本时,你得到的结果就总会是 1000:
Result = 1000Result = 1000Result = 1000即使没有显式加入任何 synchronization mechanism,这段代码现在也已经 thread-safe 且没有 data race 了,因为对 atomic type 执行的 ++counter 会以一个不可中断的 atomic transaction 方式完成加载、递增和存储。
使用 atomic_ref 的话,也可以这样修正 data race:
void increment(int& counter){    atomic_ref<int> atomicCounter { counter };    for (int i { 0 }; i < 100; ++i) {        ++atomicCounter;        this_thread::sleep_for(1ms);    }}
int main(){    int counter { 0 };    vector<jthread> threads;    for (int i { 0 }; i < 10; ++i) {        threads.emplace_back(increment, ref(counter));    }    for (auto& t : threads) { t.join(); }    println("Result = {}", counter);}
不过,这两个修正版本都会引入一个新问题:性能问题。无论是 atomic 还是显式同步,都应尽量减少使用次数,因为同步本身会降低性能。对这个例子来说,最佳也是最推荐的做法,是让 increment() 先在本地变量中完成计算,等循环结束后再一次性把结果加到共享 counter 上。即便如此,你仍然需要使用 atomic 或 atomic_ref,因为最终那次写入依旧是在多个线程之间共享的。
void increment(atomic<int>& counter){ int result { 0 }; for (int i { 0 }; i < 100; ++i) { ++result; this_thread::sleep_for(1ms); } counter += result;}等待原子变量
Section titled “等待原子变量”std::atomic 和 atomic_ref 还提供了下面这组与等待相关的成员函数,可用于高效等待某个 atomic variable 被修改:
| MEMBER FUNCTION | DESCRIPTION |
|---|---|
| wait(oldValue) | 阻塞当前线程,直到其他线程调用 notify_one() 或 notify_all(),并且 atomic 变量的值已经不再等于 oldValue。如果当前值一开始就不等于 oldValue,则函数根本不会阻塞。 |
| notify_one() | 唤醒一个阻塞在 wait() 上的线程。 |
| notify_all() | 唤醒所有阻塞在 wait() 上的线程。 |
示例如下:
atomic<int> value { 0 };
jthread job { [&value] {    println("Thread starts waiting.");    value.wait(0);    println("Thread wakes up, value = {}", value.load());} };
this_thread::sleep_for(2s);
println("Main thread is going to change value to 1.");value = 1;value.notify_all();
输出如下:
Thread starts waiting.Main thread is going to change value to 1.Thread wakes up, value = 1编写 multithreaded application 时,你必须对操作执行顺序保持高度敏感。如果多个线程需要读写共享数据,这就会成为问题。当然,也有很多办法彻底避免这个问题,例如让线程根本不共享任何数据。但如果无法避免共享,那你就必须提供同步手段,确保任意时刻至多只有一个线程可以修改这份数据。
像 Boolean 和整数这样的 scalar,通常可以通过前面讲到的 atomic operation 正确同步;但一旦你的数据更复杂,并且需要在多个线程之间共享使用,那么你就需要显式同步。
Standard Library 通过 mutex 和 lock class 为 mutual exclusion 提供支持。它们可用于在线程之间实现同步,下面几节会逐一讨论。
mutex 这个词来自 mutual exclusion。使用 mutex 的基本机制如下:
- 某个线程如果想访问(读或写)一块和其他线程共享的内存,就会尝试锁住对应的 mutex 对象。如果另一个线程当前已经持有这个锁,那么这个新线程就会阻塞,直到锁被释放,或者直到某个超时区间到期。
- 一旦线程成功拿到这个锁,它就可以安全地使用这块共享内存——当然,前提是所有线程都遵守同样的 mutex 加锁协议。
- 在线程完成读写之后,它会释放这个锁,以便其他线程有机会获取该 mutex。如果有两个或更多线程都在等同一把锁,那么标准并不保证究竟会由哪个线程获得锁并继续执行。
C++ Standard Library 提供 non-timed mutex 和 timed mutex 两大类,而且两者又都区分 recursive 和 non-recursive 版本。不过在逐一讨论这些选项之前,我们先看看一个叫做 spinlock 的概念。
spinlock 是一种同步机制:线程通过 busy loop(也就是“空转自旋”)不断尝试获取锁,拿到之后执行工作,再释放锁。在 spin 过程中,线程一直处于活跃状态,但并没有做任何真正有用的工作。相比之下,如果 mutex 无法立即获取到锁,线程往往会被阻塞。阻塞线程是一项昂贵操作,而 spinlock 正是为了避免这类阻塞而设计的。当你明确知道某个锁只会被持有极短时间时,spinlock 会比较有意义。spinlock 可以完全靠你自己的代码来实现。如下代码片段所示,只用一个 atomic type——atomic_flag——就足以实现 spinlock:
static constexpr unsigned NumberOfThreads { 50 };static constexpr unsigned LoopsPerThread { 100 };
void dowork(unsigned threadNumber, vector<unsigned>& data, atomic_flag& spinlock){    for (unsigned i { 0 }; i < LoopsPerThread; ++i) {        while (spinlock.test_and_set()) { } // Spins until lock is acquired.        // Safe to handle shared data...        data.push_back(threadNumber);        spinlock.clear();                   // Releases the acquired lock.    }}
int main(){    vector<unsigned> data;    atomic_flag dataSpinlock;    vector<jthread> threads;    for (unsigned i { 0 }; i < NumberOfThreads; ++i) {        threads.emplace_back(dowork, i, ref(data), ref(dataSpinlock));    }    for (auto& t : threads) { t.join(); }    println("data contains {} elements, expected {}.", data.size(),        NumberOfThreads * LoopsPerThread);}
由于 spinlock 依赖 busy waiting loop,因此只有在你非常确定线程持锁时间一定极短时,它才值得考虑。
非定时互斥量类
Section titled “非定时互斥量类”Standard Library 提供了三种 non-timed mutex class:std::mutex、recursive_mutex 和 shared_mutex。前两者定义在 <mutex> 中,最后一个定义在 <shared_mutex> 中。每种 mutex 都支持以下成员函数:
lock(): 调用线程尝试获取锁,并一直阻塞,直到锁真正拿到手。try_lock(): 调用线程尝试获取锁。如果当前锁正由别的线程持有,则立即返回;成功则返回true,失败则返回false。unlock(): 调用线程释放自己当前持有的锁,让其他线程有机会获取它。
std::mutex 是标准的 mutual exclusion class,具有独占所有权语义。已经持有某个 mutex 的线程,不允许再次对同一个 mutex 调用 lock() 或 try_lock(),否则可能直接导致 deadlock。
std::recursive_mutex 与 mutex 基本一致,唯一不同在于:已经持有某个 recursive mutex 的线程,可以再次对同一把 recursive mutex 调用 lock() 或 try_lock()。对应地,调用线程也必须调用同样次数的 unlock() 才能彻底释放它。
shared_mutex 支持 shared lock ownership,也常称为 readers-writer lock。线程可以取得 exclusive ownership(write lock)或 shared ownership(read lock)。shared_mutex 除了 lock()、try_lock() 和 unlock() 之外,还提供 lock_shared()、try_lock_shared() 与 unlock_shared(),用于 shared ownership 的获取与释放。
不要手动调用这些 mutex class 的 lock() / unlock() 成员函数。mutex 锁本质上是一种资源,而像所有资源一样,它们几乎总应当通过 RAII 方式获取。Standard Library 提供了专门的 RAII lock class,稍后会介绍。使用它们对避免 deadlock 至关重要。
定时互斥量类
Section titled “定时互斥量类”对 non-timed mutex 调用 lock() 时,会一直阻塞到成功拿到锁;而 try_lock() 则尝试获取锁,失败就立刻返回。除此之外,还有一类 timed mutex class,它们会尝试获取锁,但如果超过某个时间点还没成功,就会主动放弃。
Standard Library 提供了三种 timed mutex class:std::timed_mutex、recursive_timed_mutex 和 shared_timed_mutex。它们都支持 lock()、try_lock() 和 unlock();而 shared_timed_mutex 还支持 lock_shared()、try_lock_shared() 和 unlock_shared()。除此之外,它们还支持:
try_lock_for(rel_time): 在给定相对时间内尝试获取锁。try_lock_until(abs_time): 持续尝试获取锁,直到系统时间达到指定绝对时间点。
shared_timed_mutex 还额外支持 try_lock_shared_for() 和 try_lock_shared_until();而 recursive_timed_mutex 则允许同一线程多次获取同一把锁。
Lock class 是一种 RAII class,它让“正确获取与释放 mutex 上的锁”变得更容易;lock class 的析构函数会自动释放关联的 mutex。C++ 标准一共定义了四种 lock:std::lock_guard、unique_lock、shared_lock 和 scoped_lock。
lock_guard
Section titled “lock_guard”lock_guard 定义在 <mutex> 中,是一种非常简单的 lock,主要用于“构造即加锁、析构即解锁”的场景。它支持直接接收 mutex 引用来获取锁,也支持通过 std::adopt_lock 接管一把调用线程已经手动拿到的锁。
unique_lock
Section titled “unique_lock”std::unique_lock 定义在 <mutex> 中,是更强大的 lock 类型。它允许你延迟加锁、带超时加锁、尝试加锁失败后再稍后加锁,还能通过 owns_lock() 或 bool 转换判断当前是否已经持锁。
shared_lock
Section titled “shared_lock”shared_lock 定义在 <shared_mutex> 中,接口风格与 unique_lock 相同,但底层调用的是 shared_mutex 的 shared ownership 相关成员函数,因此获取的是 shared lock 而不是 exclusive lock。
一次获取多把锁
Section titled “一次获取多把锁”C++ 还提供了两个 generic lock function,用于一次性获取多个 mutex 的锁,而且不会引入 deadlock。它们都定义在 std 命名空间中,并且都是 variadic function template。
第一个函数 lock() 会以未指定顺序锁住所有给定的 mutex object,同时避免 deadlock。其原型如下:
template <class L1, class L2, class... Ln> void lock(L1&, L2&, Ln&...);try_lock() 与其原型类似,但它会依次调用每个 mutex 的 try_lock(),若全部成功则返回 -1;若其中某次失败,则先释放已拿到的锁,再返回失败 mutex 的零基索引。
下面的例子展示了如何使用 generic lock():
mutex mut1;mutex mut2;
void process(){    unique_lock lock1 { mut1, defer_lock };    unique_lock lock2 { mut2, defer_lock };    lock(lock1, lock2);    // Locks acquired.} // Locks automatically released.
scoped_lock
Section titled “scoped_lock”std::scoped_lock 定义在 <mutex> 中,和 lock_guard 类似,但它能同时接收可变数量的 mutex。这让“一次获取多把锁”变得简单很多。例如:
mutex m1;mutex m2;
void process(){ scoped_lock locks { m1, m2 }; // Uses class template argument deduction, CTAD. // Locks acquired.} // Locks automatically released.如果你有一个装着多个 mutex 的 std::array,并且想一次性把它们全部锁住,那么也可以写一个辅助 variadic function template,再结合 std::index_sequence 与 make_index_sequence 来完成。示例如下:
// Helper function to create the actual scoped_lock instance.template <size_t N, size_t... Is>auto make_scoped_lock(array<mutex, N>& mutexes, index_sequence<Is...>){    return scoped_lock { mutexes[Is]... };}
// Helper function to make it easy to use.template <size_t N>auto make_scoped_lock(array<mutex, N>& mutexes){    return make_scoped_lock(mutexes, make_index_sequence<N>{});}
int main(){    array<std::mutex, 4> mutexes;    auto lockAll { make_scoped_lock(mutexes) };}
std::call_once
Section titled “std::call_once”你可以把 std::call_once() 和 std::once_flag 组合使用,以确保某个函数或成员函数恰好只被调用一次——无论有多少线程试图用同一个 once_flag 来调用 call_once()。实际上,只有一次 call_once() 调用会真正执行目标函数。如果目标函数没有抛出任何异常,那么这次调用就叫作 effective call_once() invocation。如果目标函数抛出了异常,那么异常会被传播回调用方,而另一个调用者会被选中重新执行该函数。针对某个特定 once_flag 实例,effective invocation 一定会先于其他同一 once_flag 上的 call_once() 调用结束。其他线程如果在同一个 once_flag 上调用 call_once(),则会一直阻塞到 effective 调用完成为止。
下面这个例子演示了 call_once() 的用法。它启动三个线程来执行 processingFunction(),而这些线程需要使用某些共享资源。共享资源通过 initializeSharedResources() 初始化,而且只初始化一次。为此,每个线程都会对同一个全局 once_flag 调用 call_once()。结果就是:只有一个线程会真正执行 initializeSharedResources(),而且只执行一次。在该调用进行期间,其他线程会一直阻塞,直到 initializeSharedResources() 返回。
once_flag g_onceFlag;
void initializeSharedResources(){    // ... Initialize shared resources to be used by multiple threads.    println("Shared resources initialized.");}
void processingFunction(){    // Make sure the shared resources are initialized.    call_once(g_onceFlag, initializeSharedResources);
    // ... Do some work, including using the shared resources    println("Processing");}
int main(){    // Launch 3 threads.    vector<jthread> threads { 3 };    for (auto& t : threads) {        t = jthread { processingFunction };    }    // No need to manually call join(), as we are using jthread.}
输出如下:
Shared resources initialized.ProcessingProcessingProcessing当然,在这个例子里,你完全可以在 main() 的开头、在线程启动之前,直接调用一次 initializeSharedResources();只不过那样就无法展示 call_once() 的真正用途了。
下面几节给出几个如何使用 mutex 来同步多个线程的示例。
线程安全地写入流
Section titled “线程安全地写入流”前面在 “Threads” 一节中,我们已经看过一个名为 Counter 的类。当时提到过:像 cout 这样的 C++ stream 默认是 data-race-free 的,但多个线程的输出仍然可能发生交错。要解决这个问题,主要有两种办法:
- 使用 synchronized stream
- 使用 mutex,确保任意时刻只有一个线程能读写 stream 对象
<syncstream> 定义了 std::basic_osyncstream,并提供了预定义类型别名 osyncstream 和 wosyncstream,分别用于 char 与 wchar_t stream。这里类名中的 O 表示 output。只要所有线程都通过各自的 osyncstream 对象输出,那么通过这些对象产生的输出内容,都会在该 synchronized stream 析构时一次性进入最终输出流,从而保证不会被别的线程输出打断。从 thread-safety 的角度看,osyncstream 与 ostream 之间的关系,和 atomic_ref<int> 与 int 之间的关系非常类似。
于是,前面 Counter 类中的 function call operator 就可以改写成下面这样,借助 osyncstream 避免交错输出:
class Counter{    public:        explicit Counter(int id, int numIterations)            : m_id { id }, m_numIterations { numIterations } { }
void operator()() const { for (int i { 0 }; i < m_numIterations; ++i) { osyncstream syncedCout { cout }; syncedCout << format("Counter {} has value {}", m_id, i); syncedCout << endl; // Upon destruction, syncedCout atomically flushes // its contents into cout. } } private: int m_id { 0 }; int m_numIterations { 0 };};如果你无法使用 synchronized stream,那么也可以像下面这样,用一个 mutex 来同步 Counter 类中所有对 cout 的访问。这里会新增一个 static mutex 数据成员。之所以必须是 static,是因为所有 Counter 实例都应共享同一个 mutex。对 cout 写入之前,则通过 lock_guard 获取锁。
class Counter{    public:        explicit Counter(int id, int numIterations)            : m_id { id }, m_numIterations { numIterations } { }
        void operator()() const        {            for (int i { 0 }; i < m_numIterations; ++i) {                lock_guard lock { ms_mutex };                cout << format("Counter {} has value {}", m_id, i) << endl;            }        }    private:        int m_id { 0 };        int m_numIterations { 0 };        inline static mutex ms_mutex;};
这段代码在每次 for 循环迭代时都会创建一个 lock_guard。一般建议把持锁时间尽量压缩到最短;否则,你就会让其他等待同一把锁的线程被阻塞太久。例如,如果你把 lock_guard 放到整个 for 循环之前,那这段代码就几乎失去了所有多线程意义,因为某个线程会在整个循环期间一直持有锁,其余线程只能干等它释放。
尽量让锁的持有时间越短越好。这意味着:持锁时应尽量避免执行慢操作,例如输出到控制台、读文件、访问数据库、做长时间计算、显式 sleep,等等。
使用定时互斥量
Section titled “使用定时互斥量”下面这个例子演示了 timed mutex 的用法。它仍然使用前面的 Counter 类,但这一次改成了 timed_mutex 和 unique_lock 的组合。这里给 unique_lock 构造函数传入了 200 毫秒的相对时间,因此它会在 200 毫秒内尝试获取锁;如果在超时时间内还没有拿到锁,构造函数就会返回。之后,你就可以检查是否已经持有该锁。这里通过对变量 lock 直接做 if 判断来完成,因为 unique_lock 定义了 bool 转换运算符。超时时间使用的是 chrono library,详见第 22 章。
class Counter{    public:        explicit Counter(int id, int numIterations)            : m_id { id }, m_numIterations { numIterations } { }
        void operator()() const        {            for (int i { 0 }; i < m_numIterations; ++i) {                unique_lock lock { ms_timedMutex, 200ms };                if (lock) {                    cout << format("Counter {} has value {}", m_id, i) << endl;                } else {                    // Lock not acquired in 200ms, skip output.                }            }        }    private:        int m_id { 0 };        int m_numIterations { 0 };        inline static timed_mutex ms_timedMutex;};
双重检查锁定
Section titled “双重检查锁定”Double-checked locking pattern 实际上是一种 anti-pattern,应尽量避免。这里之所以展示它,是因为你很可能会在一些现有代码库中遇到它。它的思路是:试图绕开 mutex,以一种“半吊子”的方式写出看似更高效的代码。一旦你继续在这个模式上“追求更快”,比如使用 relaxed atomic、用普通 bool 代替 atomic<bool> 等,就很容易彻底出问题。这个模式对 data race 极其敏感,而且很难写对。更讽刺的是:在大多数情况下,使用 call_once() 反而更快;如果适用,magic static 还会更快。
请避免使用 double-checked locking pattern!应当优先使用简单 lock、atomic variable、call_once()、magic static 等其他机制。
举例来说,double-checked locking 可以被拿来保证“共享资源只初始化一次”。下面这个例子展示了它的实现方式。之所以叫 double-checked locking,是因为它会检查 g_initialized 两次:第一次在获取锁之前,第二次在获取锁之后。第一次检查是为了避免不必要的加锁;第二次检查则是为了防止在第一次检查之后、真正拿到锁之前,已经有其他线程完成了初始化。
void initializeSharedResources(){    // ... Initialize shared resources to be used by multiple threads.    println("Shared resources initialized.");}
atomic<bool> g_initialized { false };mutex g_mutex;
void processingFunction(){    if (!g_initialized) {        unique_lock lock { g_mutex };        if (!g_initialized) {            initializeSharedResources();            g_initialized = true;        }    }    print("1");}
int main(){    vector<jthread> threads;    for (int i { 0 }; i < 5; ++i) {        threads.emplace_back(processingFunction);    }}
输出会清楚表明:只有一个线程真正初始化了共享资源:
Shared resources initialized.11111condition variable 允许一个线程一直阻塞,直到某个条件被另一个线程设置,或者直到系统时间到达某个指定时刻。它是一种明确的线程间通信机制。如果你熟悉 Win32 API 下的 multithreaded programming,可以把 condition variable 类比为 Windows 中的 event object。
<condition_variable> 提供了两种 condition variable:
std::condition_variable: 只能等待在unique_lock<mutex>上。根据 C++ 标准,这样在某些平台上可以获得最佳效率。std::condition_variable_any: 可以等待在任意类型的 lock 对象上,包括自定义 lock type。
一个 condition_variable 支持以下成员函数:
-
notify_one();唤醒一个等待在该 condition variable 上的线程。
-
notify_all();唤醒所有等待在该 condition variable 上的线程。
-
wait(unique_lock<mutex>& lk);调用线程在调用
wait()之前,应当已经持有lk上的锁。调用wait()的效果是:它会先原子地执行lk.unlock(),然后阻塞当前线程等待通知。当该线程被其他线程的notify_one()或notify_all()唤醒后,函数会再次调用lk.lock(),必要时继续阻塞,直到重新拿到锁,之后才返回。 -
wait_for(unique_lock<mutex>& lk, const chrono::duration<Rep, Period>& rel_time);与
wait()类似,但除了notify_one()/notify_all()之外,给定超时到期时也会被唤醒。 -
wait_until(unique_lock<mutex>& lk, const chrono::time_point<Clock, Duration>& abs_time);与
wait()类似,但除了通知之外,当系统时间越过指定的绝对时间点时也会被唤醒。
wait()、wait_for() 和 wait_until() 还都有额外接收 predicate 的重载。例如,带 predicate 的 wait() 重载,在语义上等价于:
while (!predicate()) wait(lk);condition_variable_any 支持与 condition_variable 基本相同的一组成员函数,区别只是它接受任意 lock class,而不局限于 unique_lock<mutex>。不过,你传给它的 lock class 至少必须提供 lock() 和 unlock() 成员函数。
等待在 condition variable 上的线程,除了会因为其他线程调用 notify_one() / notify_all() 而被唤醒,也可能因为相对超时到期,或系统时间达到某个时刻而被唤醒。但它们还可能发生 spurious wake-up——也就是“无缘无故醒来”。换句话说,就算没有任何线程调用 notify,也没有任何 timeout 到期,线程依然有可能被唤醒。因此,当一个线程从 condition variable 的等待中返回时,它必须检查自己究竟为什么醒来。解决办法之一,就是使用带 predicate 的 wait() 版本;下一节会展示这种写法。
使用条件变量
Section titled “使用条件变量”一个典型例子,是用 condition variable 让后台线程处理队列中的任务。你可以定义一个 queue,把待处理项目放进去;后台线程则一直等待,直到队列里出现项目。当有新项目入队时,后台线程被唤醒,处理该项目,然后再次进入休眠,等待下一项。假设你有如下 queue:
queue<string> m_queue;为了确保任意时刻只有一个线程能修改这份 queue,我们还需要一把 mutex:
mutex m_mutex;为了能在新项目入队时通知后台线程,还需要一个 condition variable:
condition_variable m_condVar;当某个线程想往队列里添加项目时,它会先拿到 mutex 上的锁,再把项目压进队列,然后通知后台线程。无论调用 notify_one() 还是 notify_all(),都可以在持锁或不持锁的情况下执行。
// Lock mutex and add entry to the queue.lock_guard lock { m_mutex };m_queue.push(entry);// Notify condition variable to wake up thread.m_condVar.notify_all();后台线程则在一个无限循环里等待通知,如下所示。注意这里使用的是带 predicate 的 wait(),以便正确处理 spurious wake-up。这个 predicate 会检查队列是否真的非空;因此,当 wait() 返回时,你就能确定队列里确实有项目可处理。
unique_lock lock { m_mutex };while (true) { // Wait for a notification. m_condVar.wait(lock, [this]{ return !m_queue.empty(); }); // Whenever we reach this line, the mutex is locked and the queue is non-empty. // Process queue item... m_queue.pop();}本章结尾处的 “Example: Multithreaded Logger Class” 一节,会给出一个完整示例,展示如何使用 condition variable 向其他线程发送通知。
标准还定义了一个辅助函数 std::notify_all_at_thread_exit(cond, lk),其中 cond 是 condition variable,lk 是 unique_lock<mutex>。调用这个函数的线程,必须已经持有 lk 所对应的锁。在线程退出时,它会自动执行下面两步:
lk.unlock();cond.notify_all();Latch 是一种一次性的线程协调点。多个线程可以阻塞在同一个 latch 上;一旦有给定数量的线程都到达该点,所有线程就会被同时放行。你可以把它理解成一个会不断倒数的计数器:每有一个线程到达 latch 点,计数器就减一;一旦减到零,latch 就会永久保持“打开”状态,当前所有阻塞线程都会被释放,而之后再到达该 latch 的线程也会立刻被放行。
std::latch 定义在 <latch> 中。构造函数接收一个数值,表示必须有多少线程抵达该 latch 点。线程到达 latch 点后,可以调用 arrive_and_wait():这会让 latch 计数器减一,并阻塞线程直到 latch 被触发。线程也可以只阻塞而不减少计数,此时调用的是 wait()。如果只是想检查计数器是否已经归零,则可以使用 try_wait()。此外,如果需要,线程还可以调用 count_down(),仅仅减少计数而不阻塞自己。
第一个例子展示的是这样一种用法:一份数据被拆分后并行处理。下面的代码会启动多个 worker thread,每个线程各自完成一部分工作。当某个 worker thread 做完自己的工作后,它就会对 latch 调用 count_down(),表示自己已经完成。主线程则对 latch 调用 wait(),等待计数器归零,也就是等待所有 worker thread 全部结束。
// Launch a number of threads to do some work.constexpr unsigned numberOfWorkerThreads { 10 };latch latch { numberOfWorkerThreads };vector<jthread> threads;for (unsigned i { 0 }; i < numberOfWorkerThreads; ++i) { threads.emplace_back([&latch, i] { // Do some work... print("{} ", i); this_thread::sleep_for(1s); print("{} ", i); // When work is done, decrease the latch counter. latch.count_down(); });}// Wait for all worker threads to finish.latch.wait();println("\nAll worker threads are finished.");第二个例子展示的是另一种 latch 场景:某些数据需要先被加载到内存中(I/O bound),而加载完成后又要被多个线程并行处理。假设这些线程在开始处理数据前,还需要先完成一些 CPU-bound 初始化。那么,把线程先启动起来,让它们并行完成初始化,同时再并行去加载数据,就能带来更好的整体性能。下面的代码把 latch 的计数器初始化为 1,然后启动 10 个线程。每个线程先做一点初始化,随后阻塞在这个 latch 上,直到计数器降到 0。主线程在启动完这 10 个线程后,再去加载数据(例如从磁盘读取),这是一个 I/O-bound 步骤。等数据全部就绪后,只需把 latch 的计数器减到 0,就能同时唤醒所有等待中的线程。
latch startLatch { 1 };vector<jthread> threads;for (int i { 0 }; i < 10; ++i) {    threads.emplace_back([&startLatch] {        // Do some initialization... (CPU bound)
        // Wait until the latch counter reaches zero.        startLatch.wait();
        // Process data...    });}
// Load data... (I/O bound)
// Once all data has been loaded, decrement the latch counter// which then reaches zero and unblocks all waiting threads.startLatch.count_down();
barrier
Section titled “barrier”Barrier 是一种可重用的线程协调机制,由一系列 phase 构成。多个线程会阻塞在 barrier 点;每当有指定数量的线程都到达 barrier 时,就会执行一次 phase completion callback,随后唤醒所有阻塞线程,重置线程计数器,并进入下一 phase。并且在每一个 phase 期间,下一 phase 所期望的线程数还可以调整。barrier 非常适合用在“循环之间的同步”。比如,假设你有一组并发线程,它们在循环中执行某些计算;而一旦这一轮计算全部结束,你又需要对结果做某些处理,处理完之后线程才能开始下一轮循环。对这种场景来说,barrier 就非常理想:每个线程做完工作后,都阻塞在 barrier 上;等所有线程都到达 barrier 后,phase completion callback 统一处理它们的结果,然后再放行所有线程进入下一轮。
barrier 由定义在 <barrier> 中的 std::barrier class template 实现。它最重要的成员函数是 arrive_and_wait(),该函数会先让计数器减一,然后阻塞调用线程,直到当前 phase 完成。至于其他可用成员函数的完整列表,请查阅 Standard Library 参考资料。
下面这段代码演示了 barrier 的用法。它模拟的是一个使用 robot 的生产环境:在每一次迭代中,所有 robot 都要先完成自己的工作;某个 robot 完成后,会等待其他 robot 也完成;等全部 robot 都完成后,系统会准备下一轮,并通知所有 robot 重新开始。与 barrier 相关的操作已标出。
constexpr unsigned numberOfRobots { 2 };constexpr unsigned numberOfIterations { 3 };unsigned iterationCount { 1 };vector<jthread> robots;
auto completionCallback { [&] () noexcept {    if (iterationCount == numberOfIterations) {        println("Finished {} iterations, stopping robots.", numberOfIterations);        for (auto& robot : robots) { robot.request_stop(); }    } else {        ++iterationCount;        println("All robots finished. Preparing iteration {}.", iterationCount);        this_thread::sleep_for(1s);        println("Iteration {} ready to start. Waking up robots.", iterationCount);    }} };
barrier robotSynchronization { numberOfRobots, completionCallback };
auto robotThreadFunction { [&](stop_token token, string_view name) {    println("   Thread for robot {} started.", name);    while (!token.stop_requested()) {        this_thread::sleep_for(1s);        println("   {} finished.", name);        robotSynchronization.arrive_and_wait();    }    println("   {} shutting down.", name);} };
println("Preparing first iteration. Creating {} robot threads.", numberOfRobots);
for (unsigned i { 0 }; i < numberOfRobots; ++i) {    robots.emplace_back(robotThreadFunction, format("Robot_{}", i));}
for (auto& robot : robots) { robot.join(); }println("Done with all work.");
输出如下:
Preparing first iteration. Creating 2 robot threads. Thread for robot Robot_0 started. Thread for robot Robot_1 started. Robot_1 finished. Robot_0 finished.All robots finished. Preparing iteration 2.Iteration 2 ready to start. Waking up robots. Robot_1 finished. Robot_0 finished.All robots finished. Preparing iteration 3.Iteration 3 ready to start. Waking up robots. Robot_1 finished. Robot_0 finished.Finished 3 iterations, stopping robots. Robot_0 shutting down. Robot_1 shutting down.Done with all work.本章末尾的一道练习会让你继续改进这个 robot simulation:让主线程先启动所有 robot thread,等待所有 robot 都已启动,再准备第一轮迭代,然后统一通知所有等待中的 robot 开始工作。
semaphore
Section titled “semaphore”Semaphore 是一种轻量级同步原语,可作为 mutex、latch、barrier 等其他同步机制的构建模块。简单来说,semaphore 内部维护着一个表示 slot 数量的计数器,这个计数器会在构造函数中初始化。获取一个 slot 时,计数器减一;释放一个 slot 时,计数器加一。定义在 <semaphore> 中的 semaphore class 有两种:std::counting_semaphore 和 binary_semaphore。前者表示一个非负的资源计数;后者只有一个 slot,因此该 slot 要么空闲、要么已被占用,非常适合拿来作为 mutex 的构建块。它们都支持以下成员函数:
| MEMBER FUNCTION | DESCRIPTION |
|---|---|
| acquire() | 计数器减一。如果计数器当前为零,则阻塞直到可以减一为止。 |
| try_acquire() | 尝试把计数器减一;若计数器已经为零,则不阻塞并返回 false,否则返回 true。 |
| try_acquire_for() | 与 try_acquire() 相同,但会在给定 duration 内尝试。 |
| try_acquire_until() | 与 try_acquire() 相同,但会持续尝试直到系统时间到达某个时刻。 |
| release() | 将计数器增加指定数量,并唤醒阻塞在 acquire() 上的线程。 |
counting semaphore 可以精确控制“允许多少线程同时并发运行”。例如,下面这段代码最多只允许四个线程并行执行。从输出可以清楚看出,任何时刻最多只有四个线程能够同时获得 semaphore。
counting_semaphore semaphore { 4 };vector<jthread> threads;for (int i { 0 }; i < 10; ++i) { threads.emplace_back([&semaphore, i] { semaphore.acquire(); // ... Slot acquired ... (at most 4 threads concurrently) print("{}", i); this_thread::sleep_for(5s); semaphore.release(); });}semaphore 的另一个常见用途,是作为线程通知机制,替代 condition variable。例如,你可以把 semaphore 的计数器初始化为 0。这样,任何调用 acquire() 的线程都会阻塞,直到别的线程对该 semaphore 调用 release()。
Future 与 Promise
Section titled “Future 与 Promise”正如前面已经讨论过的,仅仅使用 std::thread 去启动一个“计算单个结果”的线程,并不方便在线程结束后把结果拿回来。std::thread 的另一个问题,是它对错误(比如 exception)的处理方式:如果线程内部抛出异常,而该异常没有在线程内部被捕获,那么 C++ runtime 就会调用 std::terminate(),往往直接终止整个应用。
Future 让“从线程中拿回结果”这件事变得容易得多,同时也能把 exception 从一个线程传递到另一个线程,由后者按自己的需要处理。
Promise 可以理解成“线程用来存放结果的地方”。future 则是用来读取 promise 中结果的那一端:promise 是结果的输入侧,future 是结果的输出侧。一旦某个函数——无论运行在同一线程还是另一个线程——算出了它要返回的值,它就把这个值放进 promise;之后,这个值就可以通过 future 取出来。promise/future 组合,本质上就是一条用于在线程间传递单次结果的 one-shot 通信通道。
C++ 提供了标准 future,叫作 std::future。可以按下面的方式从 std::future 中取出结果,其中 T 是结果的类型:
future<T> myFuture { ... }; // Is discussed later.T result { myFuture.get() };对 get() 的调用会取出结果并保存到变量 result 中。如果结果尚未计算完成,那么 get() 会阻塞,直到结果可用。一个 future 只能调用一次 get();第二次调用的行为在标准中是未定义的。
如果你想避免阻塞,可以先看看 future 是否已经有结果可取:
if (myFuture.wait_for(0s) == future_status::ready) { // Value is available. T result { myFuture.get() };} else { // Value is not yet available. ...}std::promise 与 std::future
Section titled “std::promise 与 std::future”C++ 提供 std::promise class,作为实现 promise 概念的一种方式。你可以对某个 promise 调用 set_value() 来存入结果,也可以调用 set_exception() 来存入异常。对同一个 promise,set_value() 或 set_exception() 都只能调用一次;如果重复调用,就会抛出 std::future_error。
另外,也可以使用 set_value_at_thread_exit() 或 set_exception_at_thread_exit(),把值或异常延迟到“线程退出时”再写入 promise。使用它们时,值或异常会在线程退出、并且所有 thread-local storage 变量都已销毁之后,才真正进入 promise。
假设线程 A 启动线程 B 去做某项计算。那么 A 可以先创建一个 promise,并把它传给 B。promise 不能复制,但可以 move 进线程。线程 B 使用这个 promise 来存储结果。在线程 A 把 promise move 给 B 之前,它先对该 promise 调用 get_future(),从而获取 future,等 B 完成后就能通过这个 future 读取结果。一个简单示例如下:
void doWork(promise<int> thePromise){    // ... Do some work ...    // And ultimately store the result in the promise.    thePromise.set_value(42);}
int main(){    // Create a promise to pass to the thread.    promise<int> myPromise;    // Get the future of the promise.    auto theFuture { myPromise.get_future() };    // Create a thread and move the promise into it.    jthread theThread { doWork, move(myPromise) };
    // Do some more work...
// Get the result. int result { theFuture.get() }; println("Result: {}", result);}std::packaged_task
Section titled “std::packaged_task”与上一节直接使用 std::promise 相比,std::packaged_task 让 promise 的用法更简单。下面这段代码就展示了这一点。它创建一个 packaged_task 来执行 calculateSum();随后通过 get_future() 从 packaged_task 中取出 future;再启动一个线程,把这个 packaged_task move 进去执行。和 std::promise 一样,packaged_task 也是 move-only。线程启动之后,对得到的 future 调用 get(),就能在结果可用后取回它。
calculateSum() 本身并不显式把任何东西存进 promise。packaged_task 会自动创建 promise,并自动把 callable——这里是 calculateSum()——的运行结果(无论是正常返回值,还是抛出的 exception)存入该 promise。
int calculateSum(int a, int b) { return a + b; }
int main(){    // Create a packaged task to run calculateSum.    packaged_task task { calculateSum };    // Get the future for the result of the packaged task.    auto theFuture { task.get_future() };    // Create a thread, move the packaged task into it, and    // execute the packaged task with the given arguments.    jthread theThread { move(task), 39, 3 };
    // Do some more work...
    // Get the result.    int result { theFuture.get() };    println("Result: {}", result);}
std::async
Section titled “std::async”如果你希望把“究竟是否真的创建新线程来完成某项计算”这件事交给 C++ runtime 自己决定,那么可以使用 std::async()。它接受一个待执行的 callable,并返回一个 future,让你可以之后取出结果。async() 运行 callable 的方式有两种:
- 在另一个线程上异步执行
- 当你对返回的 future 调用
get()时,在调用线程中同步执行
如果调用 async() 时不传入额外参数,那么 runtime 会根据系统 CPU core 数量、当前并发程度等因素,自动在上述两种机制之间做选择。你也可以通过 policy 参数来影响 runtime 的行为:
launch::async:强制 runtime 在另一线程中异步执行 callable。launch::deferred:强制 runtime 在调用线程中、且仅在get()调用时同步执行 callable。launch::async | launch::deferred:由 runtime 自行决定(也是默认行为)。
示例如下:
int calculateSum(int a, int b) { return a + b; }
int main(){    auto myFuture { async(calculateSum, 39, 3) };    //auto myFuture { async(launch::async, calculateSum, 39, 3) };    //auto myFuture { async(launch::deferred, calculateSum, 39, 3) };
    // Do some more work...
// Get the result. int result { myFuture.get() }; println("Result: {}", result);}从这个例子可以看出,std::async() 是执行“某项计算”,并在之后取回结果的最轻松方式之一。无论该计算最终是在另一个线程中异步执行,还是在当前线程中同步执行,它都适用。
由 async() 返回的 future,会在析构函数中一直阻塞到结果可用为止。(普通 future 不会这样;只有 async() 返回的这种 future 会。)这意味着:如果你调用 async() 却没有保存返回的 future,那么这次 async() 调用实际上就退化成了阻塞调用。
使用 future 的一大优势,是它们能够在线程之间传递 exception。对 future 调用 get() 时,要么返回计算结果,要么重新抛出存放在其关联 promise 中的异常。当你使用 packaged_task 或 async() 时,目标 callable 中抛出的任何 exception 都会被自动保存进 promise;而如果你直接使用 std::promise,则可以手动调用 set_exception() 把异常存进去。下面是一个使用 async() 的例子:
int calculate(){    throw runtime_error { "Exception thrown from calculate()." };}
int main(){    // Use the launch::async policy to force asynchronous execution.    auto myFuture { async(launch::async, calculate) };
    // Do some more work...
    // Get the result.    try {        int result { myFuture.get() };        println("Result: {}", result);    } catch (const exception& ex) {        println("Caught exception: {}", ex.what());    }}
std::shared_future
Section titled “std::shared_future”std::future<T> 只要求 T 是 move-constructible 的。对 future<T> 调用 get() 时,结果会被 move 出来并返回给你;这也意味着,对同一个 future<T>,get() 只能调用一次。
如果你希望能够多次调用 get(),甚至从多个线程中都能调用,那么就需要 std::shared_future<T>。shared_future 可以通过对 std::future 调用 share() 来创建,也可以通过把一个 future 传给 shared_future 构造函数来创建。因为 future 本身不可复制,所以传给 shared_future 构造函数时必须使用 move。
shared_future 还可以被用于一次性唤醒多个线程。例如,下面这段代码定义了两个 lambda expression,它们会异步运行在不同线程上。每个 lambda 一开始都会给各自的 promise 设值,以表示“自己已经启动”;接着它们都会对 signalFuture 调用 get(),并阻塞在那里,直到某个值通过对应 future 变得可用,然后才继续往下执行。两个 lambda 都按引用捕获了各自的 promise,并按值捕获了 signalFuture,因此它们都各自拥有一份 signalFuture 副本。主线程通过 async() 把这两个 lambda 异步启动到不同线程中,等两个线程都启动完后,再向 signalPromise 中设置参数,从而同时唤醒这两个线程。
promise<void> thread1Started, thread2Started;
promise<int> signalPromise;auto signalFuture { signalPromise.get_future().share() };//shared_future<int> signalFuture { signalPromise.get_future() };
auto function1 { [&thread1Started, signalFuture] {    thread1Started.set_value();    // Wait until parameter is set.    int parameter { signalFuture.get() };    // ...} };
auto function2 { [&thread2Started, signalFuture] {    thread2Started.set_value();    // Wait until parameter is set.    int parameter { signalFuture.get() };    // ...} };
// Run both lambda expressions asynchronously.// Remember to capture the future returned by async()!auto result1 { async(launch::async, function1) };auto result2 { async(launch::async, function2) };
// Wait until both threads have started.thread1Started.get_future().wait();thread2Started.get_future().wait();
// Both threads are now waiting for the parameter.// Set the parameter to wake up both of them.signalPromise.set_value(42);
示例:多线程 Logger 类
Section titled “示例:多线程 Logger 类”这一节通过一个 multithreaded Logger class,展示如何综合使用 thread、mutex、lock 与 condition variable。这个类允许来自不同线程的 log message 被追加到一个 queue 中,而 Logger 本身会在一个后台线程中处理这个 queue,并以串行方式把 log 写入文件。为了展示编写 multithreaded code 时会遇到的真实问题,这个类会分两个迭代版本逐步设计。
C++ 标准本身并没有 thread-safe queue,因此很明显,你必须使用某种 synchronization mechanism 来保护这份 queue,防止多个线程同时对它读写。本例采用 mutex 与 condition variable 来实现同步。在此基础上,你可能会把 Logger class 先定义成这样:
这个 Logger class 使用的是 std::thread,而不是 jthread。这样做是为了展示:1)不正确使用 thread 会带来怎样灾难性的后果;2)把 thread 用错到底有多容易。
export class Logger{ public: // Starts a background thread writing log entries to a file. Logger(); // Prevent copy construction and assignment. Logger(const Logger&) = delete; Logger& operator=(const Logger&) = delete; // Add log entry to the queue. void log(std::string entry); private: // The function running in the background thread. void processEntries(); // Helper member function to process a queue of entries. void processEntriesHelper(std::queue<std::string>& queue, std::ofstream& ofs) const; // Mutex and condition variable to protect access to the queue. std::mutex m_mutex; std::condition_variable m_condVar; std::queue<std::string> m_queue; // The background thread. std::thread m_thread;};其实现如下。这个初始设计里藏着几个问题;实际运行时,它很可能表现异常,甚至直接崩溃。下一轮设计会讨论并修复这些问题。这里尤其值得注意的是 processEntries() 成员函数中的 while 循环:它会处理当前 queue 中已有的所有消息。在线程持有锁时,它先把当前 queue 的内容与一个位于栈上的空局部 queue 交换;这样做完后,锁就可以释放掉,从而让其他线程不再被阻塞,可以继续往那个现在已经清空的 queue 中写入新消息。而交换出来的局部 queue,则可以在不持锁的情况下慢慢处理,因为其他线程根本不会碰它。
Logger::Logger(){    // Start background thread.    m_thread = thread { &Logger::processEntries, this };}
void Logger::log(string entry){    // Lock mutex and add entry to the queue.    lock_guard lock { m_mutex };    m_queue.push(move(entry));    // Notify condition variable to wake up thread.    m_condVar.notify_all();}
void Logger::processEntries(){    // Open log file.    ofstream logFile { "log.txt" };    if (logFile.fail()) {        println(cerr, "Failed to open logfile.");        return;    }
    unique_lock lock { m_mutex }; // Acquire a lock on m_mutex.    while (true) { // Start processing loop.        // Wait for a notification.        m_condVar.wait(lock);
        // Condition variable is notified, so something might be in the queue.
        // While we still have the lock, swap the contents of the current queue        // with an empty local queue on the stack.        queue<string> localQueue;        localQueue.swap(m_queue);
        // Now that all entries have been moved from the current queue to the        // local queue, we can release the lock so other threads are not blocked        // while we process the entries.        lock.unlock();
        // Process the entries in the local queue on the stack. This happens after        // having released the lock, so other threads are not blocked anymore.        processEntriesHelper(localQueue, logFile);
        lock.lock();    }}
void Logger::processEntriesHelper(queue<string>& queue, ofstream& ofs) const{    while (!queue.empty()) {        ofs << queue.front() << endl;        queue.pop();    }}
从这样一个已经相当简单的任务里,你应该也能看出来:写对 multithreaded code 有多难。遗憾的是,至少到目前为止,C++ Standard Library 还没有提供现成的 concurrent data structure。
这个 Logger class 可以用下面这段测试代码来验证。它会启动多个线程,并让它们都把若干消息写入同一个 Logger 实例。
void logSomeMessages(int id, Logger& logger){    for (int i { 0 }; i < 10; ++i) {        logger.log(format("Log entry {} from thread {}", i, id));        this_thread::sleep_for(50ms);    }}
int main(){    Logger logger;    vector<jthread> threads;    // Create a few threads all working with the same Logger instance.    for (int i { 0 }; i < 10; ++i) {        threads.emplace_back(logSomeMessages, i, ref(logger));    }}
如果你构建并运行这个初始版实现,会发现应用会被突然终止。这是因为程序从未对 Logger 的后台线程调用 join() 或 detach()。还记得本章前面讲过:只要某个 joinable 的 thread 对象在析构时仍然没有被 join() 或 detach(),其析构函数就会调用 std::terminate(),直接终止所有线程和整个应用。这也意味着:queue 中尚未处理完的消息根本来不及写入磁盘文件。有些 runtime library 甚至还会在这种终止方式下报错或生成 crash dump。
要解决这个问题,你需要加入一种机制,能够优雅地关闭后台线程,并在应用退出前等待后台线程彻底结束。最直接的做法,是给这个类增加一个析构函数,以及一个 Boolean 数据成员。更新后的类定义如下:
export class Logger{ public: // Gracefully shut down background thread. virtual ~Logger(); // Other public members omitted for brevity. private: // Boolean telling the background thread to terminate. bool m_exit { false }; // Other members omitted for brevity.};析构函数会把 m_exit 设为 true,唤醒后台线程,然后等待该线程彻底退出。析构函数在设置 m_exit = true 之前,必须先拿到 m_mutex 的锁。这是为了避免与 processEntries() 之间形成 race condition 或 deadlock:设想 processEntries() 此时刚好处在其 while 循环开头,已经检查过 m_exit,但还没调用 wait();如果这时主线程正好进入 Logger 析构函数,而析构函数又没有先锁住 m_mutex,那么它就可能在 processEntries() 检查完 m_exit 之后、进入等待之前,把 m_exit 设成 true 并发送通知。这样一来,processEntries() 就既看不到新的 m_exit 值,也会错过那次通知,最终导致:析构函数阻塞在 join() 上,而后台线程永久阻塞在 condition variable 上,形成死锁。析构函数中的 notify_all() 可以在持锁状态下调用,也可以在释放锁之后调用;但无论如何,在调用 join() 之前必须确保锁已经被释放,这也就是下面多出来那层花括号作用域的原因。
Logger::~Logger(){ { lock_guard lock { m_mutex }; // Gracefully shut down the thread by setting m_exit to true. m_exit = true; } // Notify condition variable to wake up thread. m_condVar.notify_all(); // Wait until thread is shut down. This should be outside the above code // block because the lock must be released before calling join()! m_thread.join();}processEntries() 成员函数也必须检查这个 Boolean,并在它变为 true 时退出处理循环。同时,只有在 queue 为空时才应调用 wait()。
void Logger::processEntries(){    // Omitted for brevity.
    unique_lock lock { m_mutex }; // Acquire a lock on m_mutex.    while (true) { // Start processing loop.        if (!m_exit) { // Only wait for notifications if we don't have to exit.            if (m_queue.empty()) { // Only wait if the queue is empty.                m_condVar.wait(lock);            }        } else {            // We have to exit, process the remaining entries in the queue.            processEntriesHelper(m_queue, logFile);            break;        }
        // Condition variable is notified, so something might be in the queue        // and/or we need to shut down this thread.
        queue<string> localQueue;        localQueue.swap(m_queue);        lock.unlock();        processEntriesHelper(localQueue, logFile);
        lock.lock();    }}
你不能只是简单地把 m_exit 写进外层 while 循环条件里,因为即便 m_exit 已经为 true,queue 中仍然可能还有没写完的 log entry。
为了触发某些特定行为,你可以在 multithreaded code 的某些位置人为加入延迟。这类延迟只应当用于测试,最终正式代码中必须删掉!例如,如果你想验证析构函数那里的 race condition 是否已经解决,可以把主程序中所有 log() 调用都去掉,让它几乎立刻进入 Logger 析构函数;然后在下面这个位置加入延迟:
void Logger::processEntries(){ // Omitted for brevity. unique_lock lock { m_mutex }; while (true) { if (!m_exit) { // Only wait for notifications if we don't have to exit. this_thread::sleep_for(1000ms); if (m_queue.empty()) { // Only wait if the queue is empty. m_condVar.wait(lock); } } // Remaining code omitted, same as before. }}与其在程序生命周期中不断动态创建和销毁线程,不如预先创建一个线程池(thread pool),需要时反复复用其中线程。对于那些希望在某种事件到来时交给线程处理的程序,这是一种很常见的技术。大多数环境中,理想线程数大致等于处理器 core 数量。如果线程数多于 core 数,那么线程就必须相互让出执行机会,这会带来额外开销。当然,线程数等于 core 数这个结论,只在“线程完全 compute bound、不会因其他原因阻塞(包括 I/O)”的情况下才成立。如果线程可能阻塞,那么线程数量大于 core 数往往反而是合理的。至于这时的最佳线程数是多少,则通常需要结合 throughput 测试来决定。
由于不同处理任务未必完全相同,因此线程池中的线程往往会接收一个 callable,把它作为输入的一部分,表示真正要执行的计算。
因为 thread pool 中的线程本来就已经存在,所以让 OS 调度线程池中的某个线程去执行任务,要比“为了响应输入临时创建一个新线程”高效得多。此外,使用 thread pool 还能帮助你更好管理线程总数——在不同平台上,这个数量可能从 1 一直到几千不等。
目前已经有不少现成库实现了 thread pool,例如 Intel Threading Building Blocks(TBB)、Microsoft Parallel Patterns Library(PPL)等等。对于 thread pool,我建议优先使用这些现成库,而不是自己重新实现。如果你真的想亲自实现 thread pool,它的思路与 object pool 很相似;第 29 章“编写高效 C++”中给出过 object pool 的实现示例。
coroutine 是一种函数:它可以在执行过程中途被挂起,并在稍后某个时刻恢复继续执行。只要函数体中出现下面任意一个关键字,它就是 coroutine:
co_await: 在等待某项计算完成时挂起 coroutine;待计算完成后恢复执行。co_return: 从 coroutine 返回(在 coroutine 中不能使用普通return)。一旦执行了它,该 coroutine 就无法再恢复。co_yield: 向调用方产出一个值,并挂起 coroutine。下一次再次调用该 coroutine 时,会从挂起点继续执行。
一般来说,coroutine 可以分成两类:stackful 和 stackless。Stackful coroutine 可以在一层层嵌套调用的很深位置被挂起;而 stackless coroutine 只能在当前最顶层 stack frame 上挂起。stackless coroutine 被挂起时,只会保存函数体中那些具有 automatic storage duration 的变量与临时对象,而不会保存整条调用栈。因此,stackless coroutine 的内存开销非常低,这使得同时运行数百万、甚至数十亿个 coroutine 成为可能。C++ 只支持 stackless 这一种。
严格来说,coroutine 本身并不一定和 multithreading 有任何关系。它们更像是一种“让函数能被挂起并在稍后恢复”的机制。当然,如果有需要,coroutine 也完全可以运行在 multithreaded 环境中。
coroutine 常见的用途包括:
- Generator
- Asynchronous I/O
- Lazy computation
- Event-driven application
- State machine
std::generator。generator 允许单线程在“生成结果”和“处理这些结果”之间来回切换,而不需要借助多个线程。
下面这段代码展示了定义在 <generator> 中的 std::generator class template 的用法:
generator<int> getSequenceGenerator(int startValue, int numberOfValues){    for (int i { startValue }; i < startValue + numberOfValues; ++i) {        // Print the local time to standard out, see Chapter 22.        auto currentTime { system_clock::now() };        auto localTime { current_zone()->to_local(currentTime) };        print("{:%H:%M:%OS}: ", localTime);        // Yield a value to the caller, and suspend the coroutine.        co_yield i;    }}
int main(){    auto gen { getSequenceGenerator(10, 5) };    for (const auto& value : gen) {        print("{} (Press enter for next value)", value);        cin.ignore();    }}
运行该程序时,最开始的输出如下:
16:35:42: 10 (Press enter for next value)按一次 Enter 后,会追加一行:
16:35:42: 10 (Press enter for next value)16:36:03: 11 (Press enter for next value)再按一次 Enter,又会多出一行:
16:35:42: 10 (Press enter for next value)16:36:03: 11 (Press enter for next value)16:36:21: 12 (Press enter for next value)每次按下 Enter,都会向 generator 请求一个新值。这会让 coroutine 恢复执行,在 getSequenceGenerator() 中跑完 for 循环的下一次迭代,输出当前本地时间,并返回下一个值。返回值的动作通过 co_yield 完成:它先产出这个值,然后立即挂起 coroutine。值本身会在 main() 中被打印出来,后面再跟一句“按 Enter 获取下一个值”。从输出可以非常直观地看出:这个 coroutine 被反复挂起、又被反复恢复。
遗憾的是,就本书范围来说,关于 coroutine 也就只能讲到这里。自己实现 coroutine(例如 std::generator 这种层次)过于复杂,远远超出本书范围。我建议优先使用由专家写好的现成 coroutine facility。如果你需要的 coroutine facility 不止 Standard Library 提供的 generator,也有第三方库可选,例如 cppcoro1 和 concurrencpp2,它们都提供了一系列更高层的 coroutine 能力。本节的主要目标,只是让你知道这件事确实存在。也许未来的某个 C++ 标准,会继续加入更多高层、标准化的 coroutine facility。
线程设计与最佳实践
Section titled “线程设计与最佳实践”这一节列出一些与 multithreaded programming 相关的 best practice。
- 优先使用并行版 Standard Library algorithm: Standard Library 拥有大量 algorithm,其中 60 多个支持并行执行。只要可行,应优先使用这些并行 algorithm,而不是自己手写多线程逻辑。关于如何为 algorithm 指定并行化选项,见第 20 章“掌握标准库算法”。
- 优先使用
jthread而不是thread: 因为jthread会在析构时自动 join,所以它更不容易被误用,也更安全。 - 关闭应用前,确保所有
thread对象都已 unjoinable: 如果你确实在用thread,那么必须保证每个thread对象都已经调用过join()或detach()。仍然 joinable 的thread在析构时会调用std::terminate(),直接终止全部线程和应用本身。还要记住:一旦detach(),线程就会继续运行。如果它此时仍在访问某些非平凡类型的全局变量,那么这些访问可能会和进程退出阶段的全局对象析构发生 race,最终导致程序在退出时崩溃。这类 bug 往往很难调试。 - 最好的同步就是不需要同步: 如果你能把程序设计成:多个线程面对共享数据时只读不写,或者只写那些其他线程永远不会读的部分,那么就根本不需要任何同步,也就不会出现 data race 或 deadlock 这类问题。
- 尽量采用 single-thread ownership pattern: 也就是某块数据在任意时刻都只归一个线程所有。所谓“拥有”,意味着其他线程既不能读,也不能写这份数据。等该线程处理完之后,再把这份数据完整移交给另一个线程。因为永远只有一个线程拥有它,所以根本不需要同步。
- 能用 atomic type / atomic operation 时就尽量用: 它们会自动处理同步问题,因此更容易写出没有 data race、也没有 deadlock 的代码。如果设计上无法使用 atomic,那么就必须借助 mutex 等同步机制来保护共享数据。
- 用 lock 保护可变共享数据: 如果你必须让多个线程写同一份可变共享数据,而且又不能使用 atomic,那么就必须使用 lock 机制来同步这些线程间的读写。
- 尽快释放锁: 当你确实需要 lock 保护共享数据时,一定要尽可能早地释放锁。线程持锁期间,其他线程都会被阻塞在同一把锁上,从而影响性能。
- 使用 RAII lock object: 优先使用
lock_guard、unique_lock、shared_lock或scoped_lock这些 RAII class,让锁在正确时机自动释放。 - 不要手动获取多把锁;改用
std::lock()、try_lock()或scoped_lock: 如果多个线程都需要获取多把锁,它们必须以一致顺序获取,才能避免 deadlock。最好直接用std::lock()/try_lock()或scoped_lock来统一完成。 - 使用支持多线程分析的 profiler: 这样能帮你定位 multithreaded application 中的性能瓶颈,并确认多个线程是否真的在把系统的处理能力吃满。Microsoft Visual Studio 自带的 profiler 就是这种工具的一个例子。
- 理解你的 debugger 对多线程的支持: 大多数 debugger 至少都具备基础的多线程调试能力。你应当能够查看应用中全部正在运行的线程列表,并切换到其中任意一个线程去检查调用栈。例如,这在排查 deadlock 时就很有帮助,因为你可以清楚看到每个线程此刻在做什么。
- 优先使用 thread pool,而不是频繁动态创建/销毁线程: 如果程序不停地动态创建和销毁线程,性能通常会明显下降。在这种情况下,更好的方案是使用 thread pool 来复用现有线程。
- 尽量使用更高层的多线程库: 截至目前,C++ 标准给你的更多还是编写 multithreaded code 的基础构建块,而正确使用这些构建块并不容易。只要条件允许,优先考虑使用更高层的多线程库,例如 Intel Threading Building Blocks(TBB)、Microsoft Parallel Patterns Library(PPL)等,而不是重复造轮子。multithreaded programming 本来就极易出错;大多数时候,你自己造出来的轮子往往没有你想象中那么圆。
本章简要概览了标准 C++ threading support library 所提供的 multithreaded programming 基础能力。你学习了如何使用 std::thread 启动线程,也看到了 jthread 如何让线程管理更安全、更不容易出错,并让编写可取消线程变得轻松很多。你还了解了如何使用 atomic type 和 atomic operation,在不显式使用同步机制的情况下操作共享数据;而当无法使用 atomic 时,你也学习了如何借助 mutex 与 condition variable 来保证多个线程对共享数据的读写同步。此外,本章还介绍了 semaphore、latch 和 barrier 这些同步原语,也展示了 promise 和 future 作为线程间单次通信通道的角色——future 让你能更方便地从线程中取回结果。本章最后以对 coroutine 的简短介绍,以及一组 multithreaded application 设计 best practice 收尾。
正如引言中所说,本章尽量触及了 Standard Library 提供的多线程基础构件,但受限于篇幅,不可能把 multithreaded programming 的全部细节讲透。市面上已有不少整本书都只讨论这一主题。若想继续深入,请参考附录 B中的相关资料。
通过完成下面这些练习,你可以巩固本章讨论的内容。所有练习的参考解答都包含在本书网站 www.wiley.com/go/proc++6e 提供的代码下载包中。不过,如果你在某道题上卡住了,建议先回过头重读本章相关部分,尽量自己找到答案,再去看网站上的解答。
- 练习 27-1: 编写一个应用,使它每隔三秒无限次发出蜂鸣声。这个三秒延迟必须作为参数传给你的线程函数。提示:把
\a输出到标准输出即可让计算机发出蜂鸣。 - 练习 27-2: 修改你在练习 27-1 中的解法,使用户按下 Enter 键时,应用可以停止。
- 练习 27-3: 再修改练习 27-1 的解法,使蜂鸣声会持续响,直到用户按下 Enter;按下 Enter 后应暂停蜂鸣;再次按 Enter 时应恢复蜂鸣。用户应能无限次地暂停和恢复。
- 练习 27-4: 编写一个应用,并发计算若干个 Fibonacci 数。例如,代码应能并行计算 Fibonacci 数列中的第 4、9、14、17 项。Fibonacci 数列从 0 和 1 开始,之后每一项都是前两项之和,因此依次为:0、1、1、2、3、5、8、13、21、34、55、89,等等。等所有结果都可用后,把它们输出到标准输出;最后,再使用一个带约束的 Standard Library algorithm 计算它们的总和。
- 练习 27-5: 改进本章前面那个 robot 示例。你可以在下载源码包的
Ch27\05_barrier\barrier.cpp中找到它。请让主线程先启动所有 robot thread,等待所有 robot 都完成启动,再准备第一轮迭代,然后统一通知所有等待中的 robot 开始工作。 - 练习 27-6: 使用
compare_exchange_strong()实现一个函数atomicMin(a, b),它会以原子方式把a设为min(a, b);其中a是atomic<int>,而b是int。