Becoming Adept at Testing
A programmer has overcome a major hurdle in her career when she realizes that testing is part of the software development process. Bugs are not an occasional occurrence. They are found in every project of significant size. A good quality assurance (QA) team is invaluable, but the full burden of testing cannot be placed on QA alone. Your responsibility as a programmer is to write code that works and to write tests to prove its correctness.
A distinction is often made between white-box testing, in which the tester is aware of the inner workings of the program, and black-box testing, which tests the program’s functionality without any knowledge of its implementation. Both forms of testing are important to professional-quality projects. Black-box testing is the most fundamental approach because it typically models the behavior of a user. For example, a black-box test can examine interface components such as buttons. If the tester clicks the button and nothing happens, there is obviously a bug in the program.
Black-box testing cannot cover everything. Modern programs are too large to employ a simulation of clicking every button, providing every kind of input, and performing all combinations of commands. White-box testing is necessary, because when you know the code—when tests are written to exercise a specific object or subsystem—then it is easier to make sure all code paths in the code are exercised by tests. This helps to ensure test coverage. White-box tests are often easier to write and automate than black-box tests. This chapter focuses on topics that would generally be considered white-box testing techniques because the programmer can use these techniques during the development.
This chapter begins with a high-level discussion of quality control, including some approaches to viewing and tracking bugs. A section on unit testing, one of the simplest and most useful types of testing, follows this introduction. You then read about the theory and practice of unit testing, as well as several examples of unit tests in action, and what fuzz testing is. Next, higher-level tests are covered, including integration tests, system tests, and regression tests. Finally, this chapter ends with a list of tips for successful testing.
QUALITY CONTROL
Section titled “QUALITY CONTROL”Large programming projects are rarely finished when a feature-complete goal is reached. There are always bugs to find and fix, both during and after the main development phase. It is essential to understand the shared responsibility of quality control and the life cycle of a bug to perform well in a group.
Whose Responsibility Is Testing?
Section titled “Whose Responsibility Is Testing?”Software development organizations have different approaches to testing. In a small startup, there may not be a group of people whose full-time job is testing the product. Testing may be the responsibility of the individual developers, or all the employees of the company may be asked to lend a hand and try to break the product before its release. In larger organizations, a full-time quality assurance staff probably qualifies a release by testing it according to a set of criteria. Nonetheless, some aspects of testing may still be the responsibility of the developers. Even in organizations where the developers have no role in formal testing, you still need to be aware of what your responsibilities are in the larger process of quality assurance.
The Life Cycle of a Bug
Section titled “The Life Cycle of a Bug”All good engineering groups recognize that bugs will occur in software both before and after its release. There are many different ways to deal with these problems. Figure 30.1 shows a formal bug process, expressed as a flow chart. In this particular process, a bug is always filed by a member of the QA team. The bug reporting software sends a notification to the development manager, who sets the priority of the bug and assigns the bug to the appropriate module owner. The module owner can accept the bug or explain why the bug actually belongs to a different module or is invalid, giving the development manager the opportunity to assign it to someone else.
Once the bug has found its rightful owner, a fix is made, and the developer marks the bug as “fixed.” At this point, the QA engineer verifies that the bug no longer exists and marks the bug as “closed” or reopens the bug if it is still present.

[^FIGURE 30.1]
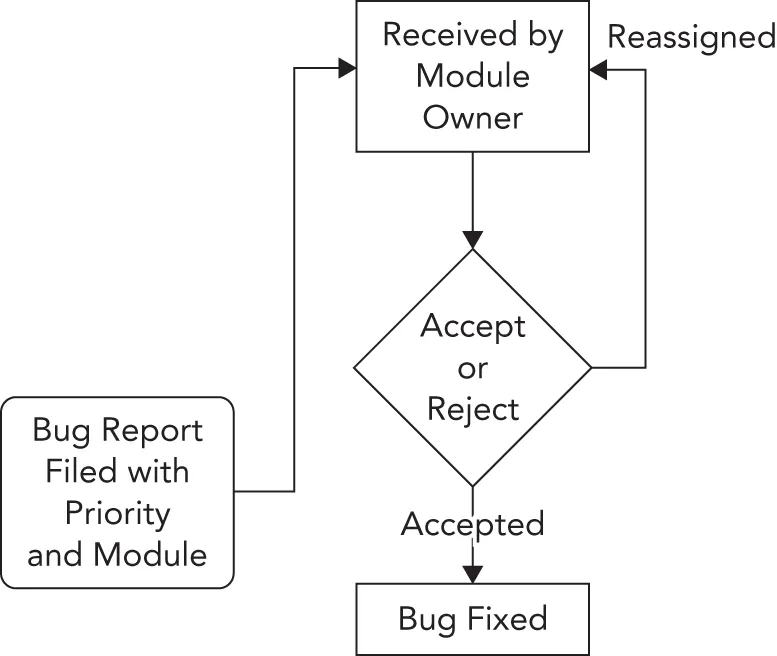
Figure 30.2 shows a less formal approach. In this workflow, anybody can file a bug and assign an initial priority and a module. The module owner receives the bug report and can either accept it or reassign it to another engineer or module. When a correction is made, the bug is marked as “fixed.” Toward the end of the testing phase, all the developers and QA engineers divide up the fixed bugs and verify that each bug is no longer present in the current build. The release is ready when all bugs are marked as “closed.”
[^FIGURE 30.2]
Bug-Tracking Tools
Section titled “Bug-Tracking Tools”There are many ways to keep track of software bugs, from informal spreadsheet- or e-mail-based schemes to expensive third-party bug-tracking software. The appropriate solution for your organization depends on the group’s size, the nature of the software, and the level of formality you want to build around bug fixing.
There are also a number of free open-source bug-tracking solutions available. One of the more popular free tools for bug tracking is Bugzilla (bugzilla.org), written by the authors of the Mozilla and Firefox web browser. As an open-source project, Bugzilla has gradually accumulated a number of useful features to the point where it now rivals expensive bug-tracking software packages. Here are just a few of its many features:
- Customizable settings for a bug, including its priority, associated component, status, and so on
- E-mail notification of new bug reports or changes to an existing report
- Tracking of dependencies between bugs and resolution of duplicate bugs
- Reporting and searching tools
- A web-based interface for filing and updating bugs
Figure 30.3 shows a bug being entered into a Bugzilla project that was set up for the second edition of this book. For my purposes, each chapter was input as a Bugzilla component. The filer of the bug can specify the severity of the bug (that is, how big of a deal it is). A summary and description are included to make it possible to search for the bug or list it in a report format.

[^FIGURE 30.3]
When writing a bug report, make sure to include as much information as possible in the report. For example, if your bug report is about an error you get, put the full error message in the bug report as text, not only as a screenshot. This allows other people to find your bug report if they come across the same error.
Bug-tracking tools like Bugzilla are essential components of a professional software development environment. In addition to supplying a central list of currently open bugs, bug-tracking tools provide an important archive of previous bugs and their fixes. A support engineer, for instance, might use the tool to search for a problem similar to one reported by a customer. If a fix was made, the support person will be able to tell the customer which version they need to update to or how to work around the problem.
UNIT TESTING
Section titled “UNIT TESTING”The only way to find bugs is through testing. One of the most important types of tests from a developer’s point of view is the unit test. Unit tests are pieces of code that exercise specific functionality of a class or subsystem. These are the finest-grained tests that you could possibly write. Ideally, one or more unit tests should exist for every low-level task that your code can perform. For example, imagine that you are writing a math library that can perform addition and multiplication. Your suite of unit tests might contain the following tests:
- Test a simple addition like 1+2
- Test addition of large numbers
- Test addition of negative numbers
- Test addition of zero to a number
- Test the commutative property of addition
- Test a simple multiplication
- Test multiplication of large numbers
- Test multiplication of negative numbers
- Test multiplication with zero
- Test the commutative property of multiplication
Well-written unit tests protect you in many ways:
- They prove that a piece of functionality actually works. Until you have some code that actually makes use of your class, its behavior is a major unknown.
- They provide a first alert when a recently introduced change breaks something. This specific usage, called a regression test, is covered later in this chapter.
- When used as part of the development process, they force the developer to fix problems from the start. If you are prevented from checking in your code with failed unit tests, then you’re forced to address problems right away.
- Unit tests let you try code before other code is in place. When you first started programming, you could write an entire program and then run it for the first time. Professional programs are too big for that approach, so you need to be able to test components in isolation.
- Last, but certainly not least, they provide an example of usage. Almost as a side effect, unit tests make great reference code for other programmers. If a co-worker wants to know how to perform matrix multiplication by using your math library, you can point her to the appropriate test.
Approaches to Unit Testing
Section titled “Approaches to Unit Testing”It’s hard to go wrong with unit tests, unless you don’t write them or you write them poorly. In general, the more tests you have, the more coverage you have. The more coverage you have, the less likely it is for bugs to fall through the cracks and for you to have to tell your boss, or worse, your customer, “Oh, we never tested that.”
There are several methodologies for writing unit tests most effectively. The Extreme Programming methodology, explained in Chapter 28, “Maximizing Software Engineering Methods,” instructs its followers to write unit tests before writing code.
Writing tests first helps you to solidify the requirements for the component and to provide a metric that can be used to determine when coding is done. However, writing tests first can be tricky and requires diligence on the part of the programmer. For some programmers, it simply doesn’t mesh well with their coding style. A less rigid approach is to design the tests before coding but implement them later in the process. This way, the programmer is still forced to understand the requirements of the module but doesn’t have to write code that makes use of nonexistent classes.
In some groups, the author of a particular subsystem doesn’t write the unit tests for that subsystem. The idea is that if you write the tests for your own code, you might subconsciously work around problems that you know about or only cover certain cases that you know your code handles well. In addition, it’s sometimes difficult to get excited about finding bugs in code you just wrote, so you might only put in a half-hearted effort. Having one developer write unit tests for another developer’s code requires a lot of extra overhead and coordination. When such coordination is accomplished, however, this approach helps guarantee more effective tests.
Code coverage is a metric to measure how much of the code is covered by unit tests. Such a metric allows you to maximize code coverage when writing unit tests. You can use a code coverage tool, such as gcov (gcc.gnu.org/onlinedocs/gcc/Gcov.html), that tells you what percentage of the code is called by unit tests. The idea is that a properly tested piece of code has unit tests to test all possible code paths that can be taken through that piece of code and thus reaches 100 percent unit-test code coverage. Different code coverage tools have different definitions of code coverage. Does the tool consider a line to be covered if it’s an if statement written on a single line and the body was never executed? How does the tool define coverage for templates? Does the tool support branch coverage to make sure each possible direction of a branch is covered? Always do some research on any tool you intend to use.
The Unit Testing Process
Section titled “The Unit Testing Process”The process of providing unit tests for your code starts from the beginning, long before any code is written. Keeping unit testability in mind during the design phase can influence the design decisions you make for your software. Even if you do not subscribe to the methodology of writing unit tests before you write code, you should at least take the time to consider what sorts of tests you will provide, even while still in the design phase. This way, you can break the task up into well-defined chunks, each of which has its own test-validated criteria. For example, if your task is to write a database access class, you might first write the functionality that inserts data into the database. Once that is fully tested with a suite of unit tests, you can continue to write the code to support updates, deletes, and selects, testing each piece as you go.
The following list of steps is a suggested approach for designing and implementing unit tests. As with any programming methodology, the best process is the one that yields the best results. I suggest that you experiment with different ways of using unit tests to discover what works best for you.
Define the Granularity of Your Tests
Section titled “Define the Granularity of Your Tests”Writing unit tests takes time; there is no way around this. Software developers are often crunched for time. To reach deadlines, developers tend to skip writing unit tests, because they think they will finish faster that way. Unfortunately, this thinking does not take the whole picture into account. Omitting unit tests will backfire in the long run. The earlier a bug is detected in the software development process, the less it costs. If a developer finds a bug during unit testing, it can be fixed immediately, before anyone else encounters it. However, if the bug is discovered by QA, then it becomes a much costlier bug. The bug can cause an extra development cycle, requiring bug management; it has to go back to the development team for a fix and then back to QA to verify the fix. If a bug slips through the QA process and finds its way to the customer, then it becomes even more expensive.
The granularity of tests refers to their scope. As the following table illustrates, you can initially unit test a database class with just a few test functions and then gradually add more tests to ensure that everything works as it should:
| LARGE-GRAINED TESTS | MEDIUM-GRAINED TESTS | FINE-GRAINED TESTS |
|---|---|---|
testConnection() testInsert() testUpdate() testDelete() testSelect() | testConnectionDropped() testInsertBadData() testInsertStrings() testInsertIntegers() testUpdateStrings() testUpdateIntegers() testDeleteNonexistentRow() testSelectComplicated() testSelectMalformed() | testConnectionThroughHTTP() testConnectionLocal() testConnectionErrorBadHost() testConnectionErrorServerBusy() testInsertWideCharacters() testInsertLargeData() testInsertMalformed() testUpdateWideCharacters() testUpdateLargeData() testUpdateMalformed() testDeleteWithoutPermissions() testDeleteThenUpdate() testSelectNested() testSelectWideCharacters() testSelectLargeData() |
As you can see, each successive column brings in more-specific tests. As you move from large-grained tests to more finely grained tests, you start to consider error conditions, different input data sets, and different modes of operation.
Of course, the decisions you make initially when choosing the granularity of your tests are not set in stone. Perhaps the database class is just being written as a proof of concept and might not even be used. A few simple tests may be adequate now, and you can always add more later. Or perhaps the use cases will change at a later date. For example, the database class might not initially have been written with international characters in mind. Once such features are added, they should be tested with specific targeted unit tests.
Consider the unit tests to be part of the actual implementation of a feature. When you make a modification, don’t just modify the tests so that they continue to work (although of course you should do this too). Write new tests and re-evaluate the existing ones. When bugs are uncovered and fixed, add new unit tests that specifically test those fixes, called regression tests.
Unit tests are part of the subsystem that they are testing. As you enhance and refine the subsystem, enhance and refine the tests.
Brainstorm the Individual Tests
Section titled “Brainstorm the Individual Tests”Over time, you will gain an intuition for which aspects of a piece of code should turn into a unit test. Certain functions or inputs will just feel like they should be tested. This intuition is gained through trial and error and by looking at unit tests that other people in your group have written. It should be pretty easy to pick out which programmers are the best unit testers. Their tests tend to be organized and frequently modified.
Until unit test creation becomes second nature, approach the task of figuring out which tests to write by brainstorming. To get some ideas flowing, consider the following questions:
- What are the things that this piece of code was written to do?
- What are the typical ways each function would be called?
- What preconditions of the functions could be violated by the caller?
- How could each function be misused?
- What kinds of data are you expecting as input?
- What kinds of data are you not expecting as input?
- What are the edge cases or exceptional conditions?
You don’t need to write formal answers to those questions (unless your manager is a particularly fervent devotee of this book or of certain testing methodologies), but they should help you generate some ideas for unit tests. The table of tests for the database class contained test functions, each of which arose from one of these questions.
Once you have generated ideas for some of the tests you would like to use, consider how you might organize them into categories; the breakdown of tests will fall into place. In the database class example, the tests could be split into the following categories:
- Basic tests
- Error tests
- Localization tests
- Bad input tests
- Complicated tests
Splitting your tests into categories makes them easier to identify and augment. It might also make it easier to realize which aspects of the code are well tested and which could use a few more unit tests.
It’s easy to write a massive number of simple tests, but don’t forget about the more complicated cases!
Create Sample Data and Results
Section titled “Create Sample Data and Results”The most common trap to fall into when writing unit tests is to match the test to the behavior of the code, instead of using the test to validate the code. If you write a unit test that performs a database select for a piece of data that is definitely in the database, and the test fails, is it a problem with the code or a problem with the test? It’s often easier to assume that the code is right and to modify the test to match. This approach is usually wrong.
To avoid this pitfall, you should understand the inputs to the test and the expected output before you try it. This is sometimes easier said than done. For example, say you wrote some code to encrypt an arbitrary block of text using a particular key. A reasonable unit test would take a fixed string of text and pass it in to the encryption module. Then, it would examine the result to see if it was correctly encrypted.
When you go to write such a test, it is tempting to try the behavior with the encryption module first and see the result. If it looks reasonable, you might write a test to look for that value. Doing so really doesn’t prove anything, however! You haven’t actually tested the code; you’ve just written a test that guarantees it will continue to return that same value. Oftentimes, writing the test requires some real work; you would need to encrypt the text independently of your encryption module to get an accurate result. If you don’t know the encryption algorithm being used, e.g., because it’s coming from a third-party library, then you can at least write tests such as decrypt(encrypt(x))==x and encrypt(a)!=encrypt(b).
Decide on the correct output for your test before you ever run the test.
Write the Tests
Section titled “Write the Tests”The exact code behind a test varies depending on what type of test framework you have in place. One framework, the Microsoft Visual C++ Testing Framework, is discussed later in this chapter. Independent of the actual implementation, however, the following guidelines will help ensure effective tests:
- Make sure that you’re testing only one thing in each test. That way, if a test fails, it will point to a specific piece of functionality.
- Be specific inside the test. Did the test fail because an exception was thrown or because the wrong value was returned?
- Use logging extensively inside of test code. If the test fails someday, you will have some insight into what happened.
- Avoid tests that depend on earlier tests or are otherwise interrelated. Tests should be as atomic and isolated as possible.
- If the test requires the use of other subsystems, consider writing stubs or mocks to simulate those subsystems. A stub or mock implements the same interface as the subsystem it simulates. They can then be used in place of any concrete subsystem implementation. For example, if a unit test requires a database but that database is not the subsystem being tested by that unit test, then a stub or mock can implement the database interface and simulate a real database. This way, running the unit test does not require a connection to a real database, and errors in the real database implementation won’t have any impact on this specific unit test. In fact, you can use a mock to simulate error conditions that might be difficult or impossible to reliably achieve using the real database!
- Code reviewers must not only review the code but review the unit tests as well. When you do a code review, tell the other engineer where you think additional tests could be added.
As you will see later in this chapter, unit tests are usually small and simple pieces of code. In most cases, writing a single unit test will take only a few minutes, making unit tests one of the most productive uses of your time.
Run the Tests
Section titled “Run the Tests”When you’re done writing a test, you should run it right away before the anticipation of the results becomes too much to bear. The joy of a screen full of passing unit tests shouldn’t be minimized. For most programmers, this is the easiest way to see quantitative data that declares your code useful and (as far as you know) correct.
Even if you adopt the methodology of writing tests before writing code, you should still run the tests immediately after they are written. This way, you can prove to yourself that the tests fail initially. Once the code is in place, you have tangible data that shows that it accomplished what it was supposed to accomplish.
It’s unlikely that every test you write will have the expected result the first time. In theory, if you are writing tests before writing code, all of your tests should fail. If one passes, either the code magically appeared or there is a problem with the test. If the coding is done and tests still fail (some would say that if tests fail, the coding is actually not done), there are two possibilities: the code could be wrong, or the tests could be wrong.
Running unit tests must be automated. This can be done in several ways. One option is to have a dedicated system that automatically runs all unit tests after every continuous integration build, or at least once a night. Such a system must send out e-mails to notify developers when unit tests are failing. Another option is to set up your local development environment so that unit tests are executed every time you compile your code. For this, unit tests should be kept small and very efficient. If you do have longer-running unit tests, put these separate, and let these be tested by a dedicated test system.
Unit Testing in Action
Section titled “Unit Testing in Action”Now that you’ve read about unit testing in theory, it’s time to actually write some tests. The following example draws on the object pool implementation from Chapter 29, “Writing Efficient C++.” As a brief recap, the object pool is a class that can be used to avoid allocating an excessive number of objects. By keeping track of already-allocated objects, the pool acts as a broker between code that needs a certain type of object and such objects that already have been allocated.
The public interface for the ObjectPool class template is as follows; consult Chapter 29 for all the details:
exporttemplate <typename T, typename Allocator = std::allocator<T>>class ObjectPool final{    public:        ObjectPool() = default;        explicit ObjectPool(const Allocator& allocator);        ~ObjectPool();
        // Prevent move construction and move assignment.        ObjectPool(ObjectPool&&) = delete;        ObjectPool& operator=(ObjectPool&&) = delete;
        // Prevent copy construction and copy assignment.        ObjectPool(const ObjectPool&) = delete;        ObjectPool& operator=(const ObjectPool&) = delete;
        // Reserves and returns an object from the pool. Arguments can be        // provided which are perfectly forwarded to a constructor of T.        template <typename… Args>        std::shared_ptr<T> acquireObject(Args&&… args);};
Introducing the Microsoft Visual C++ Testing Framework
Section titled “Introducing the Microsoft Visual C++ Testing Framework”Microsoft Visual C++ comes with a built-in testing framework. The advantage of using a unit testing framework is that it allows the developer to focus on writing tests instead of dealing with setting up tests, building logic around tests, and gathering results. The following discussion is written for Visual C++ 2022.
To get started with the Visual C++ Testing Framework, you have to create a test project. The following steps explain how to test the ObjectPool class template:
- Start Visual C++, create a new project, select Native Unit Test Project, and click Next.
- Give the project a name and click Create.
- The wizard creates a new test project, which includes a file called <
ProjectName>.cpp. Select this file in the Solution Explorer and delete it, because you will add your own files. If the Solution Explorer docking window is not visible, go to View ➪ Solution Explorer. - Right-click your project in the Solution Explorer and click Properties. Go to Configuration Properties ➪ C/C++ ➪ Precompiled Headers, set the Precompiled Header option to Not Using Precompiled Headers, and click OK. Additionally, select the
pch.cppandpch.hfiles in the Solution Explorer and delete them. Using precompiled headers is a feature of Visual C++ to improve build times but is not used for this test project. - Add empty files called
ObjectPoolTest.handObjectPoolTest.cppto the test project.
Now you are ready to start adding unit tests to the code.
The most common technique is to divide your unit tests into logical groups of tests, called test classes. You will now create a test class called ObjectPoolTest. The basic code in ObjectPoolTest.h for getting started is as follows:
#pragma once#include <CppUnitTest.h>
TEST_CLASS(ObjectPoolTest){    public:};
This code defines a test class called ObjectPoolTest, but the syntax is a bit different compared to standard C++. This is so that the framework can automatically discover all the tests.
If you need to perform any tasks that need to happen prior to running the tests defined in a test class or to perform any cleanup after the tests have been executed, then you can implement an initialize and a cleanup member function. Here is an example:
TEST_CLASS(ObjectPoolTest){ public: TEST_CLASS_INITIALIZE(setUp); TEST_CLASS_CLEANUP(tearDown);};Because the tests for the ObjectPool class template are relatively simple and isolated, empty definitions will suffice for setUp() and tearDown(), or you can simply remove them altogether. If you do need them, the beginning stage of the ObjectPoolTest.cpp source file is as follows:
#include "ObjectPoolTest.h"
void ObjectPoolTest::setUp() { }void ObjectPoolTest::tearDown() { }
That’s all the initial code you need to start developing unit tests.
Writing the First Test
Section titled “Writing the First Test”Because this may be your first exposure to the Visual C++ Testing Framework, or to unit tests at large, the first test will be a simple one. It tests whether 0 < 1.
An individual unit test is just a member function of a test class. To create a simple test, add its declaration to the ObjectPoolTest.h file:
TEST_CLASS(ObjectPoolTest){    public:        TEST_CLASS_INITIALIZE(setUp);        TEST_CLASS_CLEANUP(tearDown);
        TEST_METHOD(testSimple);  // Your first test!};
The implementation of the testSimple test uses Assert::IsTrue(), defined in the Microsoft::VisualStudio::CppUnitTestFramework namespace, to perform the actual test. Assert::IsTrue() validates that a given expression returns true. If the expression returns false, the test fails. Assert provides many more helper functions, such as AreEqual(), IsNull(), Fail(), ExpectException(), and so on. In the testSimple case, the test claims that 0 is less than 1. Here is the updated ObjectPoolTest.cpp file:
#include "ObjectPoolTest.h"
using namespace Microsoft::VisualStudio::CppUnitTestFramework;
void ObjectPoolTest::setUp() { }void ObjectPoolTest::tearDown() { }
void ObjectPoolTest::testSimple(){    Assert::IsTrue(0 < 1);}
That’s it. Of course, most of your unit tests will do something a bit more interesting than a simple assert. As you will see, the common pattern is to perform some sort of calculation and then assert that the result is the value you expect. With the Visual C++ Testing Framework, you don’t even need to worry about exceptions; the framework catches and reports them as necessary.
Building and Running Tests
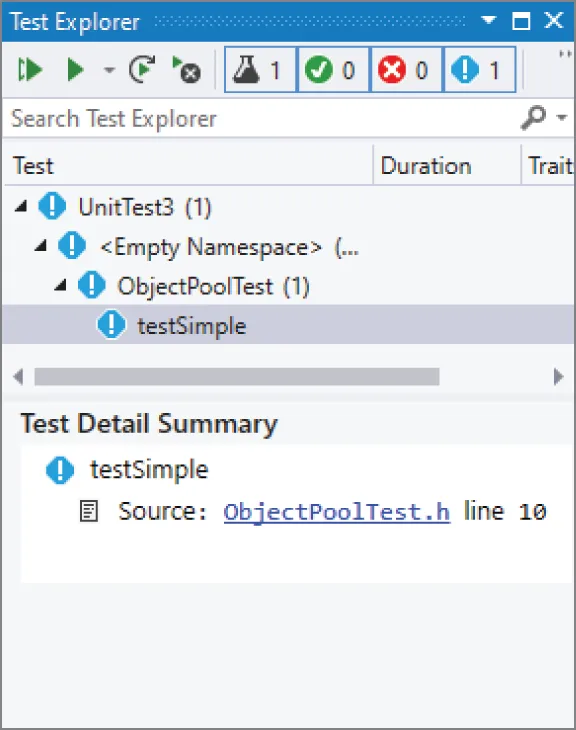
Section titled “Building and Running Tests”Build your solution by clicking Build ➪ Build Solution, and open the Test Explorer (Test ➪ Test Explorer), shown in Figure 30.4.
[^FIGURE 30.4]
After having built the solution, the Test Explorer automatically displays all discovered unit tests. In this case, it displays the testSimple unit test. You can run all tests by clicking the Run All Tests button in the upper-left corner of the window. When you do that, the Test Explorer shows whether the unit tests succeed or fail. In this case, the single unit test succeeds, as shown in Figure 30.5.
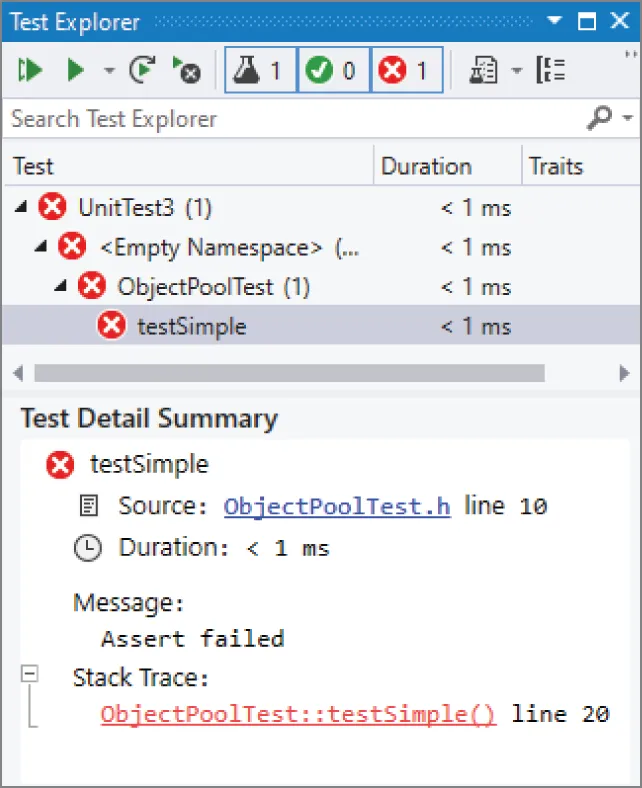
If you modify the code to assert that 1 < 0, the test fails, and the Test Explorer reports the failure, as shown in Figure 30.6.

[^FIGURE 30.5]
[^FIGURE 30.6]
The lower part of the Test Explorer window displays useful information related to the selected unit test. In case of a failed unit test, it tells you exactly what failed. In this case, it says that an assertion failed. There is also a stack trace that was captured at the time the failure occurred. You can click the hyperlinks in that stack trace to jump directly to the offending line—very useful for debugging.
Negative Tests
Section titled “Negative Tests”You can write negative tests, tests that do something that should fail. For example, you can write a negative test to test that a certain function throws an expected exception. The Visual C++ Testing Framework provides the Assert::ExpectException() function to handle expected exceptions. For example, the following unit test uses ExpectException() to execute a lambda expression that throws an std::invalid_argument exception, defined in <stdexcept>1. The template type parameter for ExpectException() specifies the type of exception to expect.
void ObjectPoolTest::testException(){ Assert::ExpectException<std::invalid_argument>( []{ throw std::invalid_argument { "Error" }; });}Adding the Real Tests
Section titled “Adding the Real Tests”Now that the framework is all set up and a simple test is working, it’s time to turn your attention to the ObjectPool class template and write some code that actually tests it. All of the following tests will be added to ObjectPoolTest.h and ObjectPoolTest.cpp, just like the earlier initial tests.
First, copy the ObjectPool.cppm module interface file next to the ObjectPoolTest.h file you created, and then add it to the project. ObjectPool.cppm uses C++23 functionality, which is not yet enabled by default in Visual C++ 2022 at the time of this writing. To enable it, open the project properties, go to Configuration Properties ➪ General, and set the C++ Language Standard to “Preview - Features from the Latest C++ Working Draft.” In a future version of Visual C++, you will be able to set this option to “ISO C++23 Standard.”
Before you can write the tests, you’ll need a helper class to use with the ObjectPool. The ObjectPool creates objects of a certain type and hands them out to the caller as requested. Some of the tests will need to check if a retrieved object is the same as a previously retrieved object. One way to do this is to create a pool of serial objects—objects that have a monotonically increasing serial number. The following code shows the Serial.cppm module interface file defining such a class:
export module serial;
export class Serial{    public:        // A new object gets a next serial number.        Serial() : m_serialNumber { ms_nextSerial++ } { }        unsigned getSerialNumber() const { return m_serialNumber; }    private:        static inline unsigned ms_nextSerial { 0 }; // The first serial number is 0        unsigned m_serialNumber { 0 };};
Now, on to the tests! As an initial sanity check, you might want a test that creates an object pool. If any exceptions are thrown during creation, the Visual C++ Testing Framework will report an error. The code is written according to the AAA principle: Arrange, Act, Assert; the test first sets up everything for the test to run, then does some work, and finally asserts the expected result. This is also often called the if-when-then principle. I recommend adding comments to your unit test that actually start with IF, WHEN, and THEN so the three phases of a test clearly stand out.
void ObjectPoolTest::testCreation(){    // IF nothing
    // WHEN creating an ObjectPool    ObjectPool<Serial> myPool;
    // THEN no exception is thrown}
Don’t forget to add a TEST_METHOD(testCreation); statement to the header file. This holds for all subsequent tests as well. You also need to add an import declaration for the object_pool and serial modules to the ObjectPoolTest.cpp source file.
import object_pool;import serial;A second test, testAcquire(), tests a specific piece of public functionality: the ability of the ObjectPool to give out an object. In this case, there is not much to assert. To prove the validity of the resulting Serial object, the test asserts that its serial number is greater than or equal to zero.
void ObjectPoolTest::testAcquire(){ // IF an ObjectPool has been created for Serial objects ObjectPool<Serial> myPool; // WHEN acquiring an object auto serial { myPool.acquireObject() }; // THEN we get a valid Serial object Assert::IsTrue(serial->getSerialNumber()>= 0);}The next test is a bit more interesting. The ObjectPool should not give out the same Serial object twice. This test checks the exclusivity property of the ObjectPool by retrieving a number of objects from the pool. The serial numbers of all retrieved objects are stored in a set. If the pool is properly dishing out unique objects, none of their serial numbers should match.
void ObjectPoolTest::testExclusivity(){    // IF an ObjectPool has been created for Serial objects    ObjectPool<Serial> myPool;    // WHEN acquiring several objects from the pool    const size_t numberOfObjectsToRetrieve { 20 };    set<unsigned> seenSerialNumbers;
    for (size_t i { 0 }; i < numberOfObjectsToRetrieve; ++i) {        auto nextSerial { myPool.acquireObject() };        seenSerialNumbers.insert(nextSerial->getSerialNumber());    }
    // THEN all retrieved serial numbers are different.    Assert::AreEqual(numberOfObjectsToRetrieve, seenSerialNumbers.size());}
The final test (for now) checks the release functionality. Once an object is released, the ObjectPool can give it out again. The pool shouldn’t allocate additional objects until it has recycled all released objects.
The test first acquires 10 Serial objects from the pool, stores them in a vector to keep them alive, and records the raw pointer of each acquired Serial. Once all 10 objects have been retrieved, they are released back to the pool.
The second phase of the test again retrieves 10 objects from the pool and stores them in a vector to keep them alive. All these retrieved objects must have a raw pointer that has already been seen during the first phase of the test. This validates that objects are properly reused by the pool.
void ObjectPoolTest::testRelease(){ // IF an ObjectPool has been created for Serial objects ObjectPool<Serial> myPool; // AND we acquired and released 10 objects from the pool, while // remembering their raw pointers const size_t numberOfObjectsToRetrieve { 10 }; // A set to remember all raw pointers that have been handed out by the pool. set<Serial*> retrievedSerialPointers; vector<shared_ptr<Serial>> retrievedSerials; for (size_t i { 0 }; i < numberOfObjectsToRetrieve; ++i) { auto object { myPool.acquireObject() }; retrievedSerialPointers.push_back(object.get()); // Add the retrieved Serial to the vector to keep it 'alive'. retrievedSerials.push_back(object); } // Release all objects back to the pool. retrievedSerials.clear();
// The above loop has created 10 Serial objects, with 10 different // addresses, and released all 10 Serial objects back to the pool.
// WHEN again retrieving 10 objects from the pool, and // remembering their raw pointers. set<Serial*> newlyRetrievedSerialPointers; for (size_t i { 0 }; i < numberOfObjectsToRetrieve; ++i) { auto object { myPool.acquireObject() }; newlyRetrievedSerialPointers.push_back(object.get()); // Add the retrieved Serial to the vector to keep it 'alive'. retrievedSerials.push_back(object); } // Release all objects back to the pool. retrievedSerials.clear();
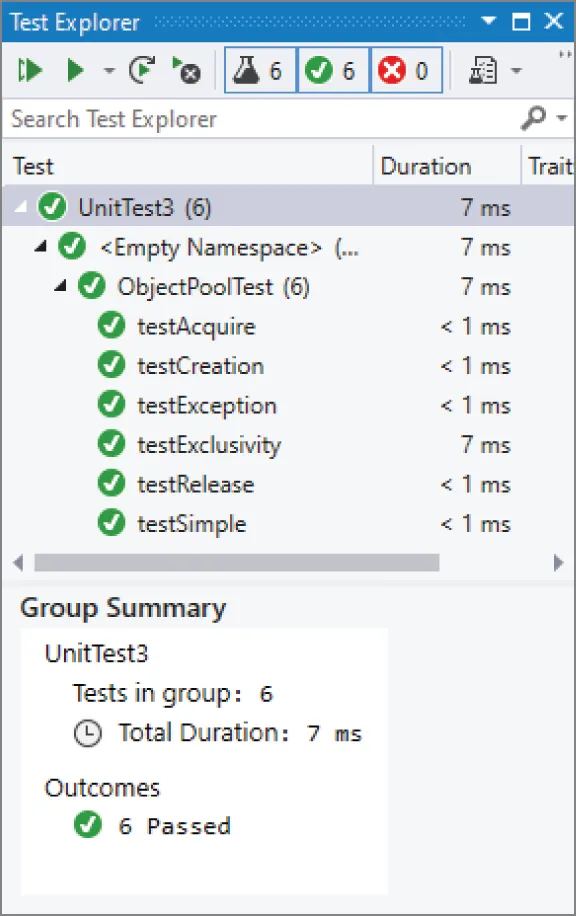
// THEN all addresses of the 10 newly acquired objects must have been // seen already during the first loop of acquiring 10 objects. // This makes sure objects are properly re-used by the pool. Assert::IsTrue(retrievedSerialPointers == newlyRetrievedSerialPointers);}If you add all these tests and run them, the Test Explorer should look like Figure 30.7. Of course, if one or more tests fail, you are presented with the quintessential issue in unit testing: is it the test or the code that is broken?
[^FIGURE 30.7]
Debugging Tests
Section titled “Debugging Tests”The Visual C++ Testing Framework makes it easy to debug unit tests that are failing. The Test Explorer shows a stack trace captured at the time a unit test failed, containing hyperlinks pointing directly to offending lines.
However, sometimes it is useful to run a unit test directly in the debugger so that you can inspect variables at run time, step through the code line by line, and so on. To do this, put a breakpoint on some line of code in a unit test. Then, right-click the unit test in the Test Explorer and click Debug. The testing framework starts running the selected tests in the debugger and breaks at your breakpoint. From then on, you can step through the code however you want.
Basking in the Glorious Light of Unit Test Results
Section titled “Basking in the Glorious Light of Unit Test Results”The tests in the previous section should have given you a good idea of how to start writing professional-quality tests for real code. It’s just the tip of the iceberg, though. The previous examples should help you think of additional tests that you could write for the ObjectPool class template.
For example, you could add a capacity() member function to ObjectPool that returns the sum of the number of objects that have been handed out and the number of objects that are still available without allocating a new chunk of memory. This is similar to the capacity() member function of vector that returns the total number of elements that can be stored in a vector without reallocation. Once you have such a member function, you can include a test that verifies that the pool always grows by double the number of elements compared to the previous time the pool grew.
There is no end to the number of unit tests you could write for a given piece of code, and that’s the best thing about unit tests. If you find yourself wondering how your code might react to a certain situation, that’s a unit test. If a particular aspect of your subsystem seems to be presenting problems, increase unit test coverage of that particular area. Even if you simply want to put yourself in the client’s shoes to see what it’s like to work with your class, writing unit tests is a great way to get a different perspective. You might even decide to write your unit tests before you implement your code. That way, you start using your planned interface before it is implemented, which could uncover use cases and error conditions that you didn’t think about before.
FUZZ TESTING
Section titled “FUZZ TESTING”Fuzz testing, also known as fuzzing, involves a fuzzer that automatically generates random input data for a program or component to try to find unhandled edge cases. Typically, a recipe is provided that specifies how input data needs to be structured so it can be used as input for the program. If clearly wrongly structured input is provided to a program, its input data parser will likely immediately reject it. A fuzzer’s job then is to try to generate input data that is not obviously wrongly structured, so it won’t be rejected immediately by the program, but that could trigger some faulty logic further along during the execution of the program. Since a fuzzer generates random input data, it requires a lot of resources to cover the entire input space. An option is to run such fuzz testing scenarios in a cloud. There are several libraries available for implementing fuzz testing, for example libFuzzer (llvm.org/docs/LibFuzzer.html) and honggfuzz (github.com/google/honggfuzz).
HIGHER-LEVEL TESTING
Section titled “HIGHER-LEVEL TESTING”While unit tests are the best first line of defense against bugs, they are only part of the larger testing process. Higher-level tests focus on how pieces of the product work together, as opposed to the relatively narrow focus of unit tests. In a way, higher-level tests are more challenging to write because it’s less clear what tests need to be written. Still, you cannot really claim that the program works until you have tested how its pieces work together.
Integration Tests
Section titled “Integration Tests”An integration test covers areas where components meet. Unlike a unit test, which generally acts on the level of a single class, an integration test usually involves two or more classes. Integration tests excel at testing interactions between two components, often written by two different programmers. In fact, the process of writing an integration test often reveals important incompatibilities between designs.
Sample Integration Tests
Section titled “Sample Integration Tests”Because there are no hard-and-fast rules to determine what integration tests you should write, some examples might help you get a sense of when integration tests are useful. The following scenarios depict cases where an integration test is appropriate, but they do not cover every possible case. Just as with unit tests, over time you will refine your intuition for useful integration tests.
A JSON-Based File Serializer
Section titled “A JSON-Based File Serializer”Suppose that your project includes a persistence layer that is used to save certain types of objects to disk and to read them back in. The hip way to serialize data is to use the JSON format, so a logical breakdown of components might include a JSON conversion layer sitting on top of a custom file API. Both of these components can be thoroughly unit tested. The JSON layer can have unit tests that ensure that different types of objects are correctly converted to JSON and populated from JSON. The file API can have tests that read, write, update, and delete files on disk.
When these modules start to work together, integration tests are appropriate. At the least, you should have an integration test that saves an object to disk through the JSON layer and then reads it back in and does a comparison to the original. Because the test covers both modules, it is a basic integration test.
Readers and Writers to a Shared Resource
Section titled “Readers and Writers to a Shared Resource”Imagine a program that contains a data structure shared by different components. For example, a stock-trading program can have a queue of buy-and-sell requests. Components related to receiving stock transaction requests can add orders to the queue, and components related to performing stock trades can take data off the queue. You can unit test the heck out of the queue class, but until it is tested with the actual components that will be using it, you really don’t know if any of your assumptions are wrong.
A good integration test uses the stock request components and the stock trade components as clients of the queue class. You can write some sample orders and make sure that they successfully enter and exit the queue through the client components.
Wrapper Around a Third-Party Library
Section titled “Wrapper Around a Third-Party Library”Integration tests do not always need to occur at integration points in your own code. Many times, integration tests are written to test the interaction between your code and a third-party library.
For example, you may be using a database connection library to talk to a relational database system. Perhaps you built an object-oriented wrapper around the library that adds support for connection caching or provides a friendlier interface. This is an important integration point to test because, even though the wrapper probably provides a more useful interface to the database, it introduces possible misuse of the original library.
In other words, writing a wrapper is a good thing, but writing a wrapper that introduces bugs will be a disaster.
Integration Testing Techniques
Section titled “Integration Testing Techniques”When it comes to actually writing integration tests, there is often a fine line between integration and unit tests. If a unit test is modified so that it touches another component, is it suddenly an integration test? In a way, the answer is moot because a good test is a good test, regardless of the type of test. I recommend you use the concepts of integration and unit testing as two approaches to testing, but avoid getting caught up in labeling the category of every single test.
In terms of implementation, integration tests are often written by using a unit testing framework, further blurring their distinction. As it turns out, unit testing frameworks provide an easy way to write a yes/no test and produce useful results. Whether the test is looking at a single unit of functionality or the intersection of two components hardly makes a difference from the framework’s point of view.
However, for performance reasons or organizational reasons, you may want to attempt to separate unit tests from integration tests. For example, your group may decide that everybody must run integration tests before checking in new code, but be a bit laxer on running unrelated unit tests. Separating the two types of tests also increases the value of results. If a test failure occurs within the JSON class tests, it will be clear that it’s a bug in that class, not in the interaction between that class and the file API.
System Tests
Section titled “System Tests”System tests operate at an even higher level than integration tests. These tests examine the program as a whole. System tests often make use of a virtual user that simulates a human being working with the program. Of course, the virtual user must be programmed with a script of actions to perform. Other system tests rely on scripts or a fixed set of inputs and expected outputs.
Much like unit and integration tests, an individual system test performs a specific test and expects a specific result. It is not uncommon to use system tests to make sure that different features work in combination with one another.
In theory, a fully system-tested program would contain a test for every permutation of every feature. This approach quickly grows unwieldy, but you should still make an effort to test many features in combination. For example, a graphics program could have a system test that imports an image, rotates it, performs a blur filter, converts it to black and white, and then saves it. The test would compare the saved image to a file that contains the expected result.
Unfortunately, few specific rules can be stated about system tests because they are highly dependent on the actual application. For applications that process files with no user interaction, system tests can be written much like unit and integration tests. For graphical programs, a virtual user approach may be best. For server applications, you might need to build stub clients that simulate network traffic. The important part is that you are actually testing real use of the program, not just a piece of it.
Regression Tests
Section titled “Regression Tests”Regression testing is more of a testing concept than a specific type of test. The idea is that once a feature works, developers tend to put it aside and assume that it will continue to work. Unfortunately, new features and other code changes often conspire to break previously working functionality.
Regression tests are often put in place as a sanity check for features that are, more or less, complete and working. If the regression test is well written, it will cease to pass when a change is introduced that breaks the feature.
If your company has an army of quality-assurance testers, regression testing may take the form of manual testing. The tester acts as a user would and goes through a series of steps, gradually testing every feature that worked in the previous release. This approach is thorough and accurate if carefully performed, but is not particularly scalable.
At the other extreme, you could build a completely automated system that performs each function as a virtual user. This would be a scripting challenge, though several commercial and noncommercial packages exist to ease the scripting of various types of applications.
A middle ground is known as smoke testing. Some tests will only test a subset of the most important features that should work. The idea is that if something is broken, it should show up right away. If smoke tests pass, they could be followed by more rigorous manual or automated testing. The term smoke testing was introduced a long time ago, in electronics. After a circuit was built, with different components like vacuum tubes, resistors, and so on, the question was, “Is it assembled correctly?” A solution was to “plug it in, turn it on, and see if smoke comes out.” If smoke came out, the design might be wrong, or the assembly might be wrong. By seeing what part went up in smoke, the error could be determined.
Some bugs are like nightmares: they are both terrifying and recurring. Recurring bugs are frustrating and a poor use of engineering resources. To prevent bugs from recurring, you should write regression tests for bugs that you fix. By writing a test for a bug fix, you both prove that the bug is fixed and set up an alert that is triggered if the bug ever comes back—for example, if your change is rolled back or otherwise undone, or if two branches are not merged correctly into the main development branch. When a regression test of a previously fixed bug fails, it should be easy to fix because the regression test can refer to the original bug number and describe how it was fixed the first time.
TIPS FOR SUCCESSFUL TESTING
Section titled “TIPS FOR SUCCESSFUL TESTING”As a software engineer, your role in testing may range anywhere from basic unit testing responsibility to complete management of an automated test system. Because testing roles and styles vary so much, here are several tips from my experience that may help you in different testing situations:
- Spend some time designing your automated test system. A system that runs constantly throughout the day will detect failures quickly. A system that sends e-mails to engineers automatically or sits in the middle of the room loudly playing show tunes when a failure occurs, will result in increased visibility of problems.
- Don’t forget about stress testing. Even if a full suite of unit tests passes for your database access class, it could still fall down when used by several dozen threads simultaneously. You should test your product under the most extreme conditions it could face in the real world.
- Test on a variety of platforms or a platform that closely mirrors the customer’s system. One technique of testing on multiple platforms is to use a virtual machine environment that allows you to run several different platforms on the same physical machine.
- Some tests can be written to intentionally inject faults in a system. For example, you could write a test that deletes a file while it is being read, or that simulates a network outage during a network operation.
- Bugs and tests are closely related. Bug fixes should be proven by writing regression tests. A comment with a test could refer to the original bug number.
- Don’t remove tests that are failing. When a co-worker is slaving over a bug and finds out you removed tests, he will come looking for you.
The most important tip I can give you is to remember that testing is part of software development. If you agree with that and accept it before you start coding, it won’t be quite as unexpected when the feature is finished, but there is still more work to do to prove that it works.
SUMMARY
Section titled “SUMMARY”This chapter covered the basic information that all professional programmers should know about testing. Unit testing in particular is the easiest and most effective way to increase the quality of your own code. Higher-level tests provide coverage of use cases, synchronicity between modules, and protection against regressions. No matter what your role is with regard to testing, you should now be able to confidently design, create, and review tests at various levels.
Now that you know how to find bugs, it’s time to learn how to fix them. To that end, Chapter 31, “Conquering Debugging,” covers techniques and strategies for effective debugging.
EXERCISES
Section titled “EXERCISES”By solving the following exercises, you can practice the material discussed in this chapter. Solutions to all exercises are available with the code download on the book’s website at www.wiley.com/go/proc++6e. However, if you are stuck on an exercise, first reread parts of this chapter to try to find an answer yourself before looking at the solution from the website.
-
Exercise 30-1: What are the three types of testing?
-
Exercise 30-2: Make a list of unit tests that you can think of for the following piece of code:
export class Foo{public:// Constructs a Foo. Throws invalid_argument if a >= b.explicit Foo(int a, int b) : m_a { a }, m_b { b }{if (a >= b) {throw std::invalid_argument { "a should be less than b." };}}int getA() const { return m_a; }int getB() const { return m_b; }private:int m_a { 0 };int m_b { 0 };}; -
Exercise 30-3: If you are using Visual C++, implement the unit tests that you’ve listed in Exercise 30-2 using the Visual C++ Testing Framework.
-
Exercise 30-4: Suppose you have written a function to calculate the factorial of a number. The factorial of a number n, written as n!, is the product of all numbers 1 to n. For example, 3! equals 1×2×3. You decide to follow the advice given in this chapter and to write unit tests for your code. You run the code to calculate 10!; it produces 36288000. You write a unit test that verifies that the code produces 36288000 when asked to calculate the factorial of 10. What do you think of such a unit test?
Footnotes
Section titled “Footnotes”-
At the time of this writing, Visual C++ 2022 contained a bug which prevents combining #include <CppUnitTest.h> and import std;. As a workaround, replace import std; statements with #include statements for the required header files, e.g., #include
. See the downloadable source code archive for the full set of required header files in the different source code files. ↩